For many years, I avoided Arch Linux, and although I always wanted to try the distro, the installation process was way too advanced. I did try to install it a couple of times, and on my second try, I accidentally deleted one of my main hard drives, losing all my important files. Thankfully, I can teach you how to install Arch Linux without making the same mistakes as I did and get done with it in a matter of minutes.
- Download Arch Linux
- Create a bootable USB with Rufus
- Write in DD Image Mode
- Enter Arch’s Installation Console
- Run the installation command
- Choose the default language
- Select the Mirrors and Locates
- Choose a filesystem
- Select a disk to install Arch Linux
- Choose a bootloader
- Swap
- Hostname and Root Password
- Create an administrator account
- Select your audio server
- Choose which Kernel to install
- Network configuration settings
- Select a Timezone
- Install Arch Linux
- Post-Installation configuration
- Frequently asked questions about Arch Linux
Gone are the days when EndeavourOS and Manjaro Linux were the only Arch-based distros that were easy to install; nowadays, you can install Arch Linux with a simple command, and simply select the graphical environment of your choice and a few other options.
Even so, if you want a step-by-step guide with images and more detailed steps, I’ve created a how-to tutorial on how to install Arch Linux on your PC, explaining each and every option to make it as easy and as fast as possible.
-
Download Arch Linux
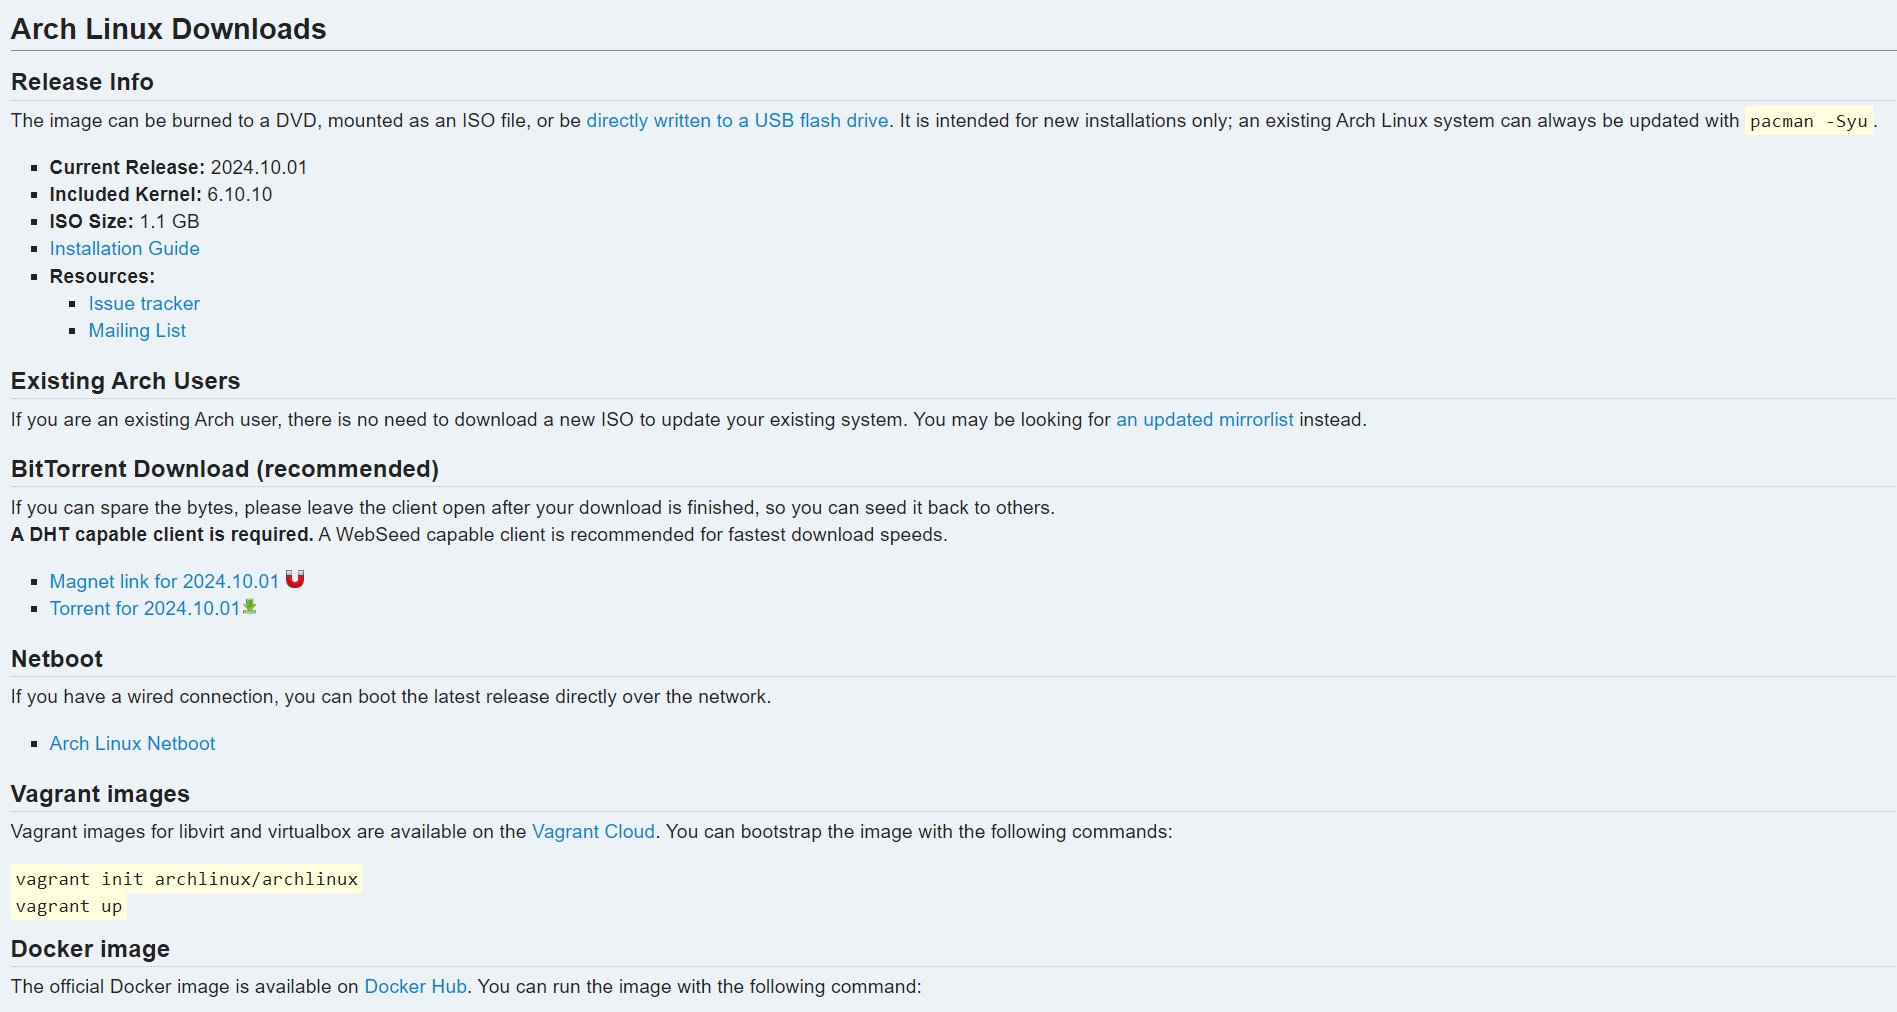
The first step is to download the latest version of Arch Linux, which comes in ISO format. Head over to ArchLinux.org and choose which way you want to download the latest version (I’ve used qBittorrent).
-
Create a bootable USB with Rufus
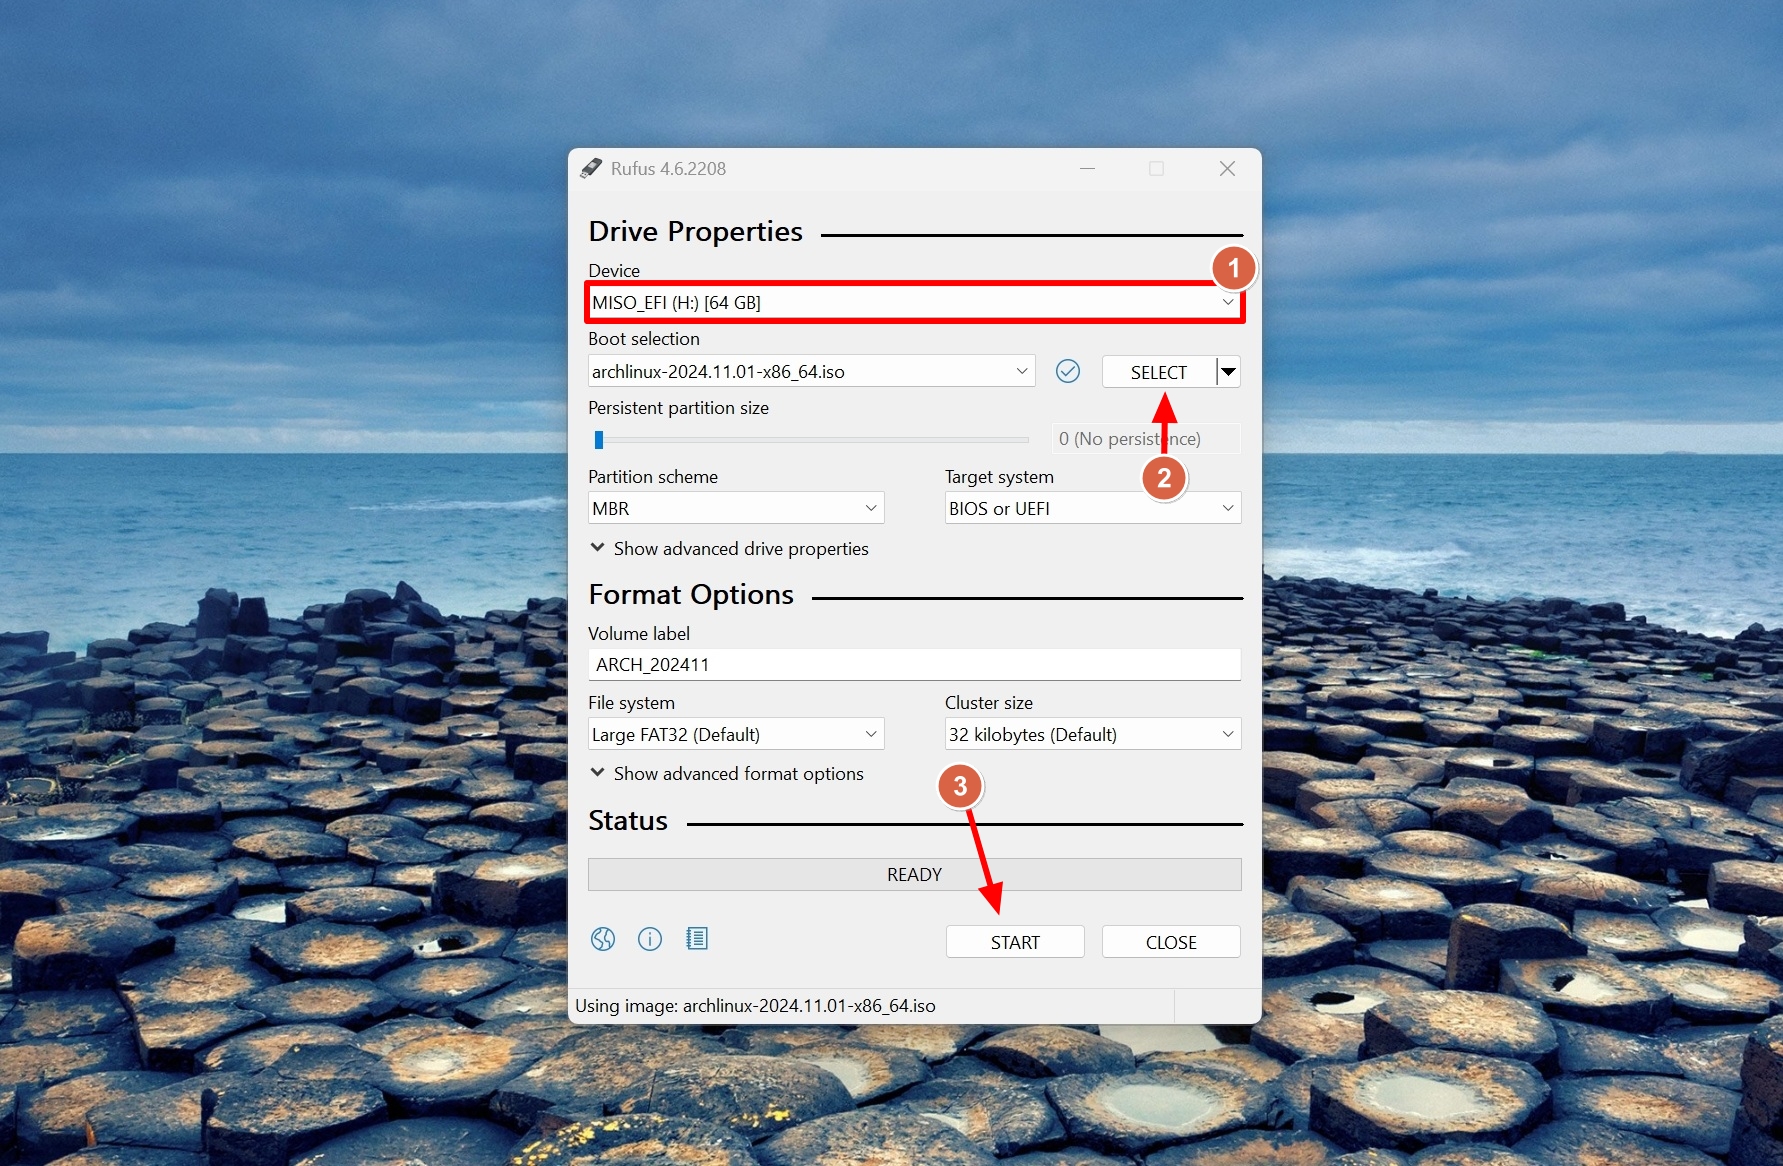
To create a bootable USB with Arch Linux, simply download and install Rufus (it’s also available through the Microsoft Store if you’re using Windows). Once you do, start the application, select your USB device, select the ISO file that you’ve downloaded, and start the process by clicking on “Start“.
-
Write in DD Image Mode
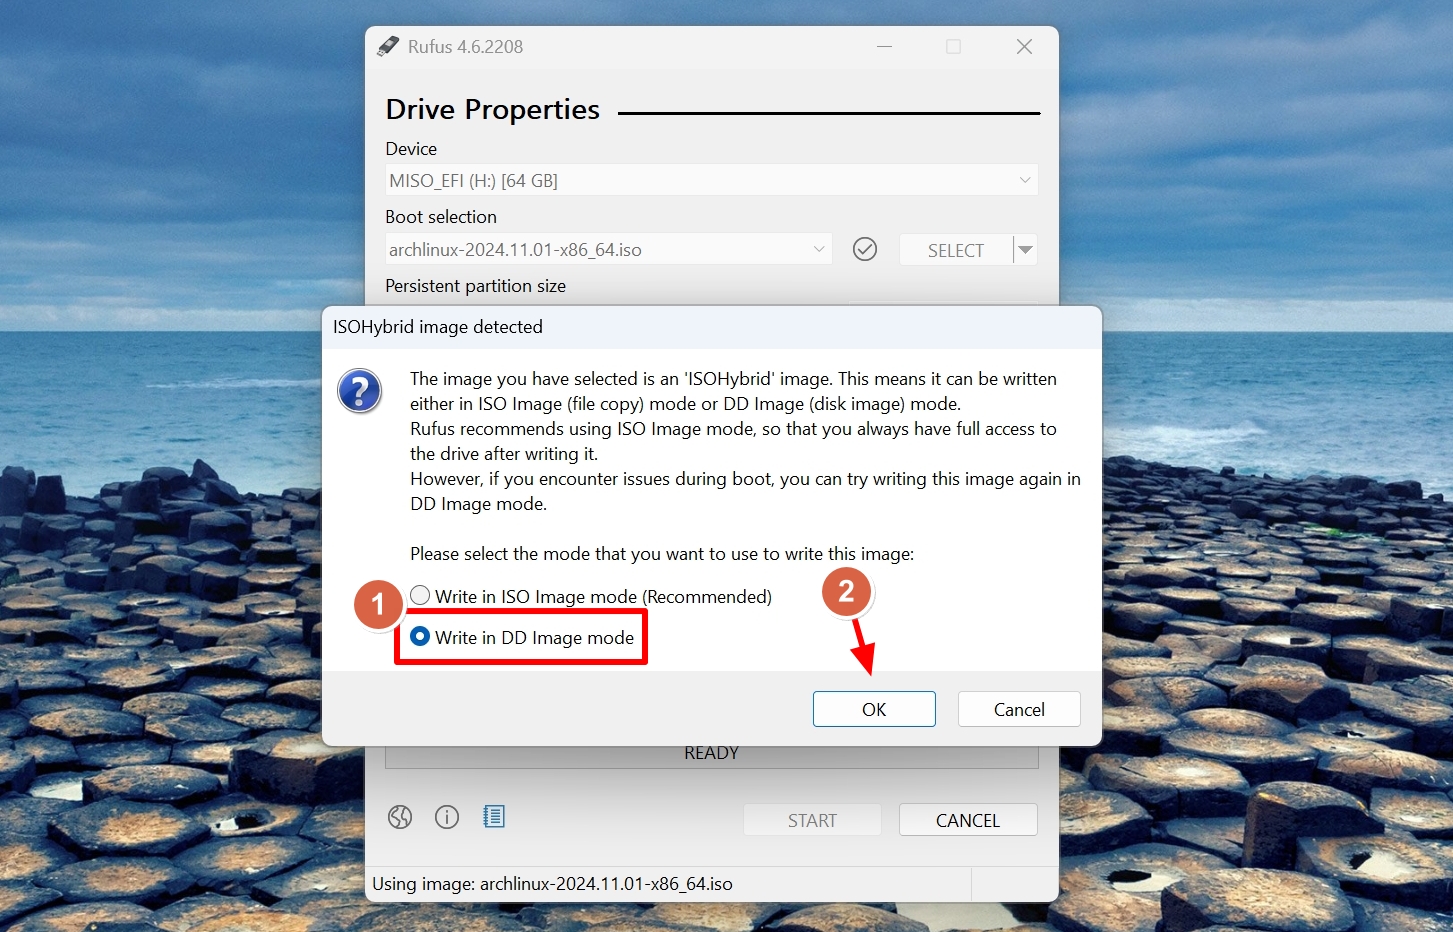
Rufus will show up a pop-up window asking if you you want to write the ISO file in ISO Image Mode (Recommended) or in DD Image Mode. For Arch-based distributions, you’ll have to select the second option, while for Ubuntu and Debian-based distros the first will do just fine. Choose the “Write in DD Image Mode” option and click “OK“.
-
Enter Arch’s Installation Console
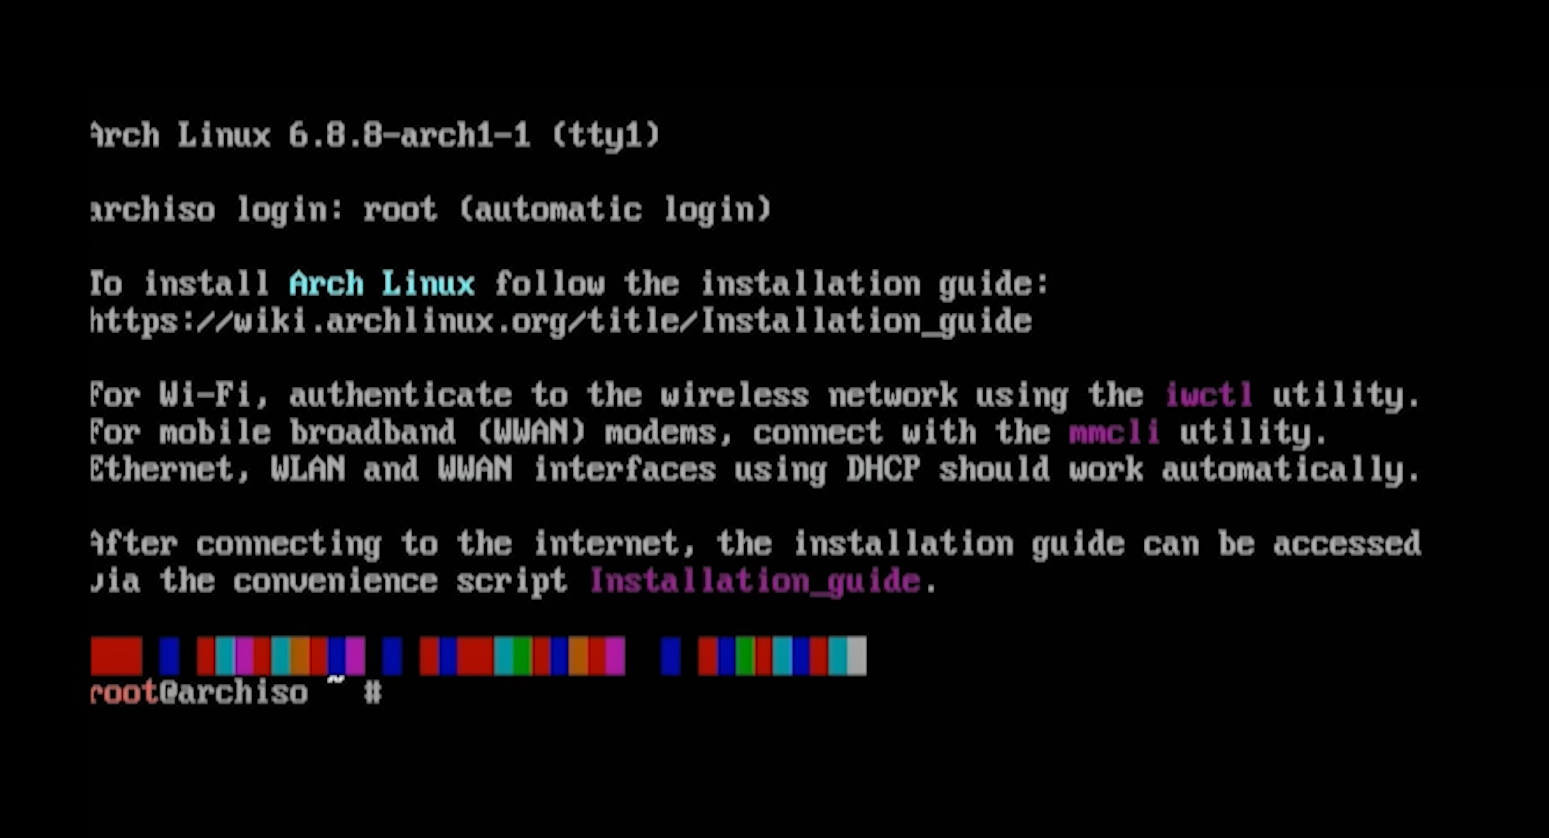
To install Arch Linux we will first need to enter its console. To do so, restart your PC or laptop (with the USB device connected) and start hitting F11, F12, DEL, or the right button to enter your BIOS/UEFI. From there, simply choose your USB device and you’ll see the screen above.
-
Run the installation command
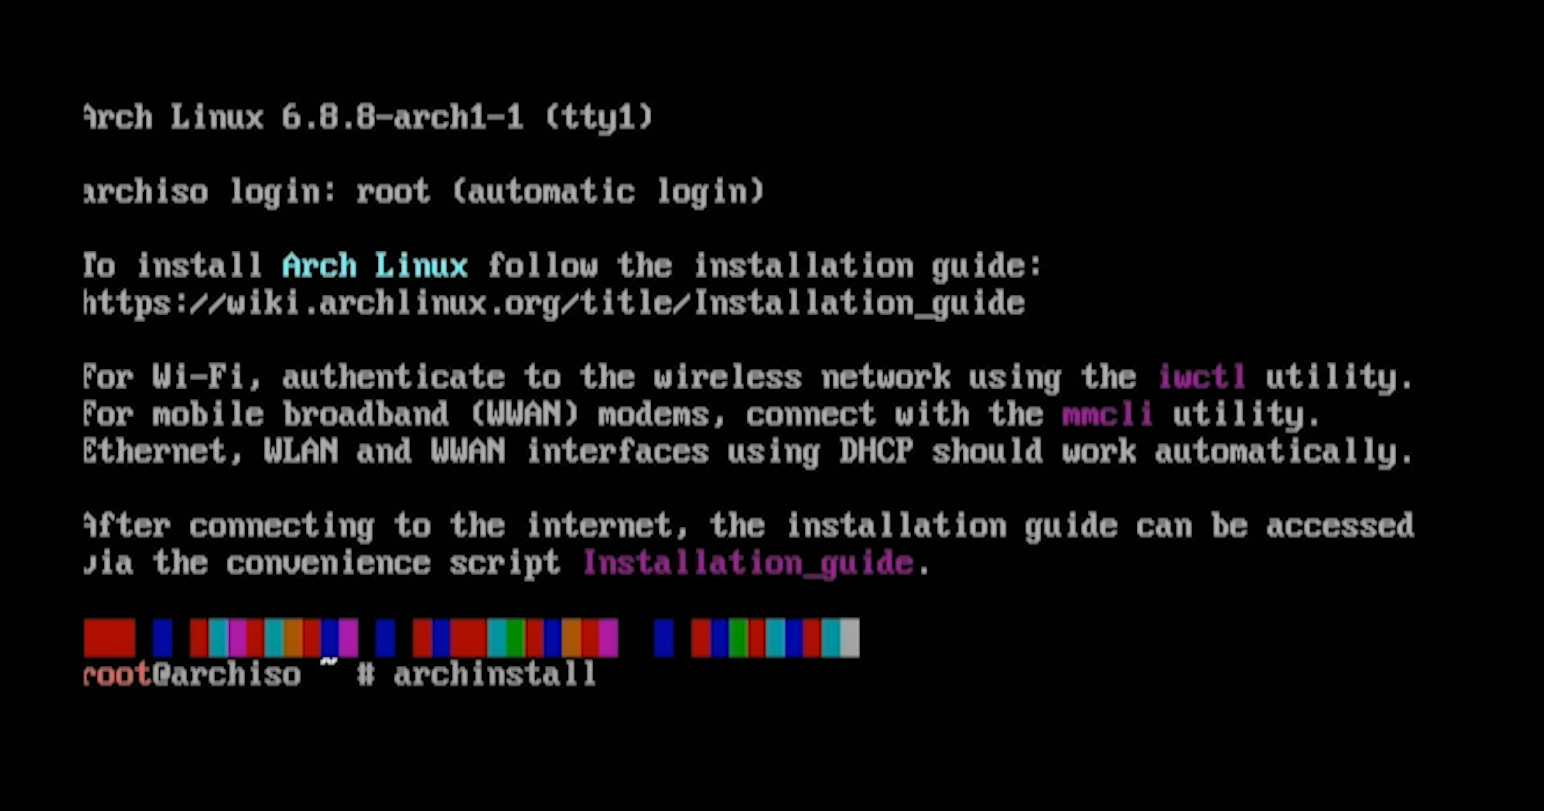
In Arch’s console, simply write archinstall and hit Enter.
-
Choose the default language
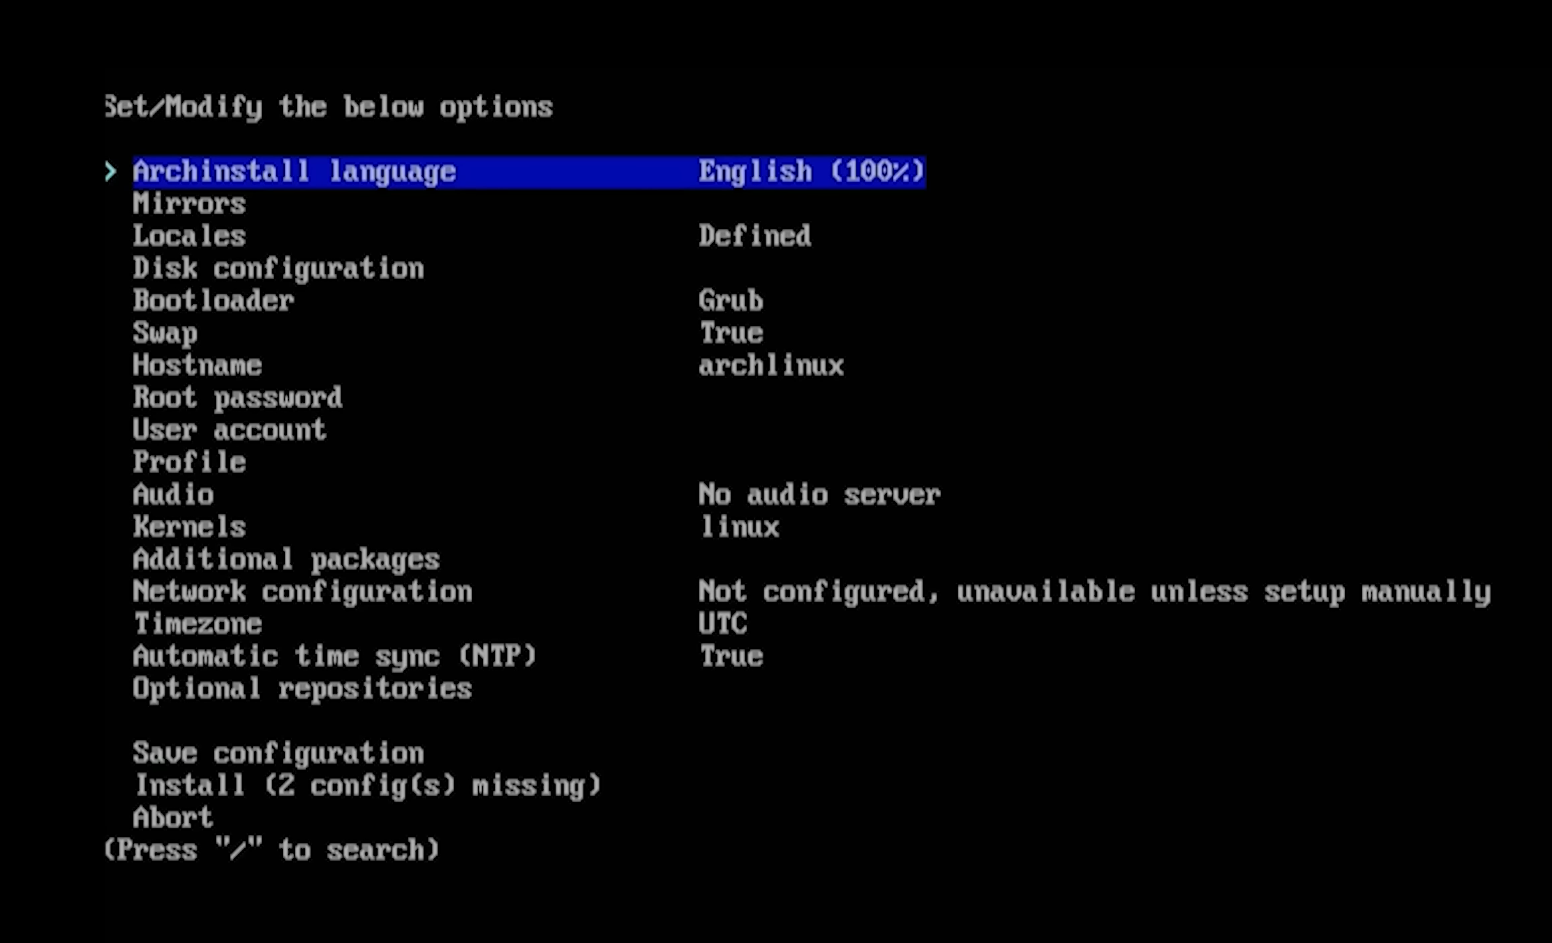
You should now see the same options as in the image example above. This is Arch’s installation wizard, which makes the installation process easier than ever before. Start by choosing a default language (you can change it later if you want).
-
Select the Mirrors and Locates
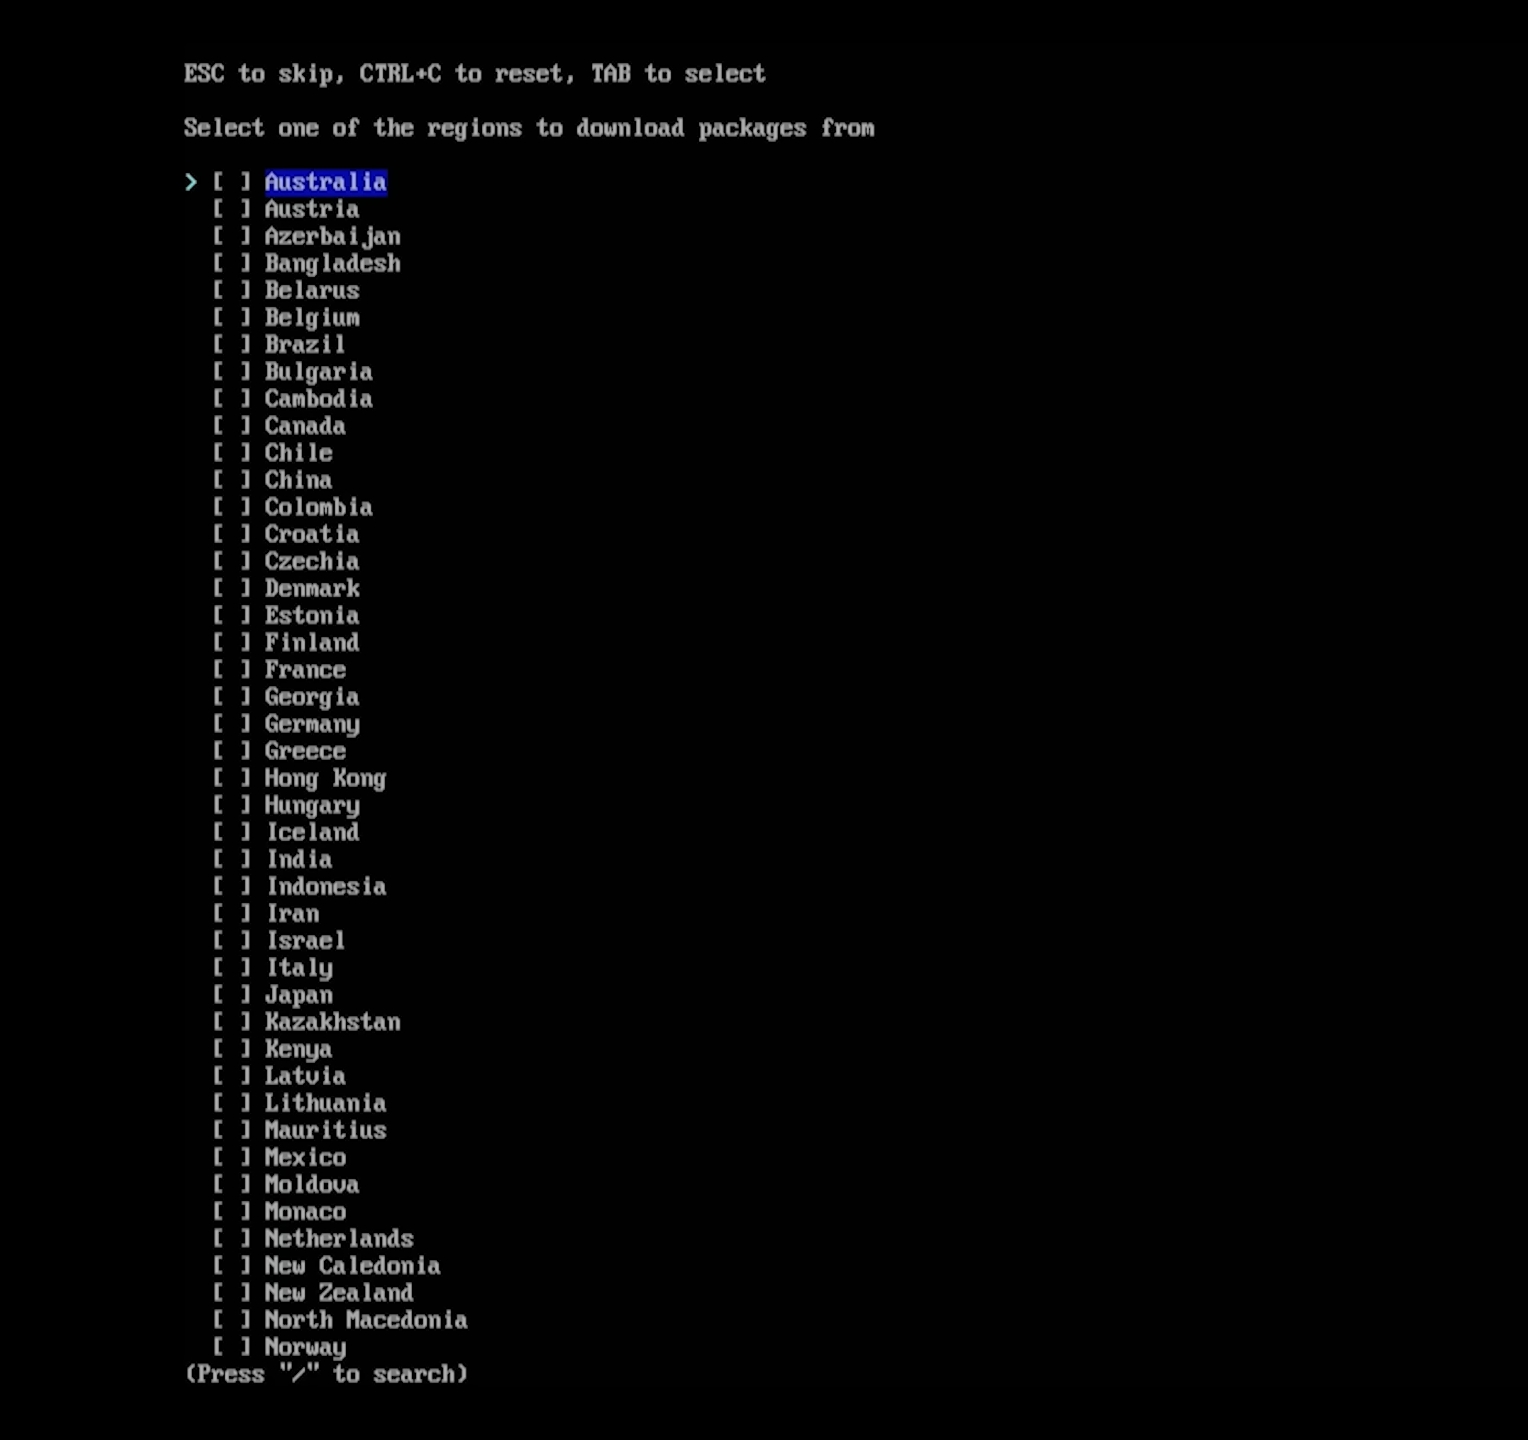
Mirrors are basically the servers that host copies of the official Arch Linux repositories, and selecting the right one will significantly improve the download times. For Mirrors, simply select your country, or the nearest one. In Locates, you can setup your keyboard languages, in which I only selected English as the default language (you can add more later).
-
Choose a filesystem
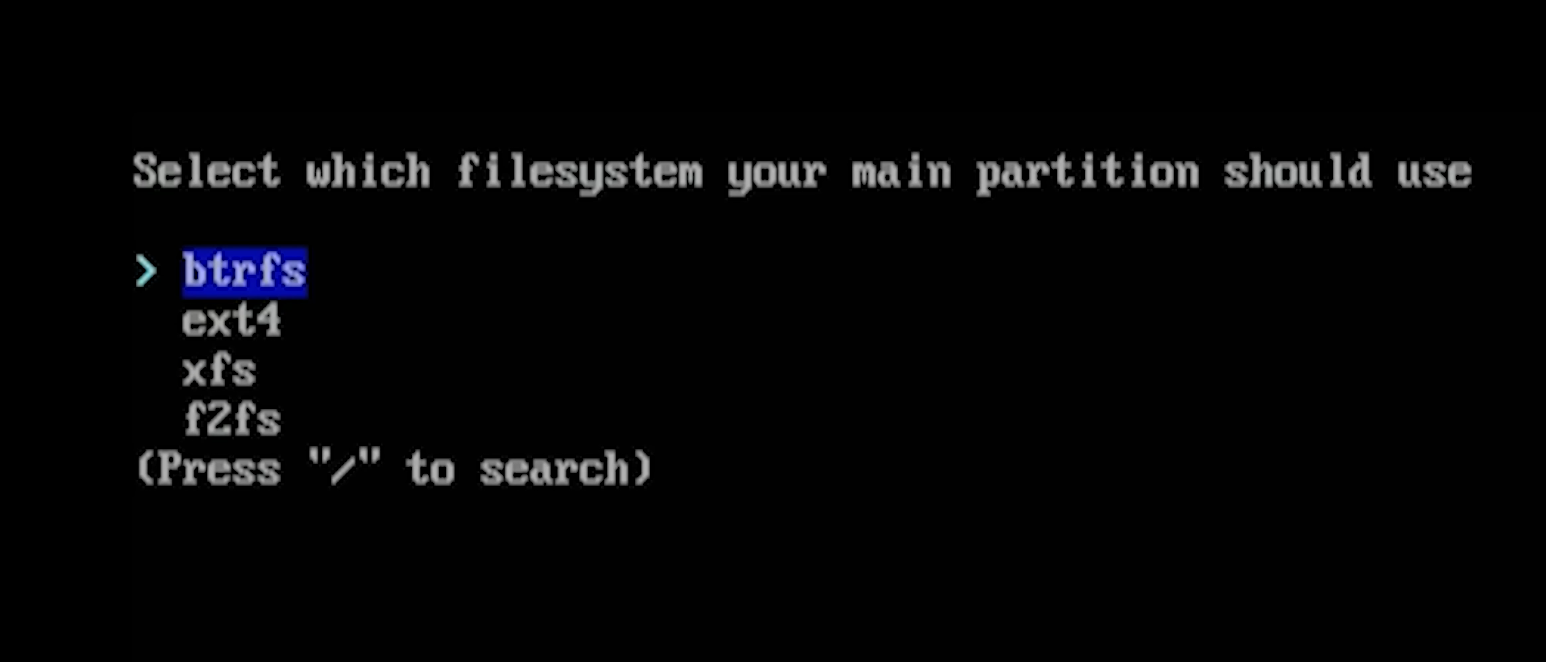
For the Filesystem, you can either select btrfs for speed and performance or ext4 for stability. I usually go with ext4, but btrfs didn’t cause me any issues the last time I used it. Avoid xfs and f2fs, especially if you don’t know what they are.
-
Select a disk to install Arch Linux
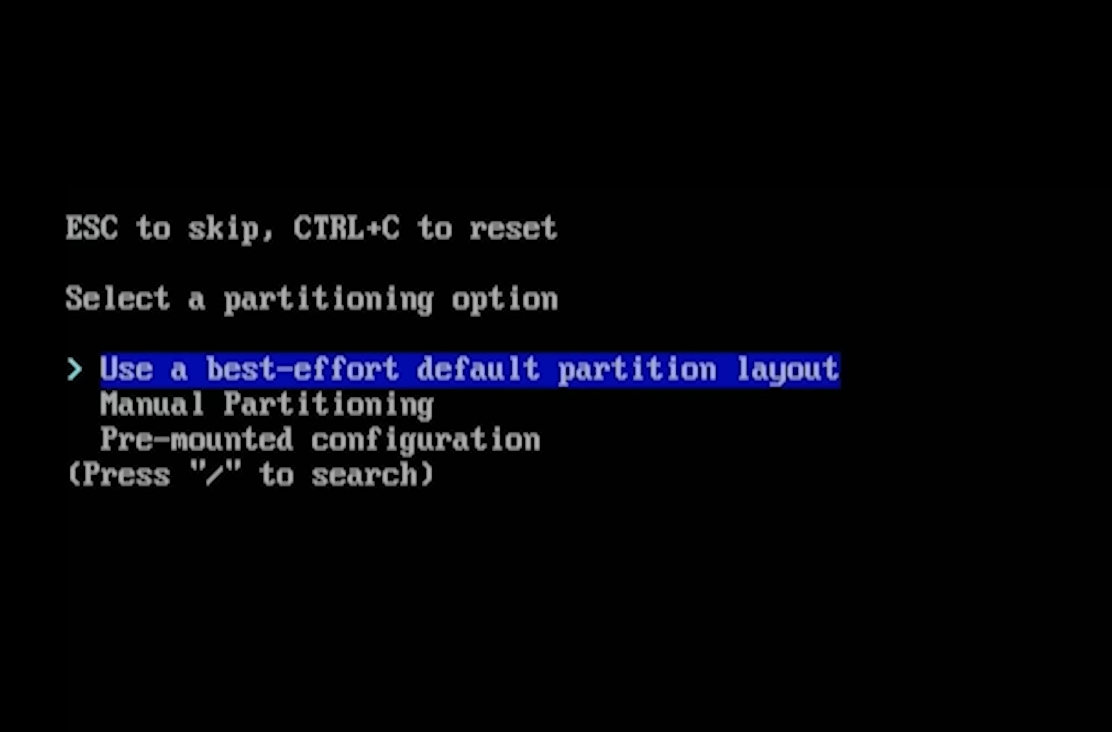
This is as simple as it sounds: Select which disk you want Arch Linux to be installed on. You should see a list with all the available disk and their partitions. Please note that once you’ve done that, there’s no going back and all the files in that disk will be deleted.
-
Choose a bootloader
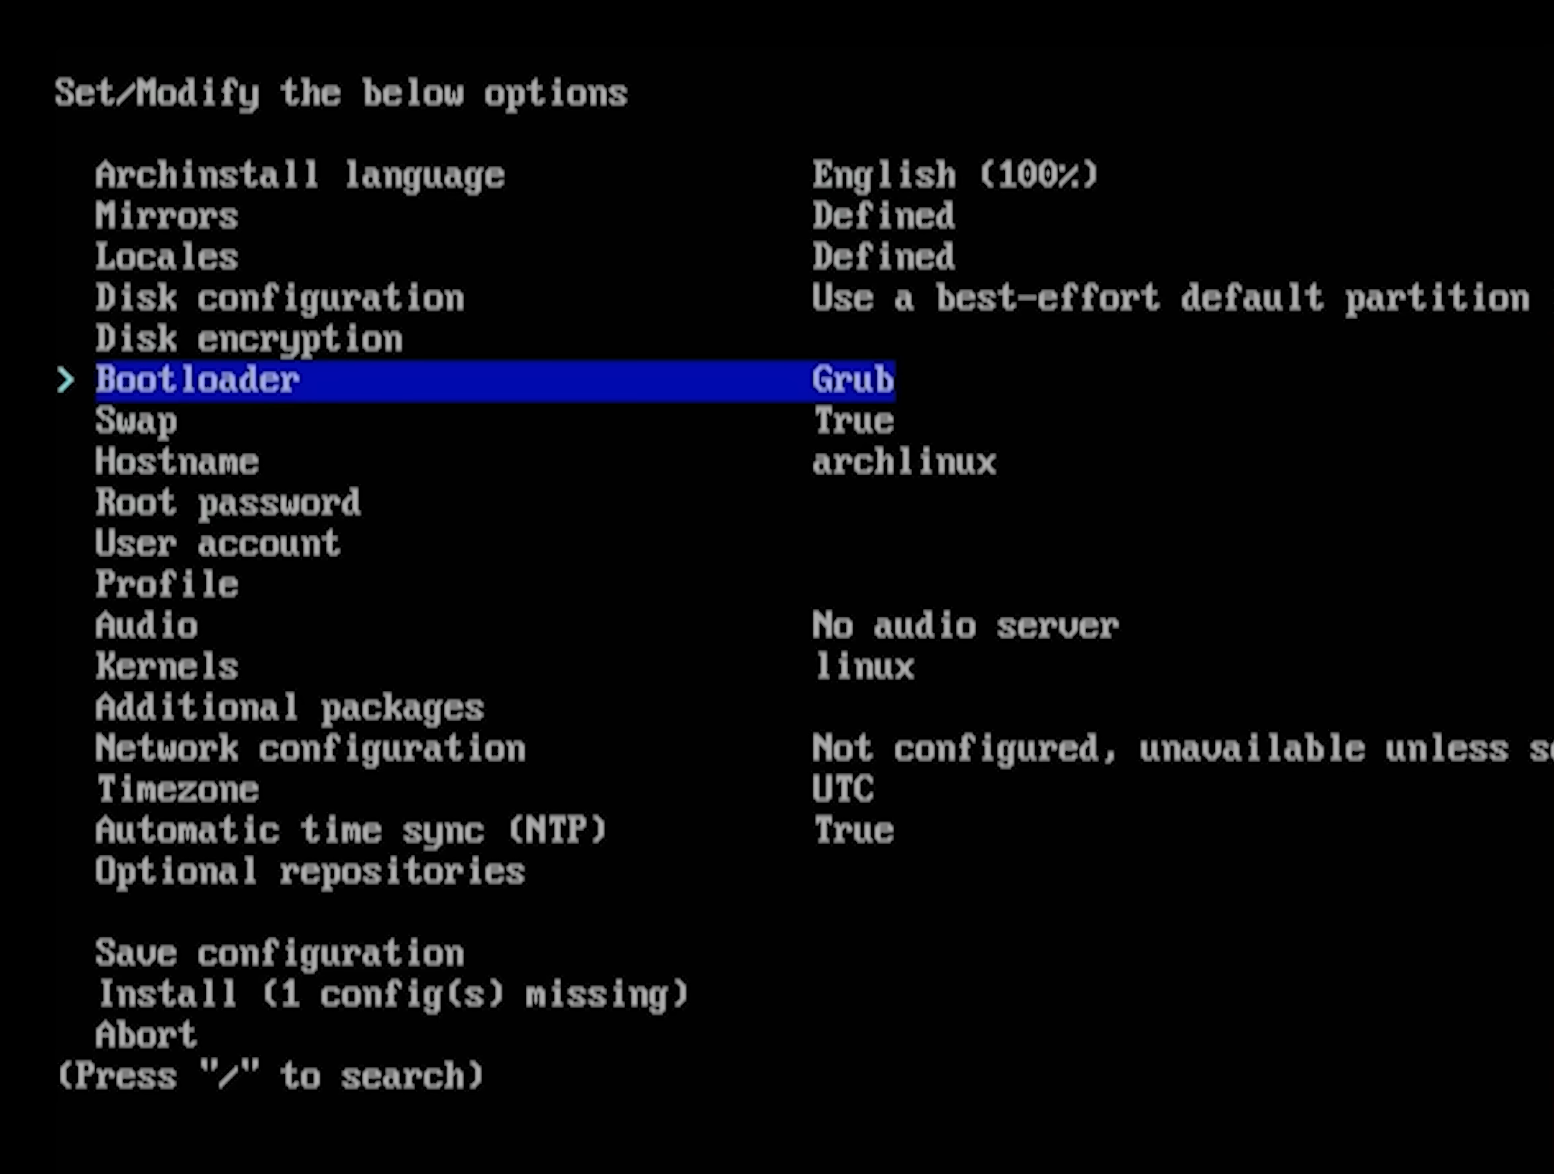
When it comes to bootloaders, Grub is the king of all, and to be honest, it simply works all the time without any issues.
-
Swap
If you’re using an older HDD disk or you have less than 8GB of RAM, creating a swap space may be beneficial and improve your system’s performance. If you have 8GB of RAM or more and an SSD or M.2 SSD, you can skip that. I have an SSD, so I will not be creating a swap space.
-
Hostname and Root Password
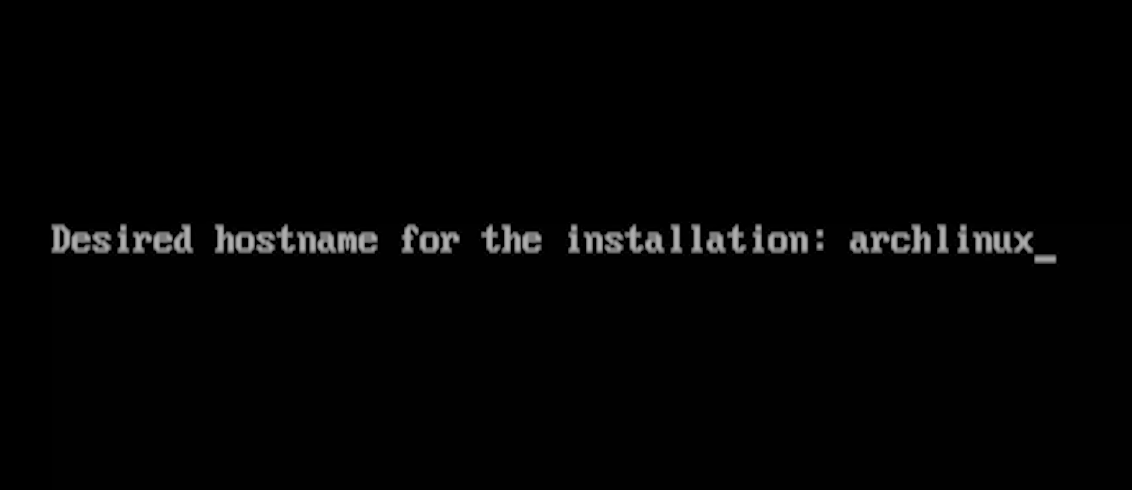
Add a name and a root password for the hostname of your computer. This is not what you’ll use to log in to your account.
-
Create an administrator account
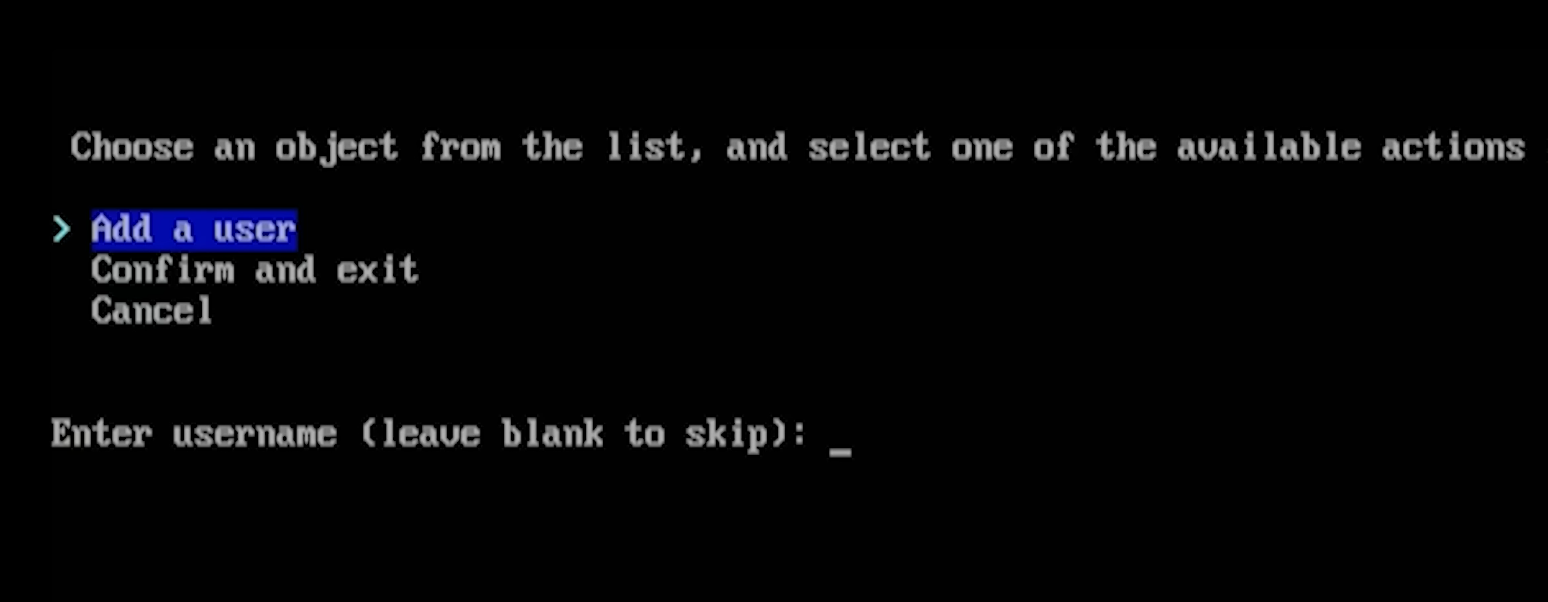
Here we can create an admin for Arch Linux, this is the account that you’ll be using to log in and access your operating system and all of your files. Add a username and a strong password to proceed.
-
Select your audio server
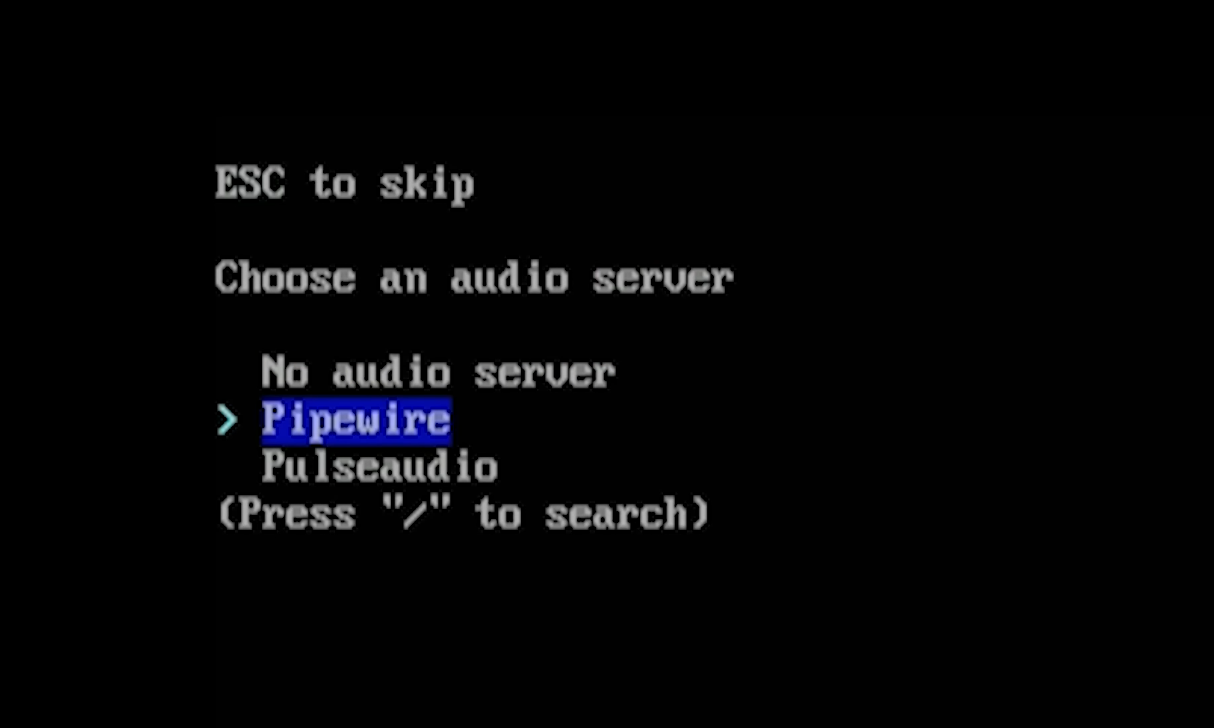
When it comes to the audio server, Pipewire usually works out of the box, so I preferred it over Pulseaudio. You can change that later if you want, but selecting the right one from the beginning will save you time.
-
Choose which Kernel to install
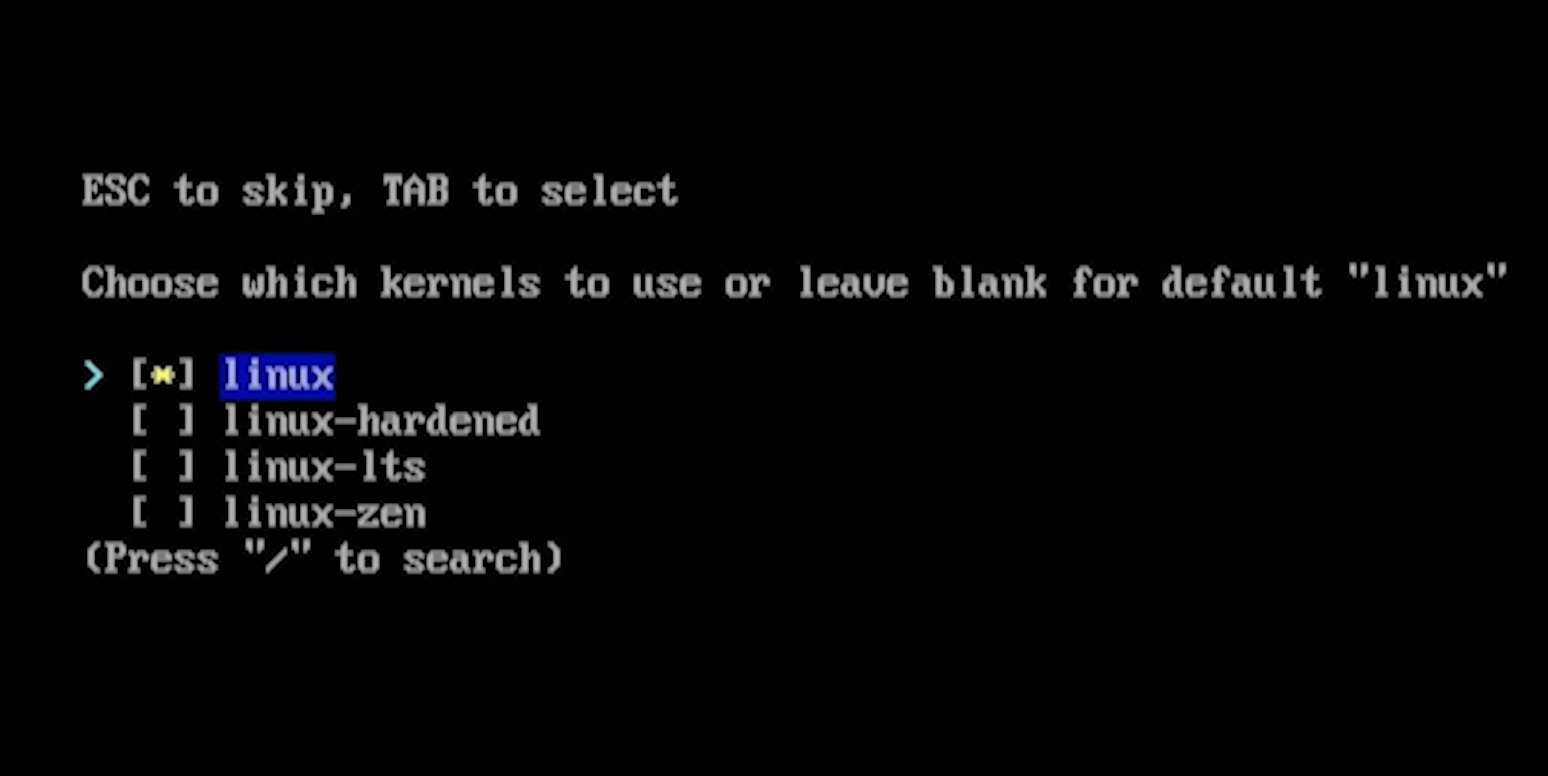
If you don’t care about the Kernels, choose the first option. If you’re looking for the best stability and security, go with linux-lts, which LTS stands for “Long Time Support”.
-
Network configuration settings
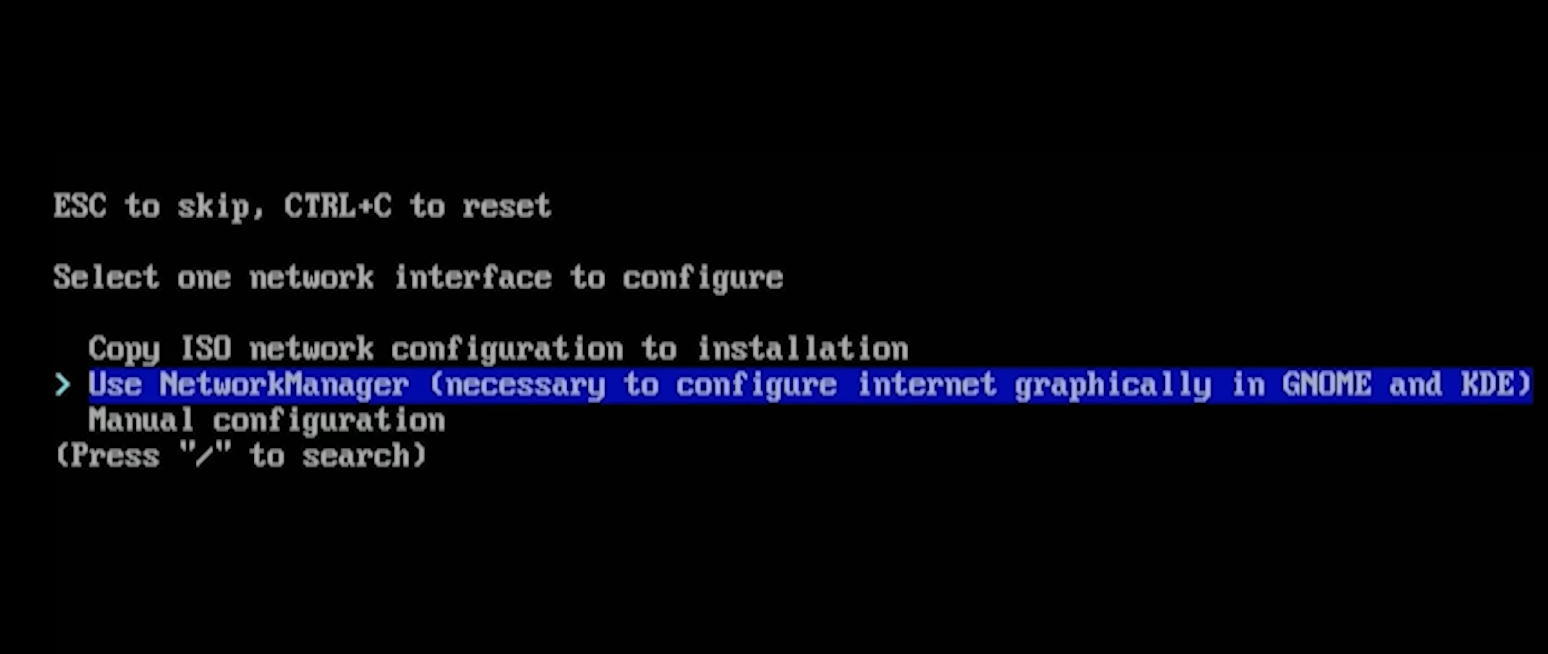
When it comes to the Network configuration, it’s recommended to choose the default option: “Use NetworkManager“.
-
Select a Timezone
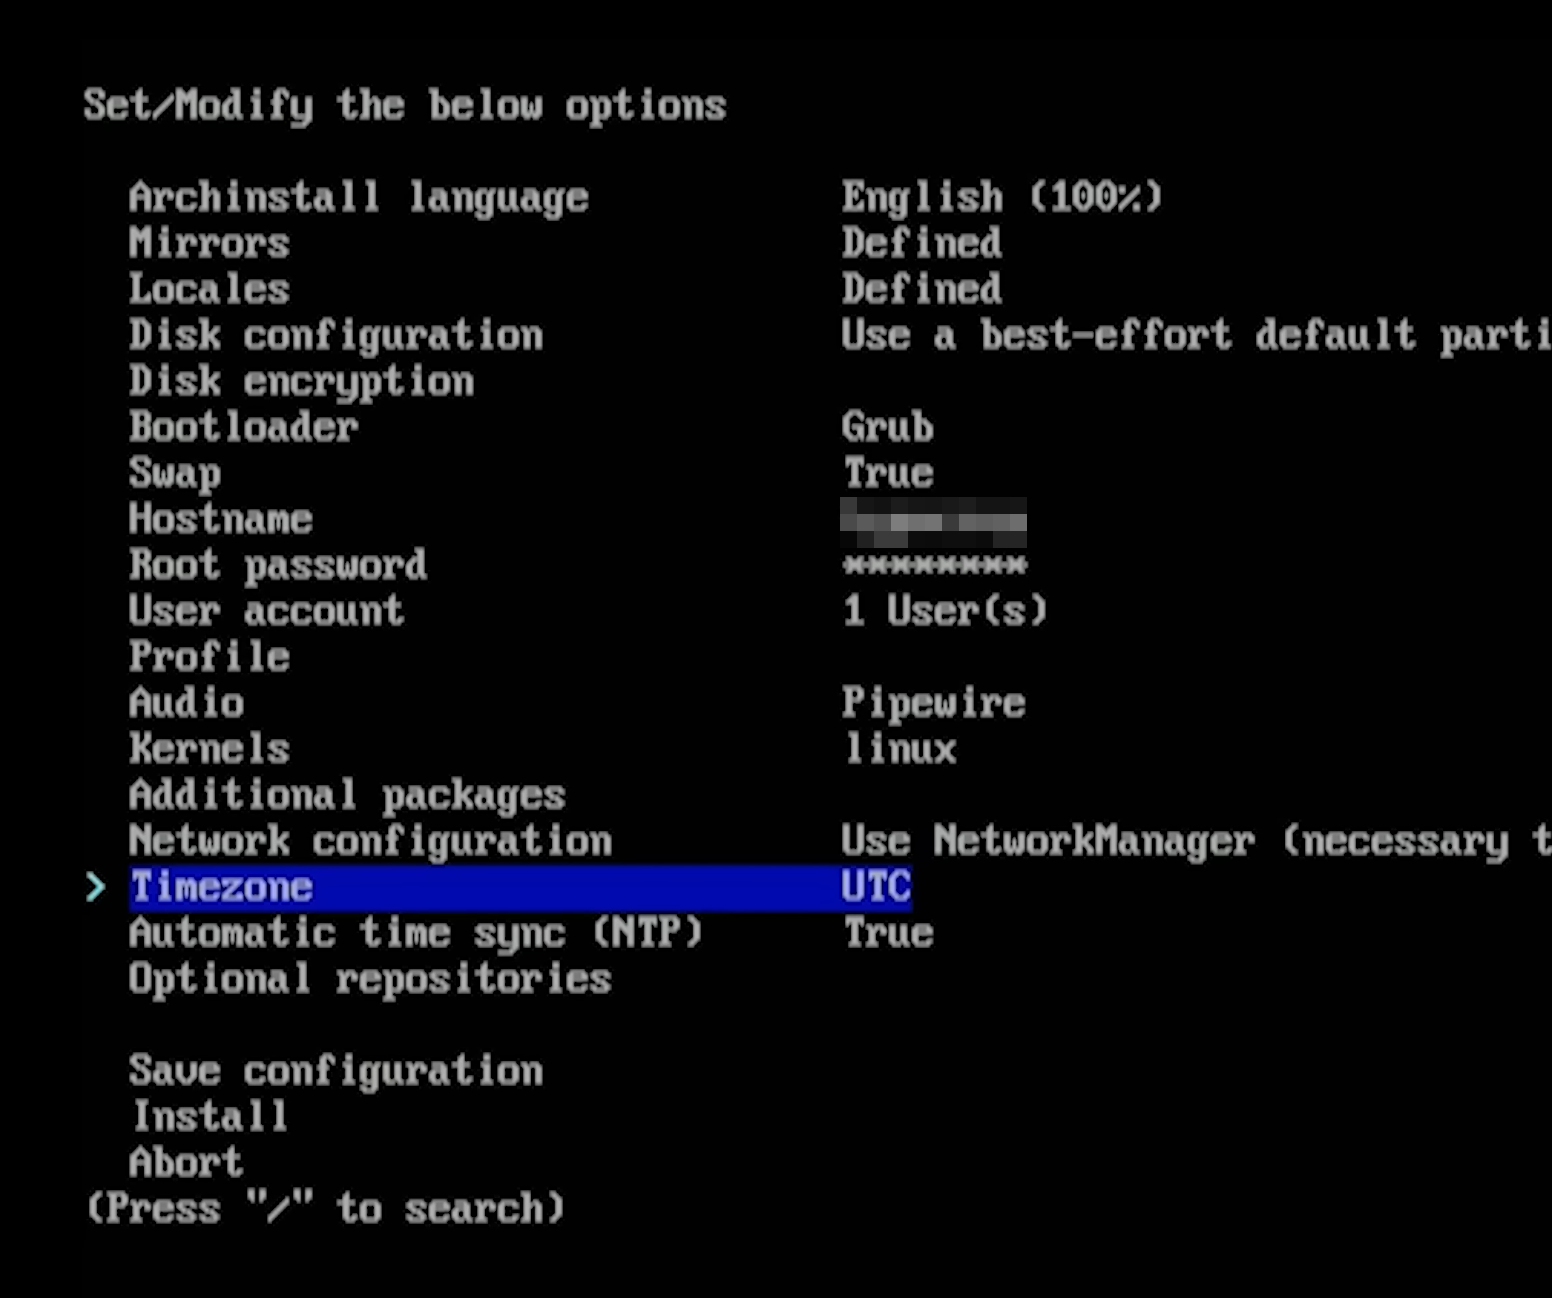
Simply choose a Timezone (based on your location). You can always change that later if you need to.
-
Install Arch Linux
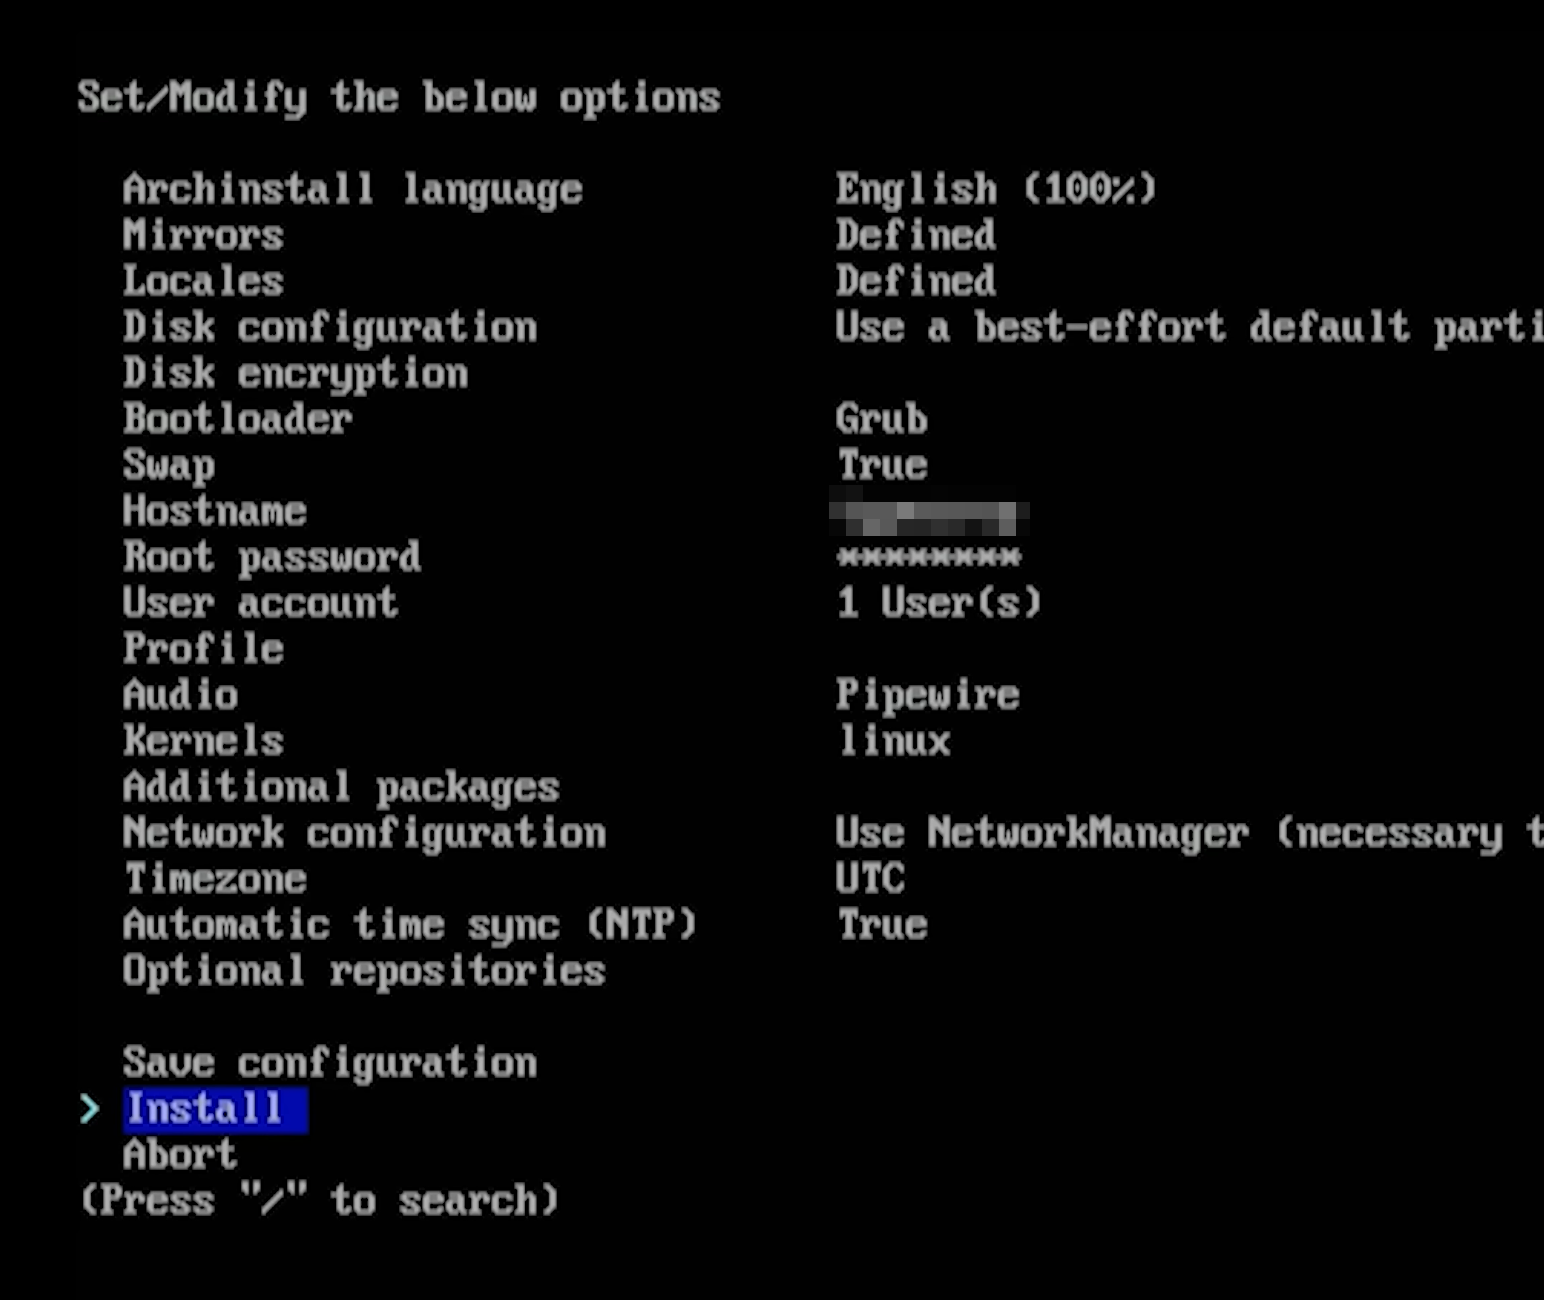
Once you’ve selected everything, simply hit the “Install” option and let Arch Linux complete its installation process. It may take a while, so that’s your chance to go and fill up another cup of coffee.
-
Post-Installation configuration
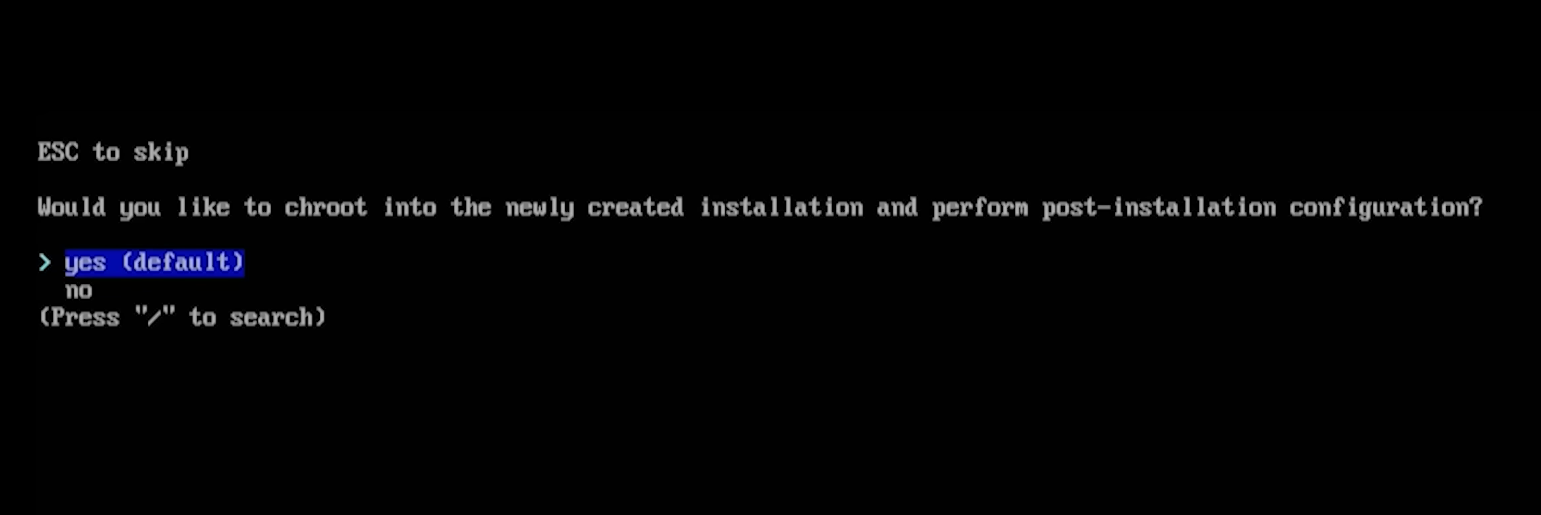
Click on “yes” (or “no“, whatever) and hit the Enter button to proceed.
Once the installation has been completed, you should be able to launch Arch Linux. If you installed the operating system on another disk and you have Windows or macOS as the default, you may have to enter your BIOS/UEFI boot menu and manually select to boot with Arch Linux instead of Windows or macOS.
Frequently asked questions about Arch Linux
Have more questions? Leave your comment with as many details as you can at the end of this page.
What is the ‘Archinstall’ command?
Archinstall is the official command from Arch Linux that gives you access to a powerful Python-based script that simplifies the process of installing and setting up Arch Linux. Once you execute the command from a live USB device, you can install the operating system just by selecting your preferred options, including the graphical environment, bootloader, country and language, create an admin user, etc.
How can I create a bootable USB from macOS?
The best tools I found that almost always work for writing ISO images and creating bootable USB devices with Linux are Unetbootin and balenaEtcher. You can also use Apple’s default and pre-installed Disk Utility tool to create a bootable USB, but the process is manual and more time-consuming than using a simple third-party tool.
I got an error during the installation. Now what?
One of the best things about Arch Linux is that, almost always, you’ll find a solution to your problem online. To fix any error, first you need to understand it, and each error is different. Take a picture and search for it on Google or use an AI chatbot/assistant. Refer to the Arch Wiki for more information.
Which graphical environment should I choose?
There are currently multiple different graphical environments that you can use on Linux, including popular ones such as KDE Plasma, Gnome, Xfce, Cinnamon, Deepin, and even Window Managers like i3 and Awesome Window Manager.
The choice heavily relies on your personal taste and preferences, do you want something fast and stable? Something fancy with bleeding or updates? Maybe both? Here’s my comparison for GNOME vs. KDE Plasma vs. XFCE.
Have you been able to install Arch Linux? And if so, what did you like and hate the most, and how is your experience as of now? Let me know in the comments down below!




And how do we install WM on the system such as gnome,kde,hyperland,cinnamon etc
Hey, depending on the WM that you want to install. In Arch Linux, you could start with something like (in Terminal):
sudo pacman -S i3 xorg-server xorg-xinit(change the i3 if you prefer a different window manager). You can edit the.xinitrcfile usingcp /etc/X11/xinit/xinitrc ~/.xinitrcand add the following line to start the window manager:exec i3.Let me know if you need any more help! 🙂