I notice a lot of discussions on Reddit and other forums with people complaining about their Creative Sound Blaster Play! external USB adapter having a low sound volume, some of them even saying their new motherboard was generating higher sound quality and volume.
If you’re struggling with your Creative Sound Blaster Play! 3 external USB adapter, here are a few things you can try to fix the issue.
Install the USB Device drivers
Instead of downloading any new drivers, you can try a little tweak that would probably solve the problem with the low volume issue. This is only for people using any version of Windows and not for Linux and macOS users – although I had no issues using the Sound Blaster Play! 3 in my Manjaro Linux and EndeavourOS.σ
Important Note: Before proceeding, please remove your in-ear, earbuds, and headphones, or reduce the volume as low as possible. After installing the right driver and the Sound Blaster Play! 3 starts working, the gain in volume will be significant.
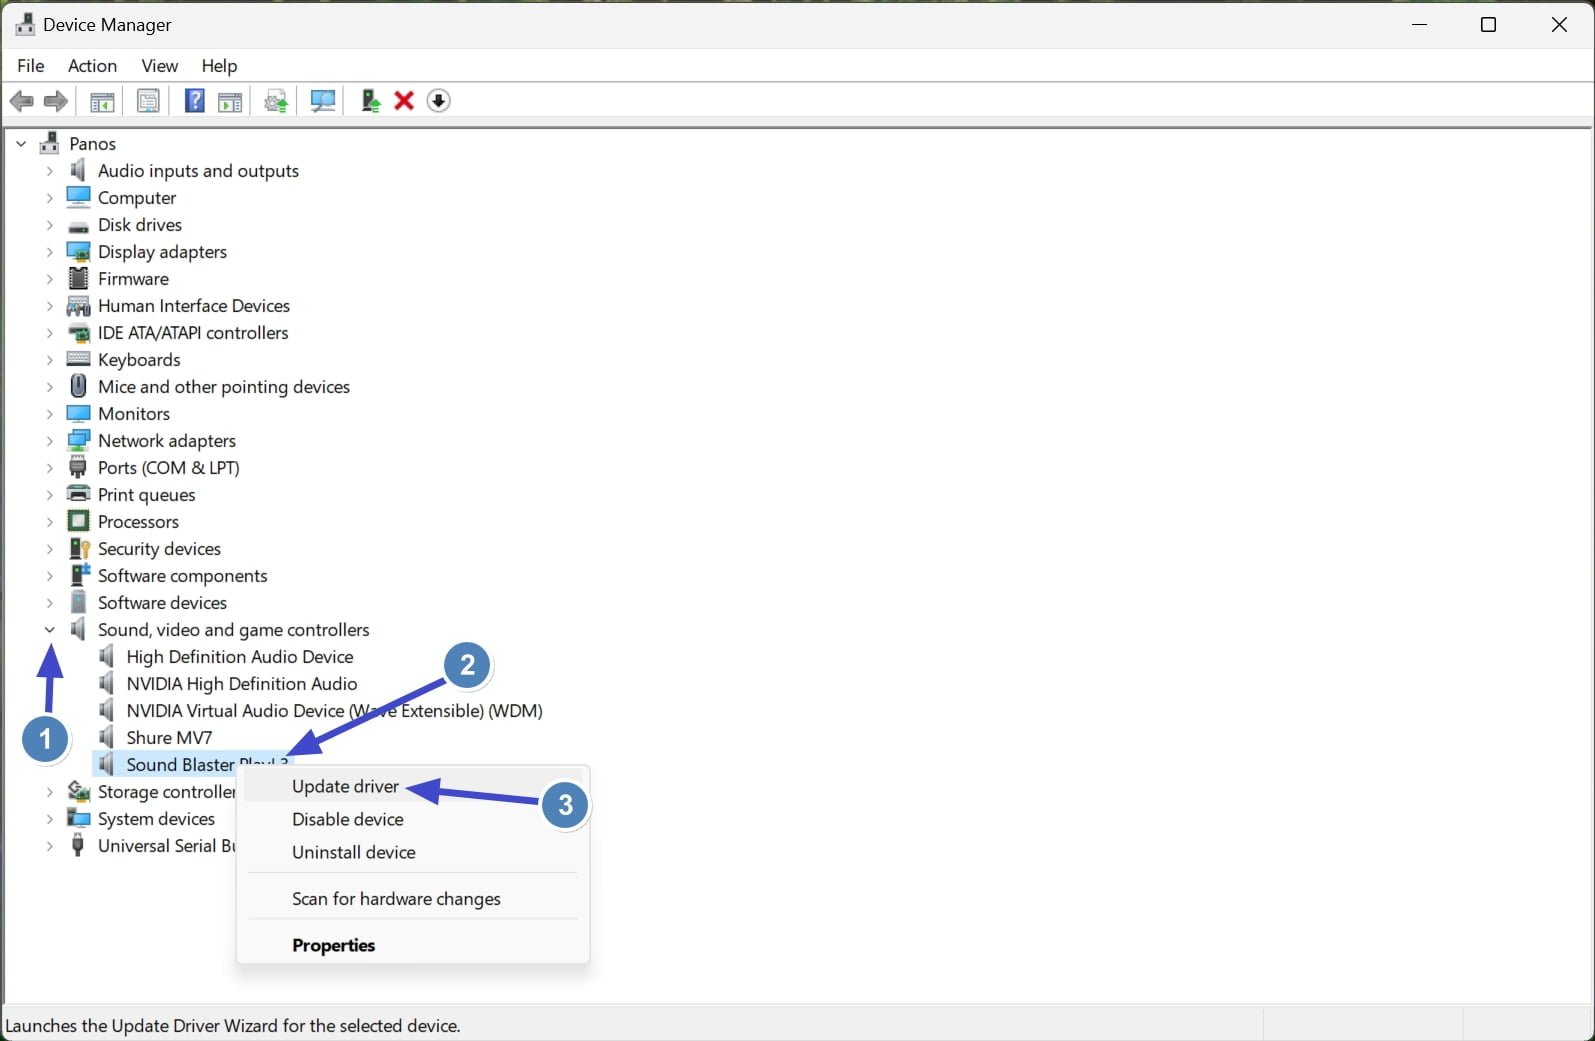
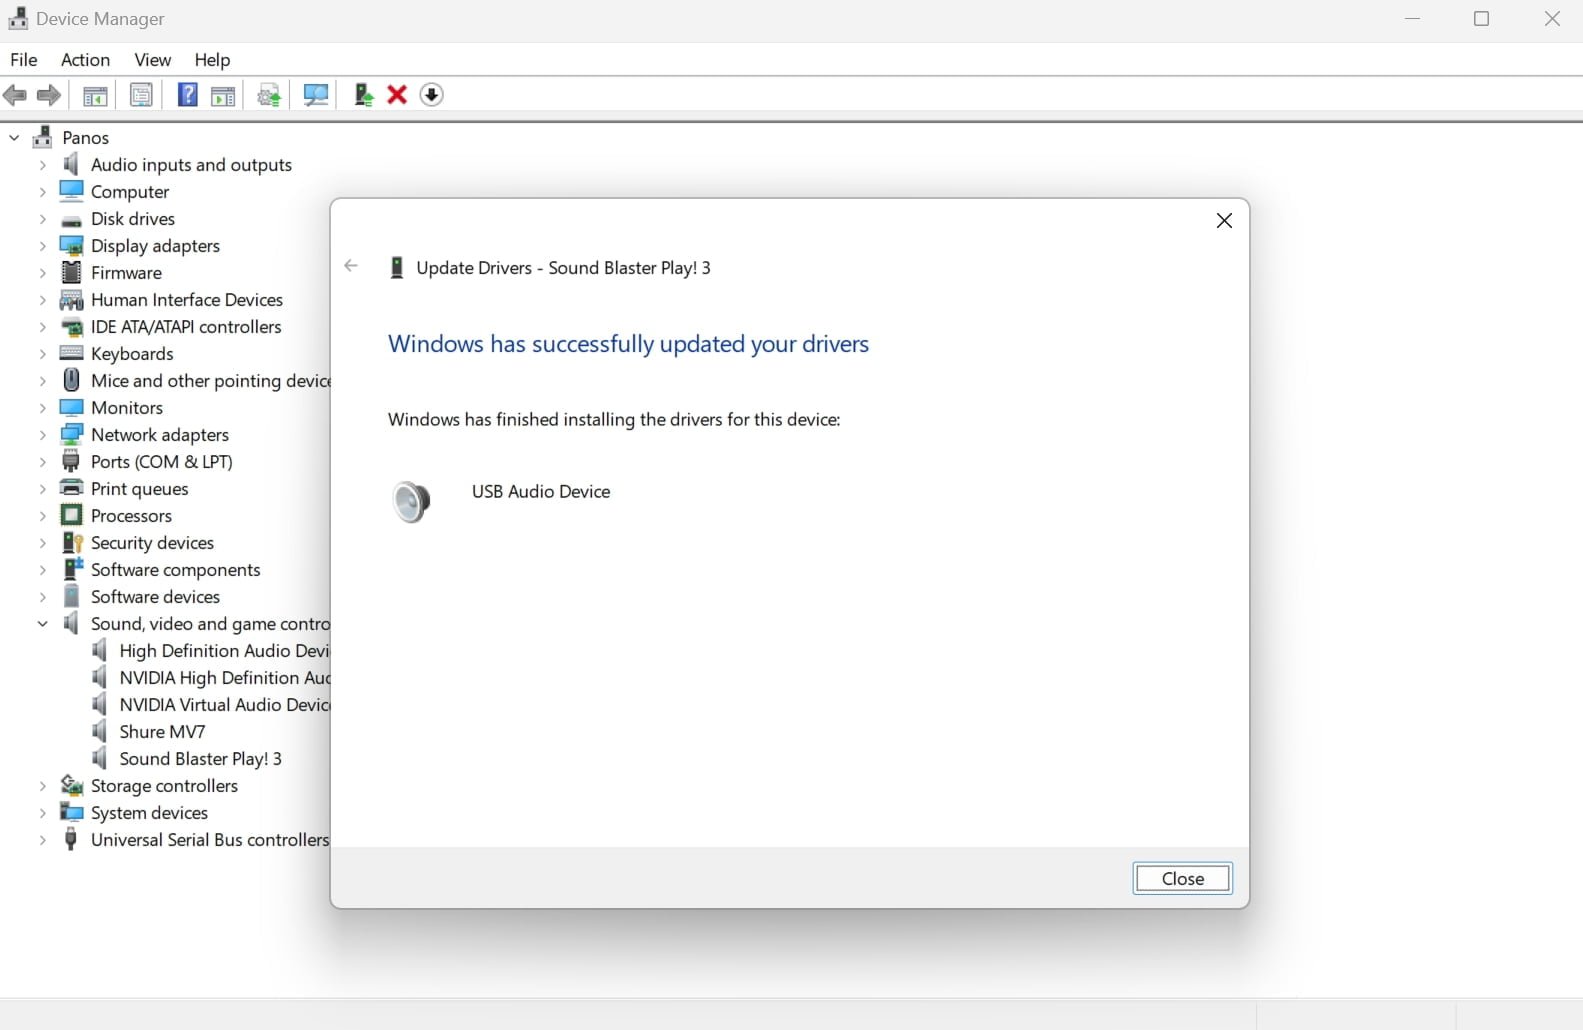
- Right-click on the Start Menu and click on “Device Manager“.
- Find the “Sound Blaster Play! 3” option under “Sound, video, and game controllers“.
- Right-click on the “Sound Blaster Play! 3” option and click on “Update driver“.
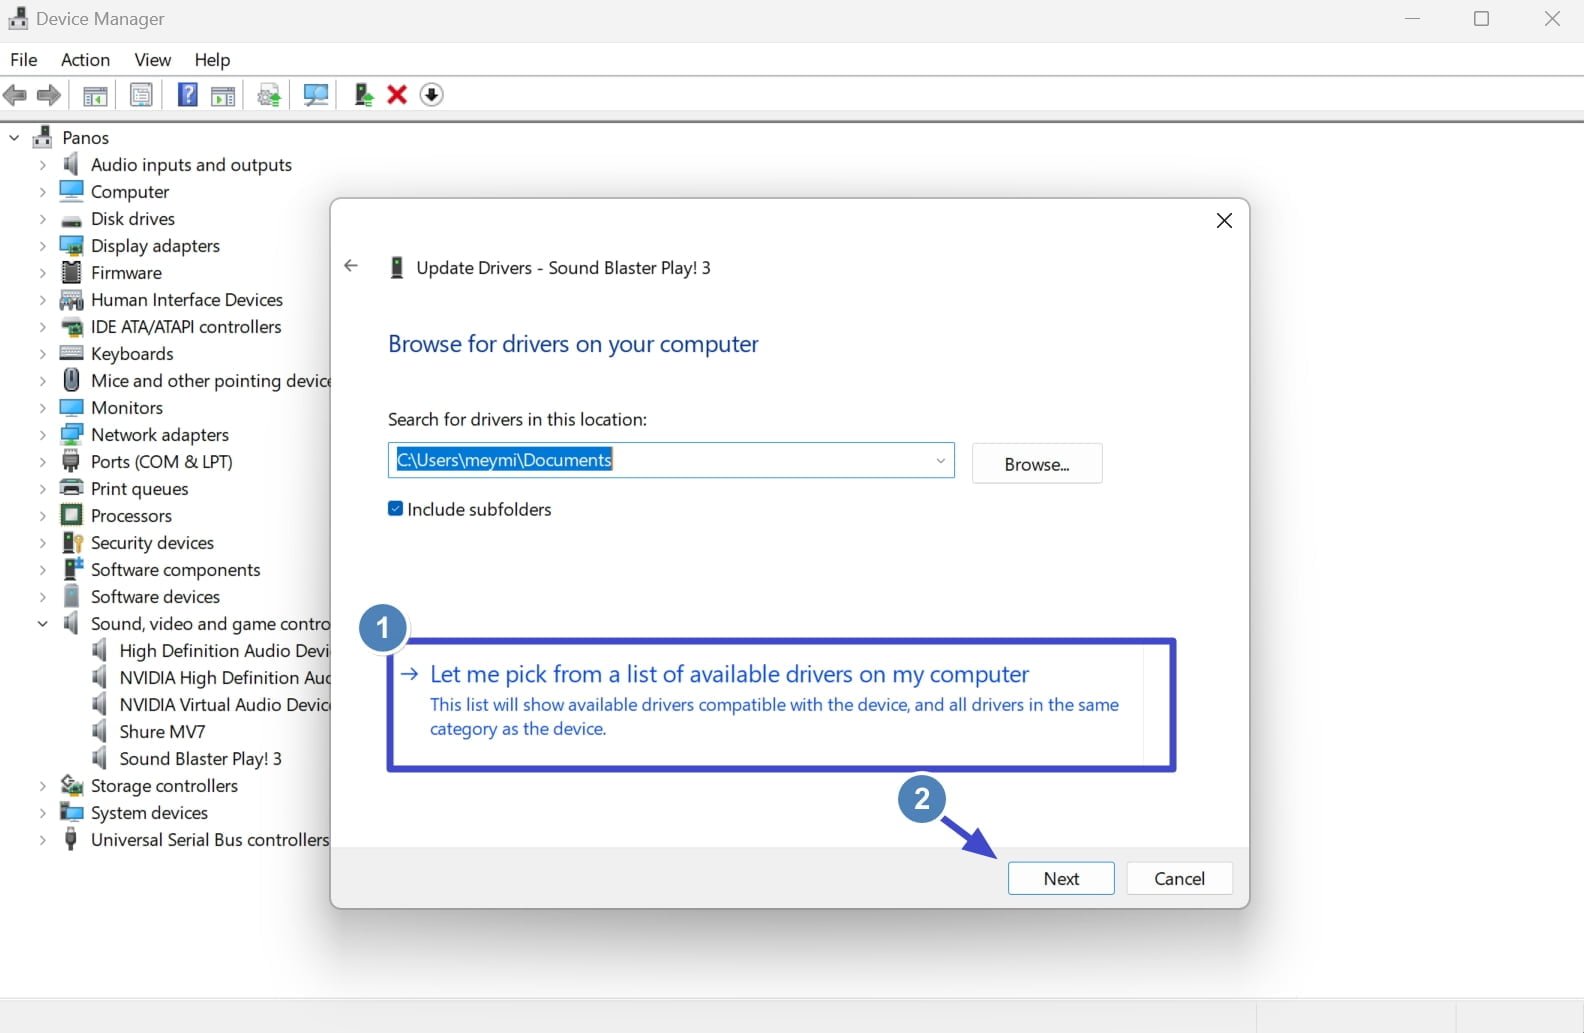
- Select “Browse my computer for drivers“, select “Let me pick from a list of available drivers on my computer“, and click on “Next“.
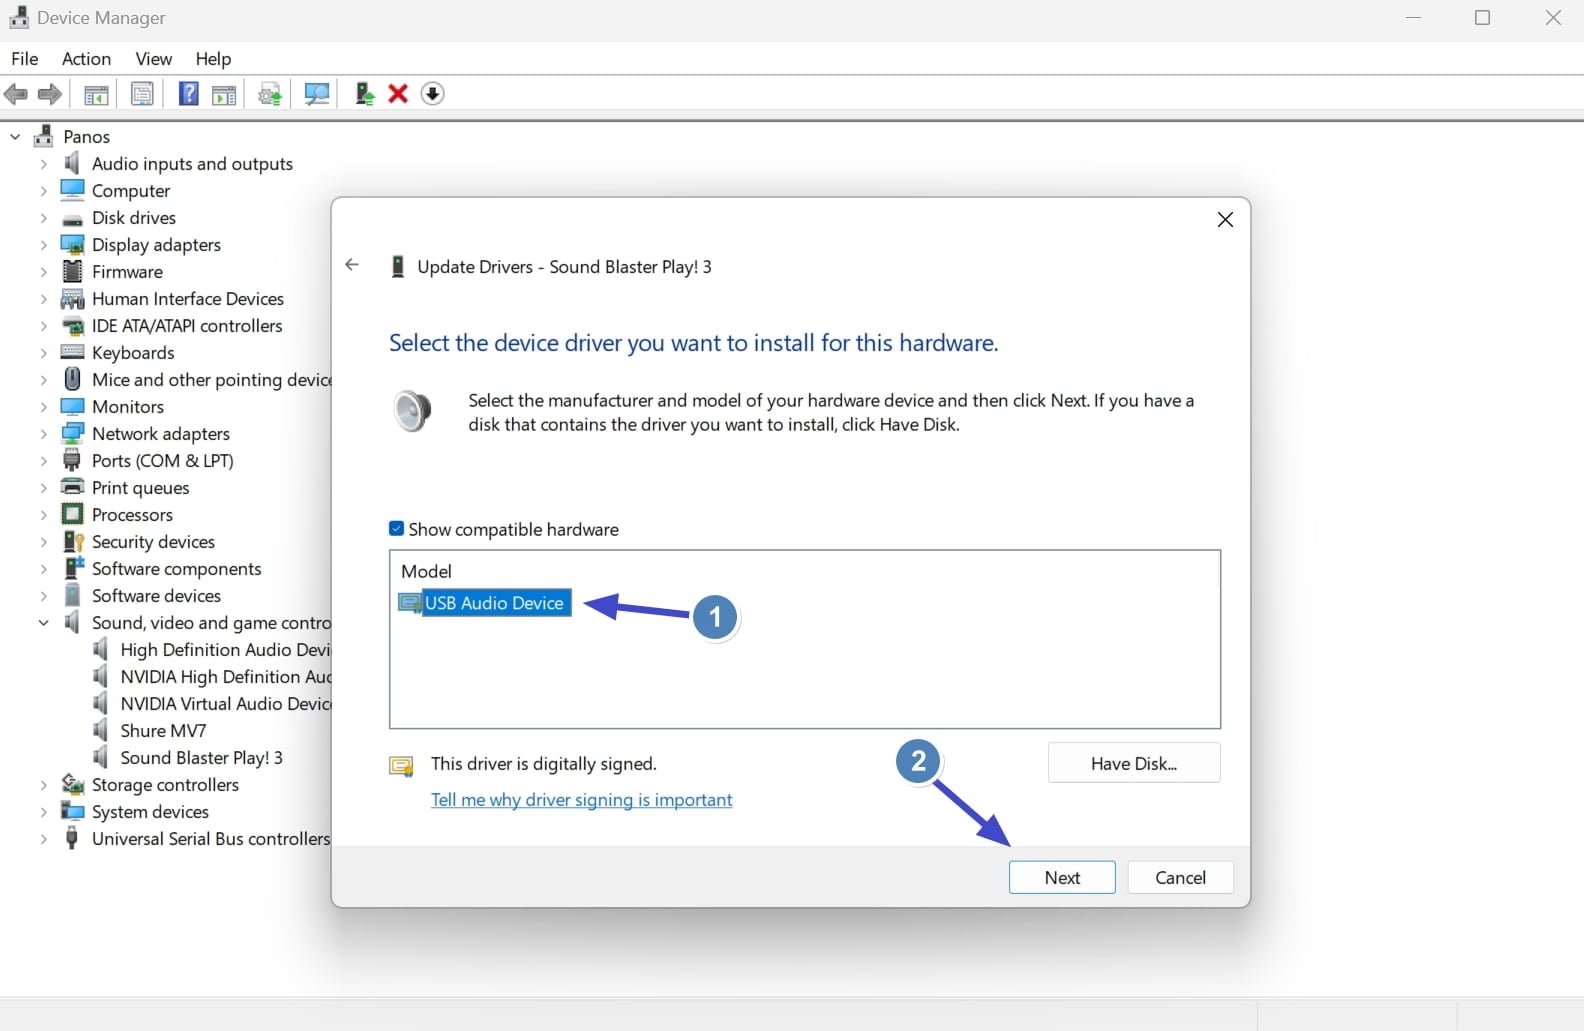
- Select the “USB Audio Device” and click on “Next“.
- After the driver has been installed, click on “Close“.
- Restart your PC/laptop and check your sound quality and volume.


That should solve the issue of your experience with the Creative Sound Blaster Play! 3 having low volume. But if the issue persists, there are a few more tricks I may have under my sleeve.
1. Best External USB Adapter with no drivers for Windows and Mac

Creative Labs Sound Blaster Play! 3 External USB Sound Adapter
The Sound Blaster PLAY! 3 drives a wide range of headphones – from mobile phone earbuds and gaming headsets all the way to more expensive studio-grade headphones.
Buy On AmazonUninstalling and reinstalling the drivers
I am not really sure why, but for some reason uninstalling only the Creative Labs software (in case you’re using it, I am not) won’t fix the issue. What some users reporting is that you should follow a specific order at uninstalling specific drivers and then reinstalling them from the Windows “Device Manager” tool.
Here’s how to do it:
- Uninstall the Creative Labs software.
- Open the Start Menu and click on “Settings“.
- Go to “Apps“, and click on “Installed Apps“.
- Find the Creative Labs app, click on the three dots, and click on “Uninstall“.
- Uninstall the Sound Blaster Play! 3 drivers.
- Right-click on the Start Menu and click on “Device Manager“.
- Find the “Sound Blaster Play! 3” option under “Sound, video, and game controllers“.
- Right-click on the “Sound Blaster Play! 3” option and click on “Uninstall device“.
- Uninstall your motherboard’s onboard sound card drivers.
- Using the Device Manager tool, in the “Sound, video, and game controllers” section”, uninstall your device’s built-in drivers.
- Restart your PC.
- Open the Device Manager again, click on “Action” from the top menu, and click on “Scan for hardware changes“.
- Wait until Windows installs the latest drivers, and also check for new updates from the Settings app.
- Restart your PC and check if the issue has been fixed.
Basically, we’re removing and reinstalling all the drivers, even the built-in ones that came with our motherboard’s onboarding sound card.
Other ways of fixing the Creative Sound Blaster Play! 3 low volume issue
If the volume is still low, the problem may not be with your external USB adapter’s drivers but either with some wrong settings on the operating system or even the hardware itself.
In any case, try searching through the Windows settings, maybe you haven’t selected the right output? Look for Creative Sound Blaster Play! 3 name, make sure you have selected it and your volume is not set to very low by default.
Make sure you’ve also tested a different USB port on your PC or laptop. Try connecting your external USB adapter to another USB port, check if Windows changed the output device from the Settings app, and then check your volume and sound quality again.
If anything fails, take a look at their Support Center or immediately contact them through email.
Did any of the solutions provided in the article help you fix your issue? And if yes, what did you try that ultimately fixed the problem with the low volume? Drop your comments down below, and let me know if you’re still experiencing the same issue.