In case you haven’t heard, Microsoft has announced that Windows 10 will reach end of support on October 14, 2025. After that day, you’ll either have to pay for extra security updates, upgrade to Windows 11, switch to another operating system, get a new device, or risk your online security.
As more advanced users are waiting for any news surrounding Windows 12, everyone else is on a clock. Time is ending faster than ever now, and if you find yourself with a device that cannot be upgraded to Windows 11 and you’re not interested in purchasing a new device with Windows 11, let me tell you that you have a few great options.
How to check if your device supports TPM 2.0, and thus, Windows 11
Look, things are simpler than most websites make them sound. Microsoft wanted to make their operating system a whole lot safer and more secure, and to do so, they added a requirement: Support for TPM 2.0.
But wait, what’s that?
TPM comes from Trusted Platform Module, which comes in versions, and we’re currently in version 2.0 (and thus, TPM 2.0).
Most modern desktop PCs and laptops support the latest version, and it’s basically used in Windows 11 for a few features and options, including for Windows Hello (which indedifies you like phones do), BitLocker for extra data protection, Credential Guard, and even in secure boot mode in which TPM ensures only trusted software loads during startup.
How to check if your device supports TPM 2.0?
If you got your device within the last 5 years, there are high chances that it supports TPM 2.0. To make sure that this is the case, follow the steps provided below:
- Press
Windows Key +Rto open the Run dialog. - Inside the Run dialog, write
tpm.mscand hit Enter. - Look at the Specification Version; if it says “2.0“, you’re good to go.
Don’t worry if your device doesn’t support TPM 2.0, as we’ll see later how you can install Windows 11 even on unsupported devices (although it’s not recommended). We will also see how you can easily switch from Windows to Linux, getting a beautiful distro that will make your hardware powerful again.
How to enable TPM?
Sometimes, even if your device supports TPM 2.0, the technology may be deactivated by the manufacturer, meaning that you’ll have to manually activate it from your UEFI/BIOS settings. If it sounds scary, don’t worry, we’ll get this done within seconds.
Here’s how to enable TPM 2.0 (if your device supports it):
- In Windows, open Settings and go to Update & Security -> Recovery -> Restart now.
- From the next screen, go to Troubleshoot -> Advanced Options -> UEFI Firmware Settings -> Restart.
- Once you’re in UEFI/BIOS, you’ll have to find and enable TPM 2.0. Sometimes it’s under the Security Device Support, other times under the TPM State section, and it may have different names depending on your hardware, including Intel PPT, Intel Platform Trust Technology, AMD fTPM, AMD PSP fTPM, etc.
If you have trouble finding the option, I’d suggest you search your motherboard’s model (you can find it using a free tool like Speccy) and look for the instructions on how to enable/disable TPM.
Backup everything you have on your device
Let’s start from the basics; You’ll have to backup all of your important files. This is crucial because you’ll never really know how safe your files are in an unsupported operating system, and you’ll need them if you want to upgrade or replace your operating system.
The best way to backup your files is on another disk, but you can also use any cloud service, including Microsoft’s OneDrive and Google Drive. You may also need more storage space if you have many files, so choosing a subscription plan for at least a month of use may also come as an extra.
Apart from copying and pasting your files to another drive, you can also keep a backup through the operating system’s settings, but that will keep many more files that you may not need. Here’s how:
- Open the Control Panel: You can do this by searching for “Control Panel” in the Start menu.
- Click on the “Backup and Restore” setting under the “System and Security” section.
- Click the “Set up backup” option on the right.
- Select an external drive to store the backups.
- Choose the “Let me choose” option under “What do you want to backup?” to ensure everything you want is backed up.
- Check the items under “Data Files” and include the Local Disk (C:).
- Click “Next” and set up the backup schedule.
Once you’ve done this and you have a backup with all of your important files, you’ll then have to decide what will happen to your devices. There are two options when it comes to changing your operating system: You’ll either stay with Windows 10, which is unsafe, force-upgrade to Windows 11 with a little trick, or replace it with Linux.
Force-install Windows 11 on older hardware
This is not the safest option, and you may experience issues in the near future, but if you really want to keep Windows installed, installing the latest version is as crucial as it gets. While Microsoft is not supporting older hardware with Windows 11, that doesn’t mean that users can’t install it, as there’s an easy way to get around this problem.
Create a bootable USB with Windows 11 using Rufus
Rufus, a free tool for creating bootable USBs, is a great solution to this issue, as it lets you create a bootable USB with Windows 11 that can run on older devices that are not supported, and it even lets you adjust the operating system for PCs and laptops with less than 4GB of RAM.
- Head over to Microsoft’s official website and grab the latest Windows 11 ISO file. Anyone can download the operating system for free.
- Download Rufus from its official website or find it through the Microsoft Store.
- Get a USB device with at least 8GB of free storage space, and make sure you’ve kept a backup of the files it has (as they’ll also be deleted).
- Once done, open Rufus, click on “Browse”, select the ISO file that you downloaded earlier, and make sure you’ve also selected the USB device.
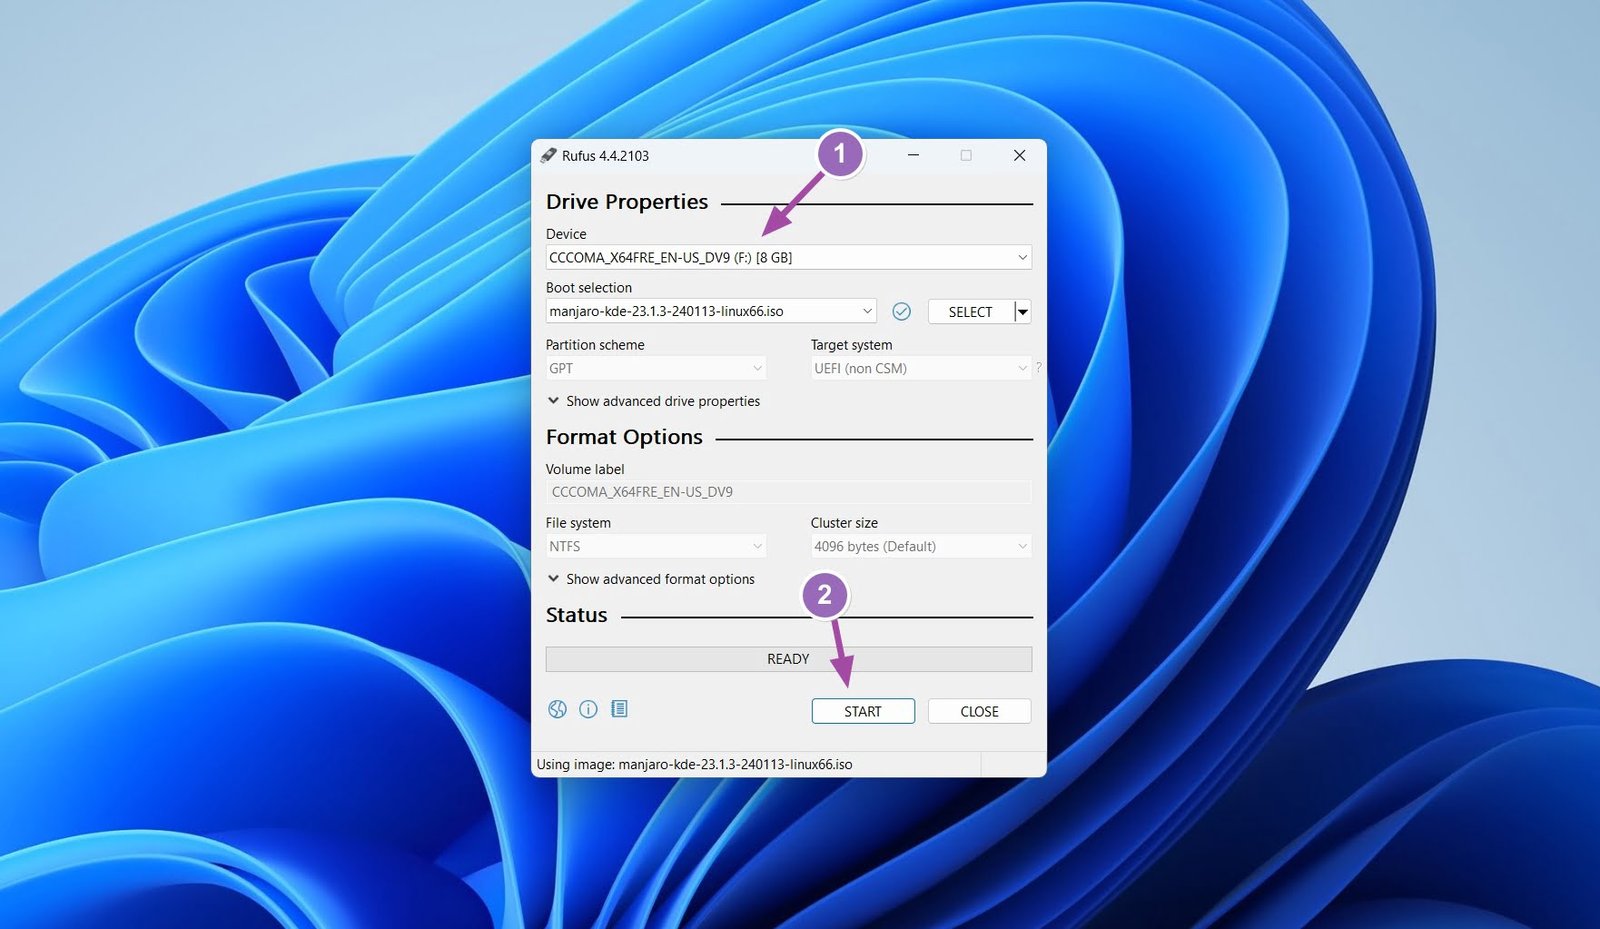
- Click on “Start” and wait until Rufus has extracted and imported all the files to your USB device.
- Open the Settings in Windows 10, scroll down, and click on Update & Security. On the right pane, click Recovery.
- Under Advanced startup, click Restart now. Wait for a few seconds, and you’ll access the Boot Options Menu.

- You can now proceed with installing Windows 11 on your PC or laptop, which means deleting all disks and replacing everything there is on them.


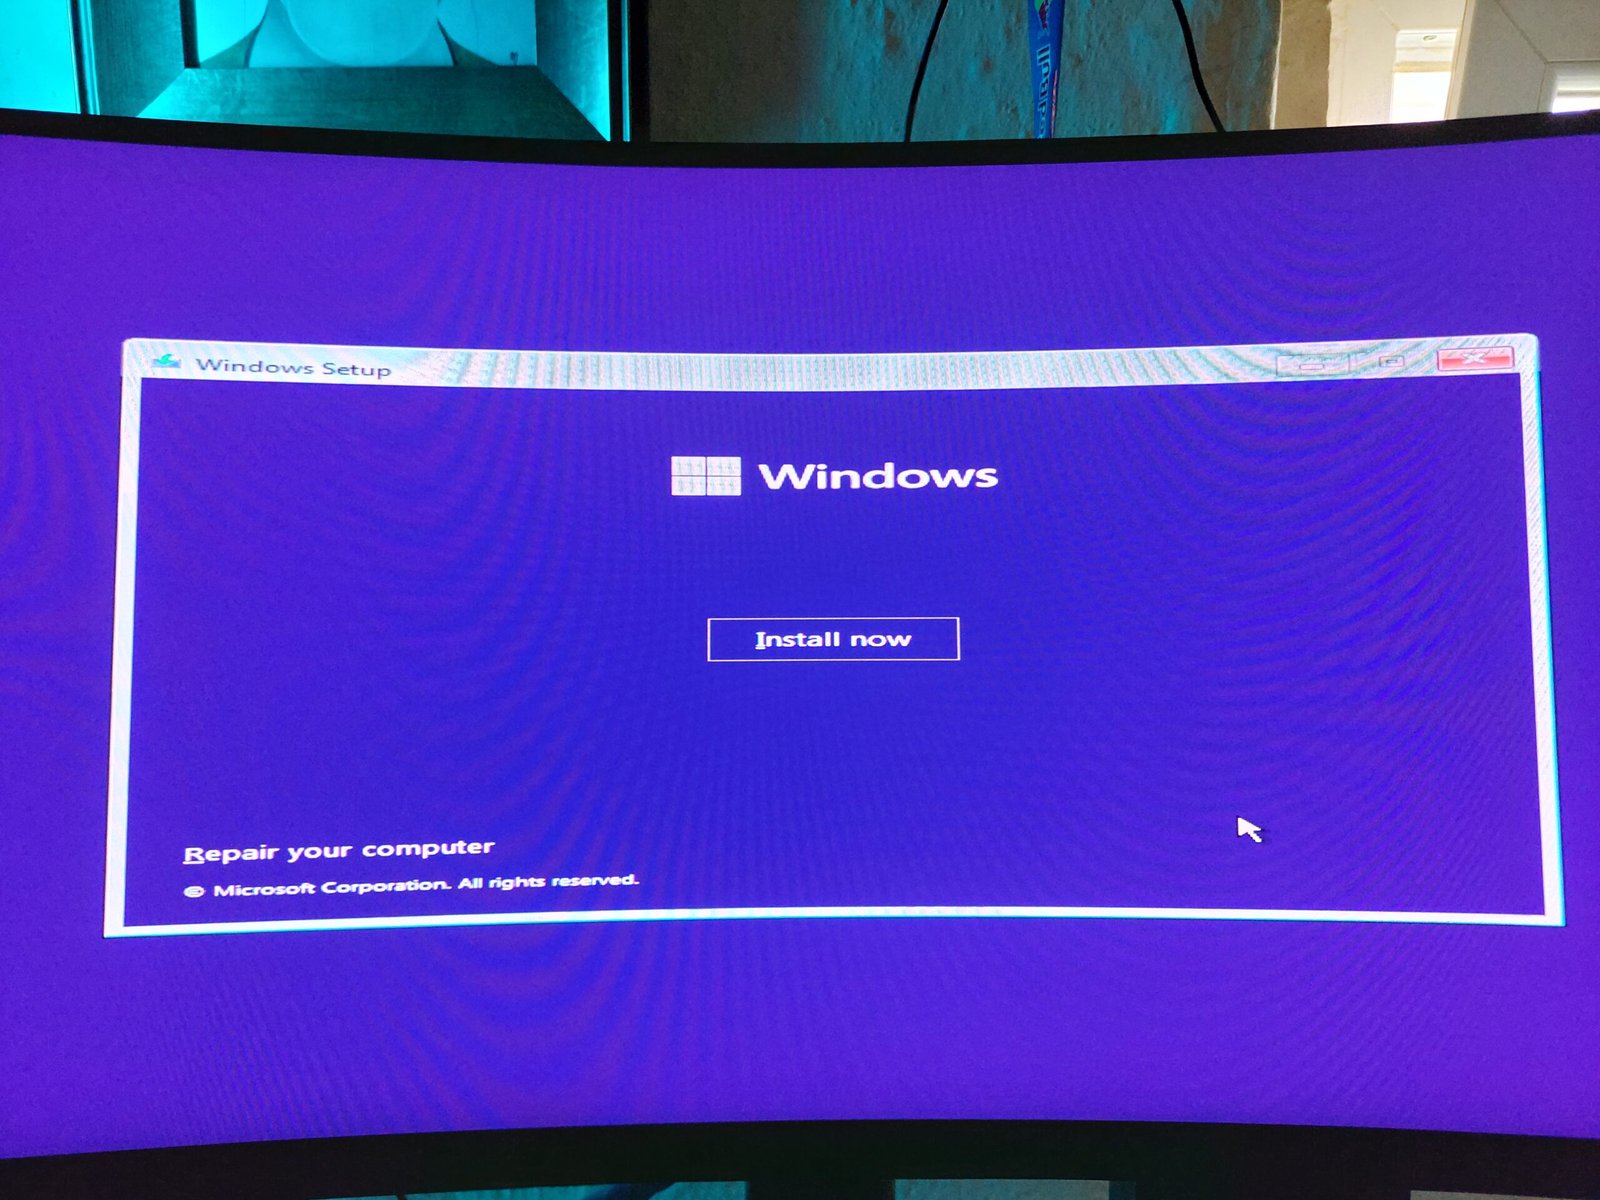
Installing Windows 11 on older hardware
While the installation of Windows 11 is pretty easy and straightforward, if you need more help, follow the steps provided below:
- Click on the “Install now” button.
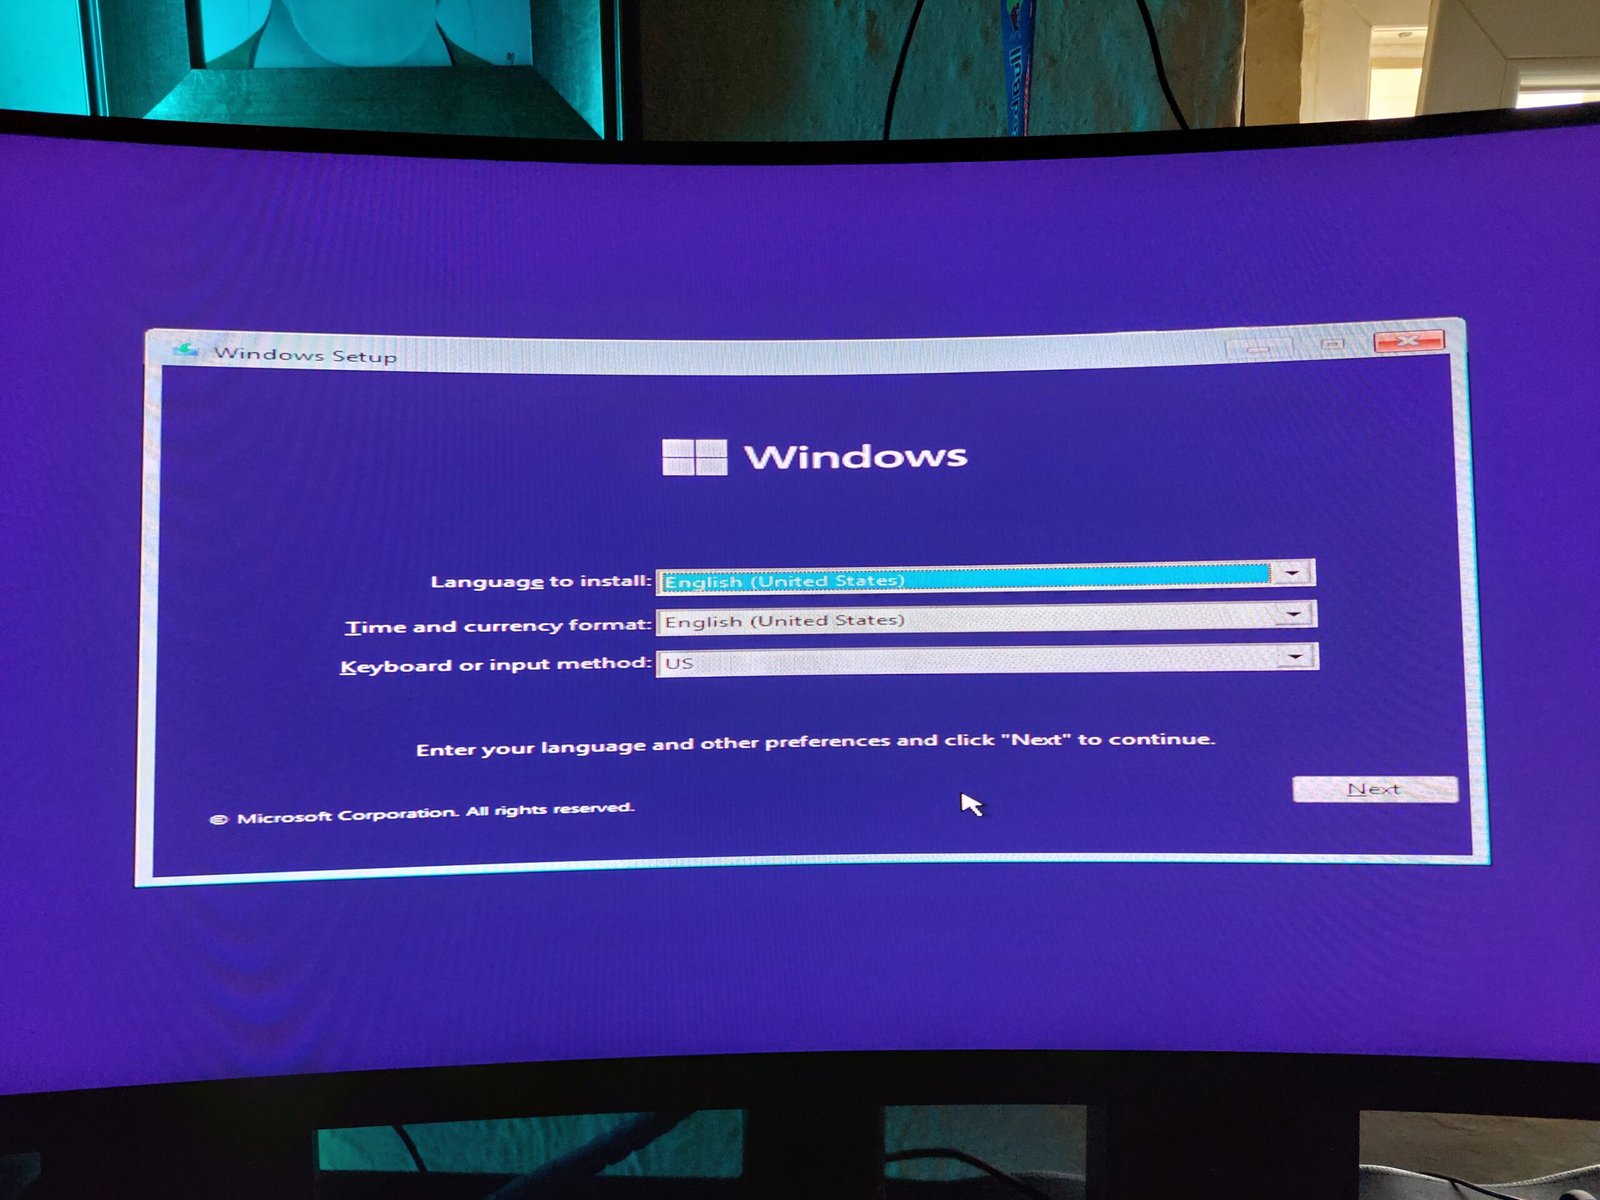
- Choose your preferred language, time and currency format, and keyboard and input method. Once done, click on “Next“.
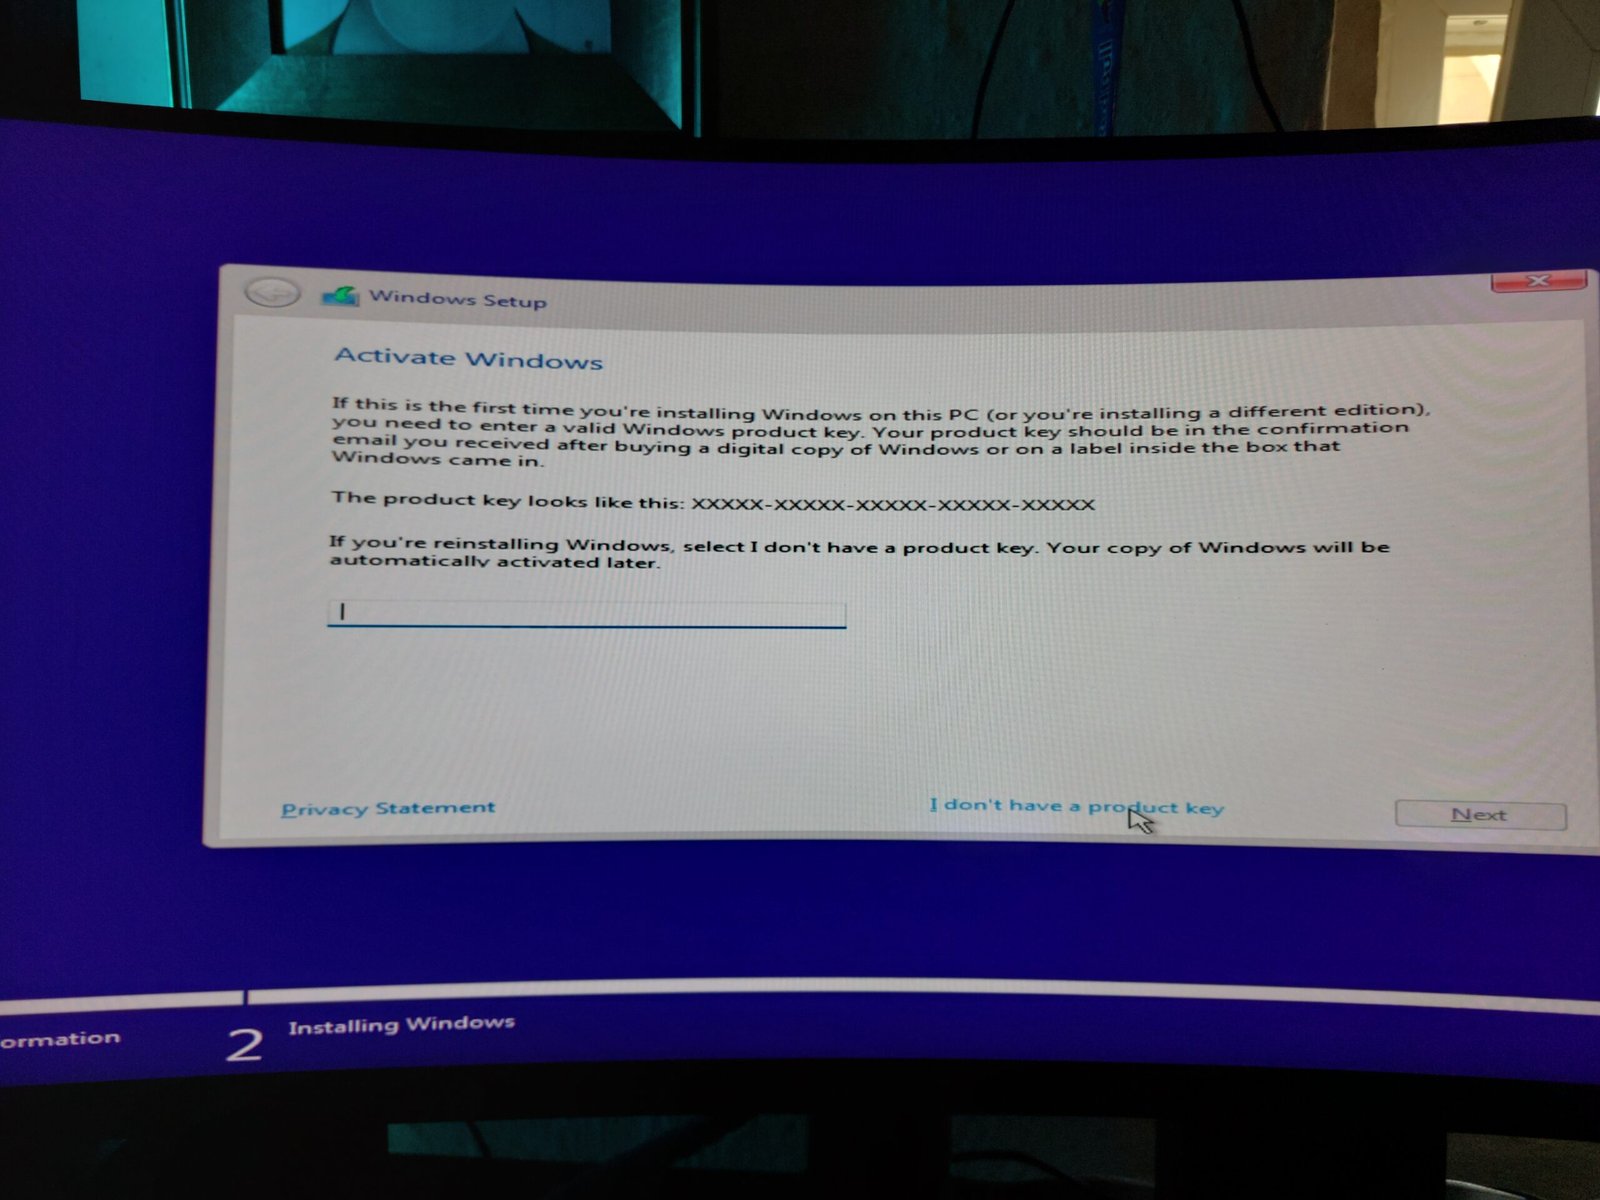
- In the next step, you can add your Windows license so you can activate it. If you don’t have it, don’t worry, simply click on the “I don’t have a product key” option. You can add it later, or Windows will automatically get the key that is already registered in your device.
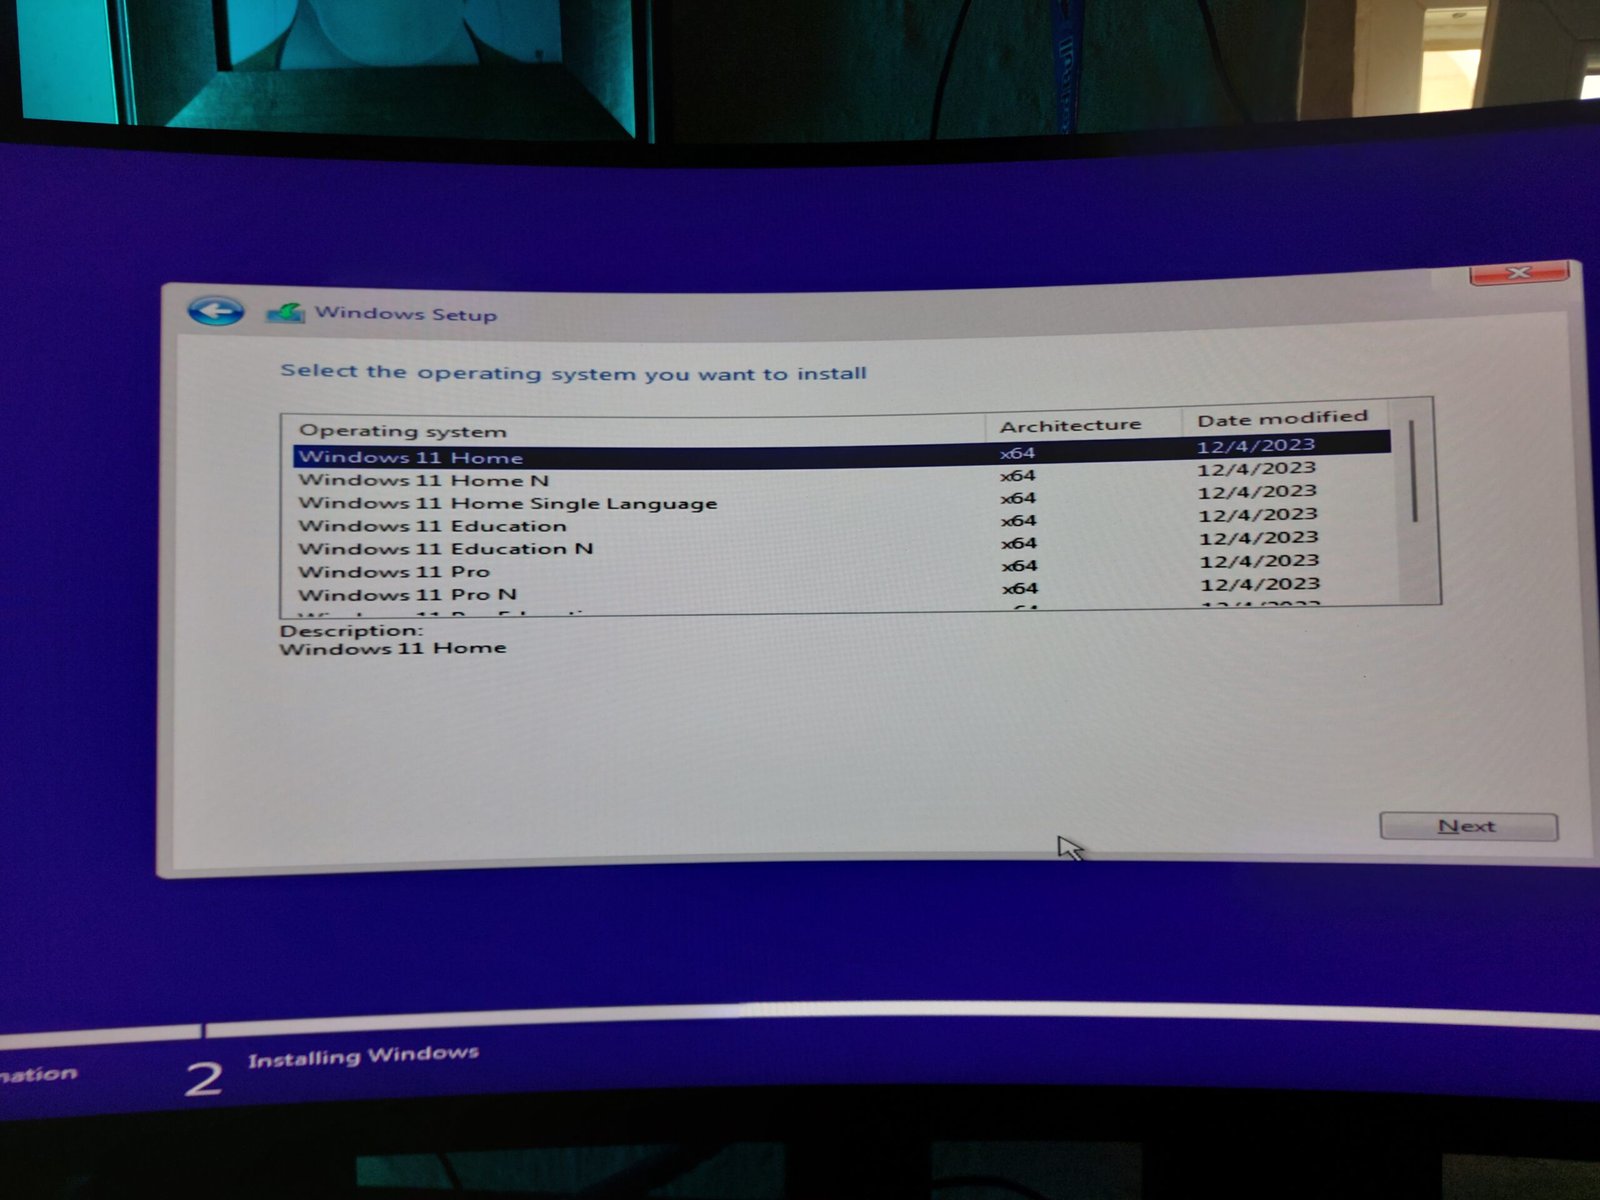
- Select which version of the operating system you want to install, such as Windows 11 Home, Windows 11 Pro, etc.
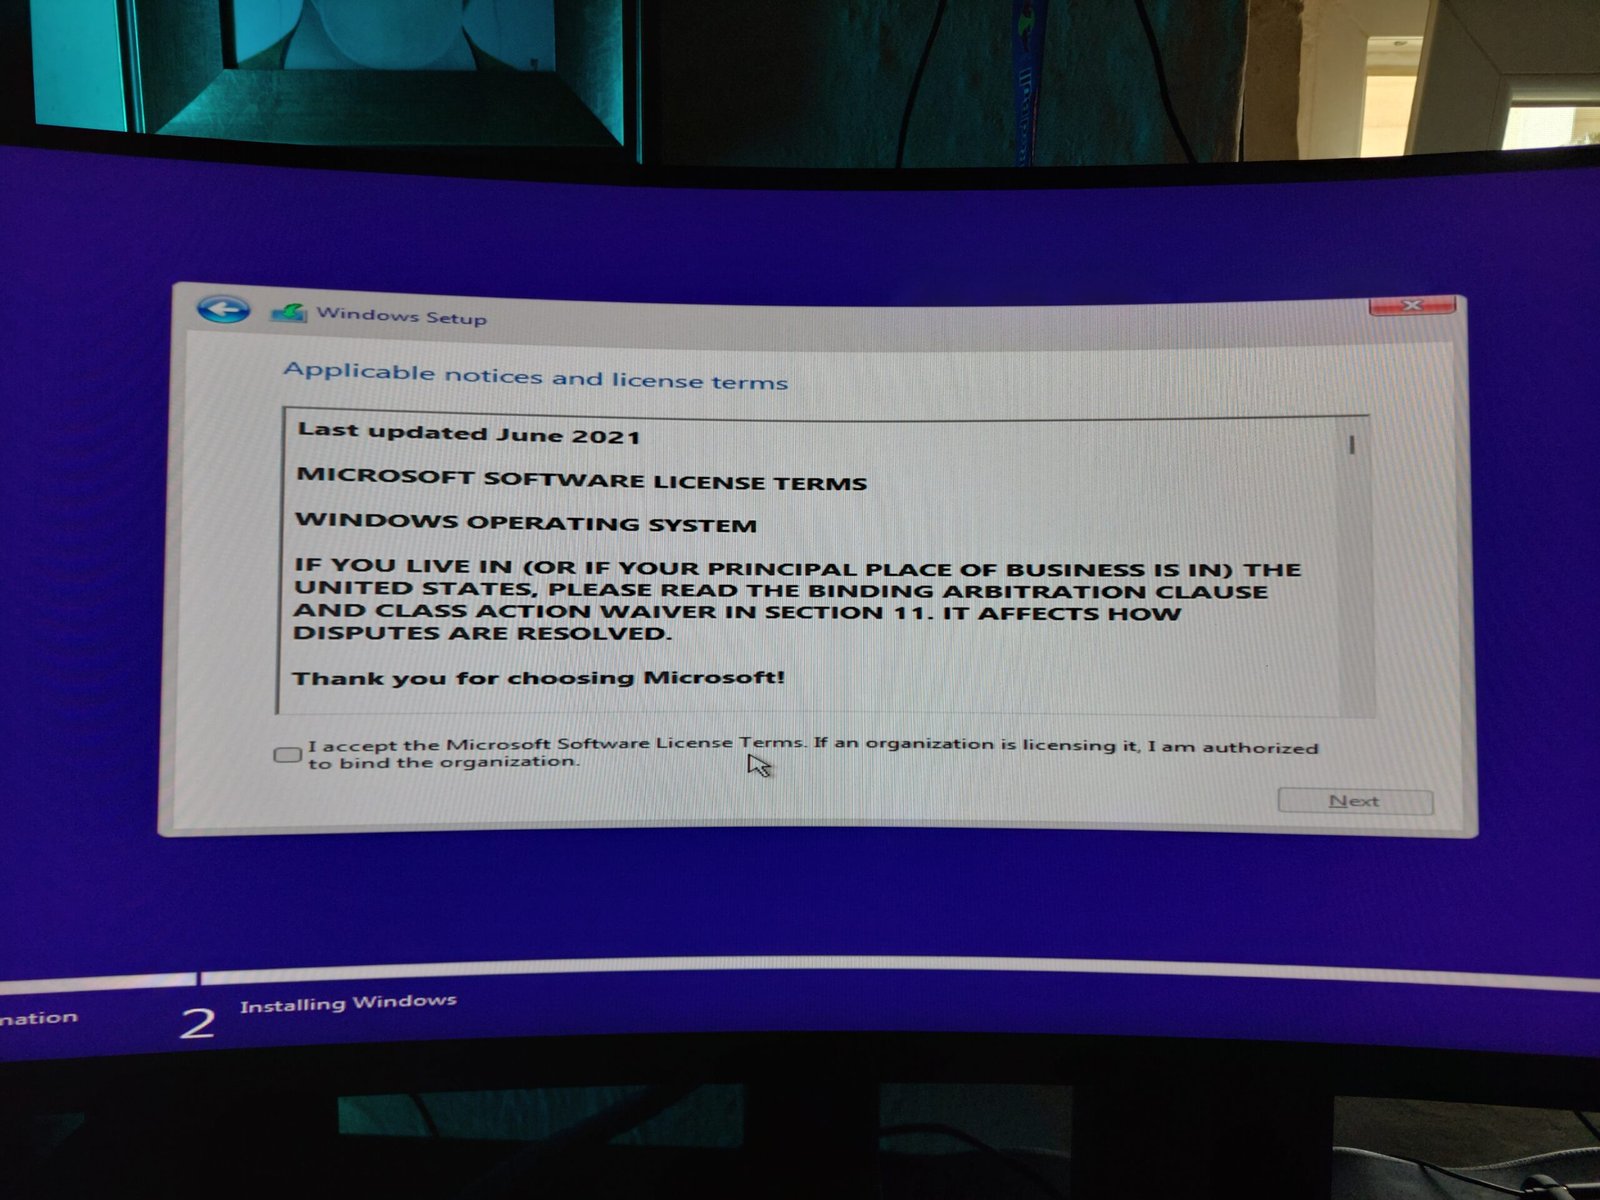
- Accept Microsoft’s applicable notices and license terms and click on “Next“.
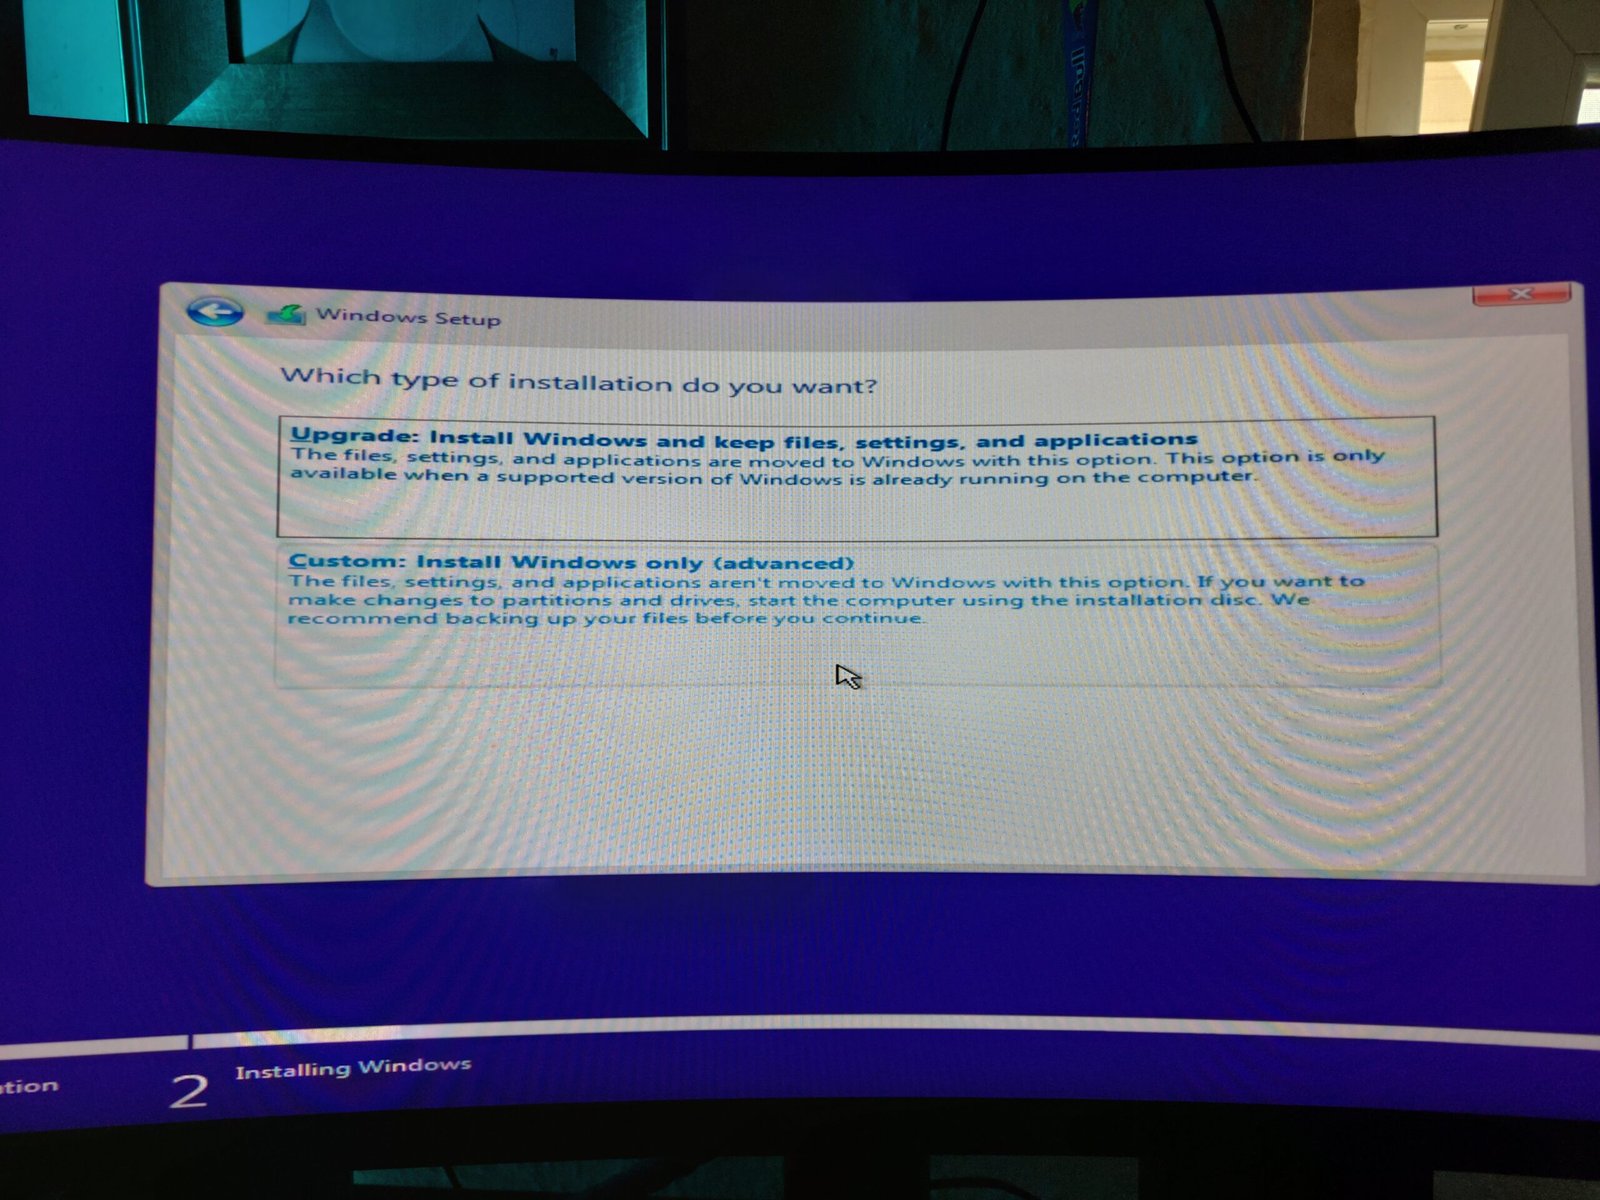
- Select “Custom: Install Windows only (advanced)“.
- Choose which disk you want to install Windows 11 on. If you have one disk but you’re seeing many partitions, simply delete them all until they become one partition. Be careful, though, as it will show any disk that you have connected to your PC, and if you have an external disk that has important files, make sure it’s unselected.
- Wait until the installation is done, and proceed by following the next simple steps, including connecting to your Microsoft account, setting up your operating system, choosing more input methods for your keyboard, etc.


Based on your hardware and how fast your disk is, it may take several minutes until Windows 11 is installed, and your device will restart a few times.
Replace Windows 10 with Linux
What’s better than using an unsupported or incompatible operating system? Use something faster, that keeps getting updated, has a huge community of people, and still supports your older hardware. Yes, that’s Linux, and it’s pretty easy to install and configure any Linux distro that you may like.
The best thing about using Linux is that you put an end to the endless installation of AntiVirus software, you won’t have to pay a dime, and you have lots of options when it comes to customizing it and making it your own.
Installing Linux is the same as Windows; you can use Rufus to create a bootable USB device with the Linux ISO that you’re going to download. So follow the steps provided above. But first, you’ll have to decide which Linux distro is best for you.
Here’s a quick look at the graphical environments that exist as of this moment of writing:
Need even more detailed instructions on how to install a Linux distro alongside Windows or by completely deleting anything on your disk and simply installing your favourite distribution? Here’s a great tutorial to get started easier and faster than ever before:
In this guide, I am installing Manjaro Linux, which is my top choice when it comes to distros, but you can follow the same steps with any other distro (well, apart from Arch Linux, which is another story).
Conclusion: The end of Windows 10 is not the end of older hardware
While it’s unclear how well and smoothly Windows 11 will run on an incompatible device using Rufus’s options, there’s always Linux as a great, faster, and safer alternative. There are many Linux distributions that support – and will continue to support – older hardware that can’t run any of the newest versions of Windows, and it can keep them alive and well.
Unfortunately, there isn’t any news on Windows 12, but something tells me your PC or laptop won’t be able to run the operating system if they do not support the TPM 2.0, which is the case for Windows 11 too. If you don’t like running incompatible or customized versions, again, Linux remains the only top alternative choice.
Sure, you can try Chrome OS Flex too, and you can easily install it by following the guide on WikiHow.com, but Linux is far more robust, and you can customize it accordingly if you want it to look and behave more like Windows or even macOS.