I’ve been using the Shure MV7 dynamic microphone for all my podcasts, voice-overs, YouTube videos, and even for calls and gaming for the last three years. In that time, I had to make a few changes, such as changing the low-quality pop filter that comes with it and making some configurations to make it work even better.
- What you need to know about the Shure MV7
- MOTIV Mix App Review
- What is the MOTIV Mix?
- The most important features
- Creating your own presets
- Updating to the latest firmware update
- How to increase the sound volume of the Shure MV7
- Upgrading the pop filter with a better one
- The Pros and Cons of the Shure MV7
- Get the most out of the Shure MV7: Best Upgrades & Equipment you can buy
- Should you buy the Shure MV7?
When I started ‘The Blogging Dispatch‘, my podcast series, which is an educational blog helping people to start their own blog, podcast, or vlog channel and make money out of it, I had to make sure that I had a good microphone to start with. I immediately went and purchased a microphone for almost $80 that included a mic arm. And while a budget-friendly microphone that comes with its own mic arm is not that bad of a choice, the results weren’t what I was expecting.
It looked like a good choice, and I even took the time to read as many reviews as possible; It was my first microphone after all. I was wrong. I should – and I can’t stress this enough – have taken the time to do better research, and I should’ve watched more YouTube videos from podcasters who know about microphones. But I was young and excited to start my own podcast channel, so spending more time researching was out of the question.
While the sound was clearer and more professional than the one I used to record with my smartphone and laptop, I couldn’t help but notice the difference between the quality of my voice and the one that I was enjoying listening to from my favorite podcasters. So after a year of experimenting, researching, and learning more about sound editing and podcast creation, I went and purchased the Shure MV7 dynamic microphone, and here’s everything I learned so far during the last three years.
Editor’s Note
I’ve been using daily (yes, daily) the Shure MV7 for the past 6+ years. I’ve traveled more times than I can count with it, and even hit it a few times fairly hard. In 2026, this beast still works like I just bought it, and I never felt the need to upgrade it (there’s just no reason to do so).
What you need to know about the Shure MV7
I won’t get you bored with all the technical details and how the technology behind the Shure MV7 works. I’ll leave that to the professional content creators out there who want to spend their time looking at every little detail, which is always a good read before purchasing (mostly for studio use) any equipment.
But if you are a content creator just looking to purchase a good microphone, then I may be able to help you by providing some good details I’d love to know before getting this dynamic mic.
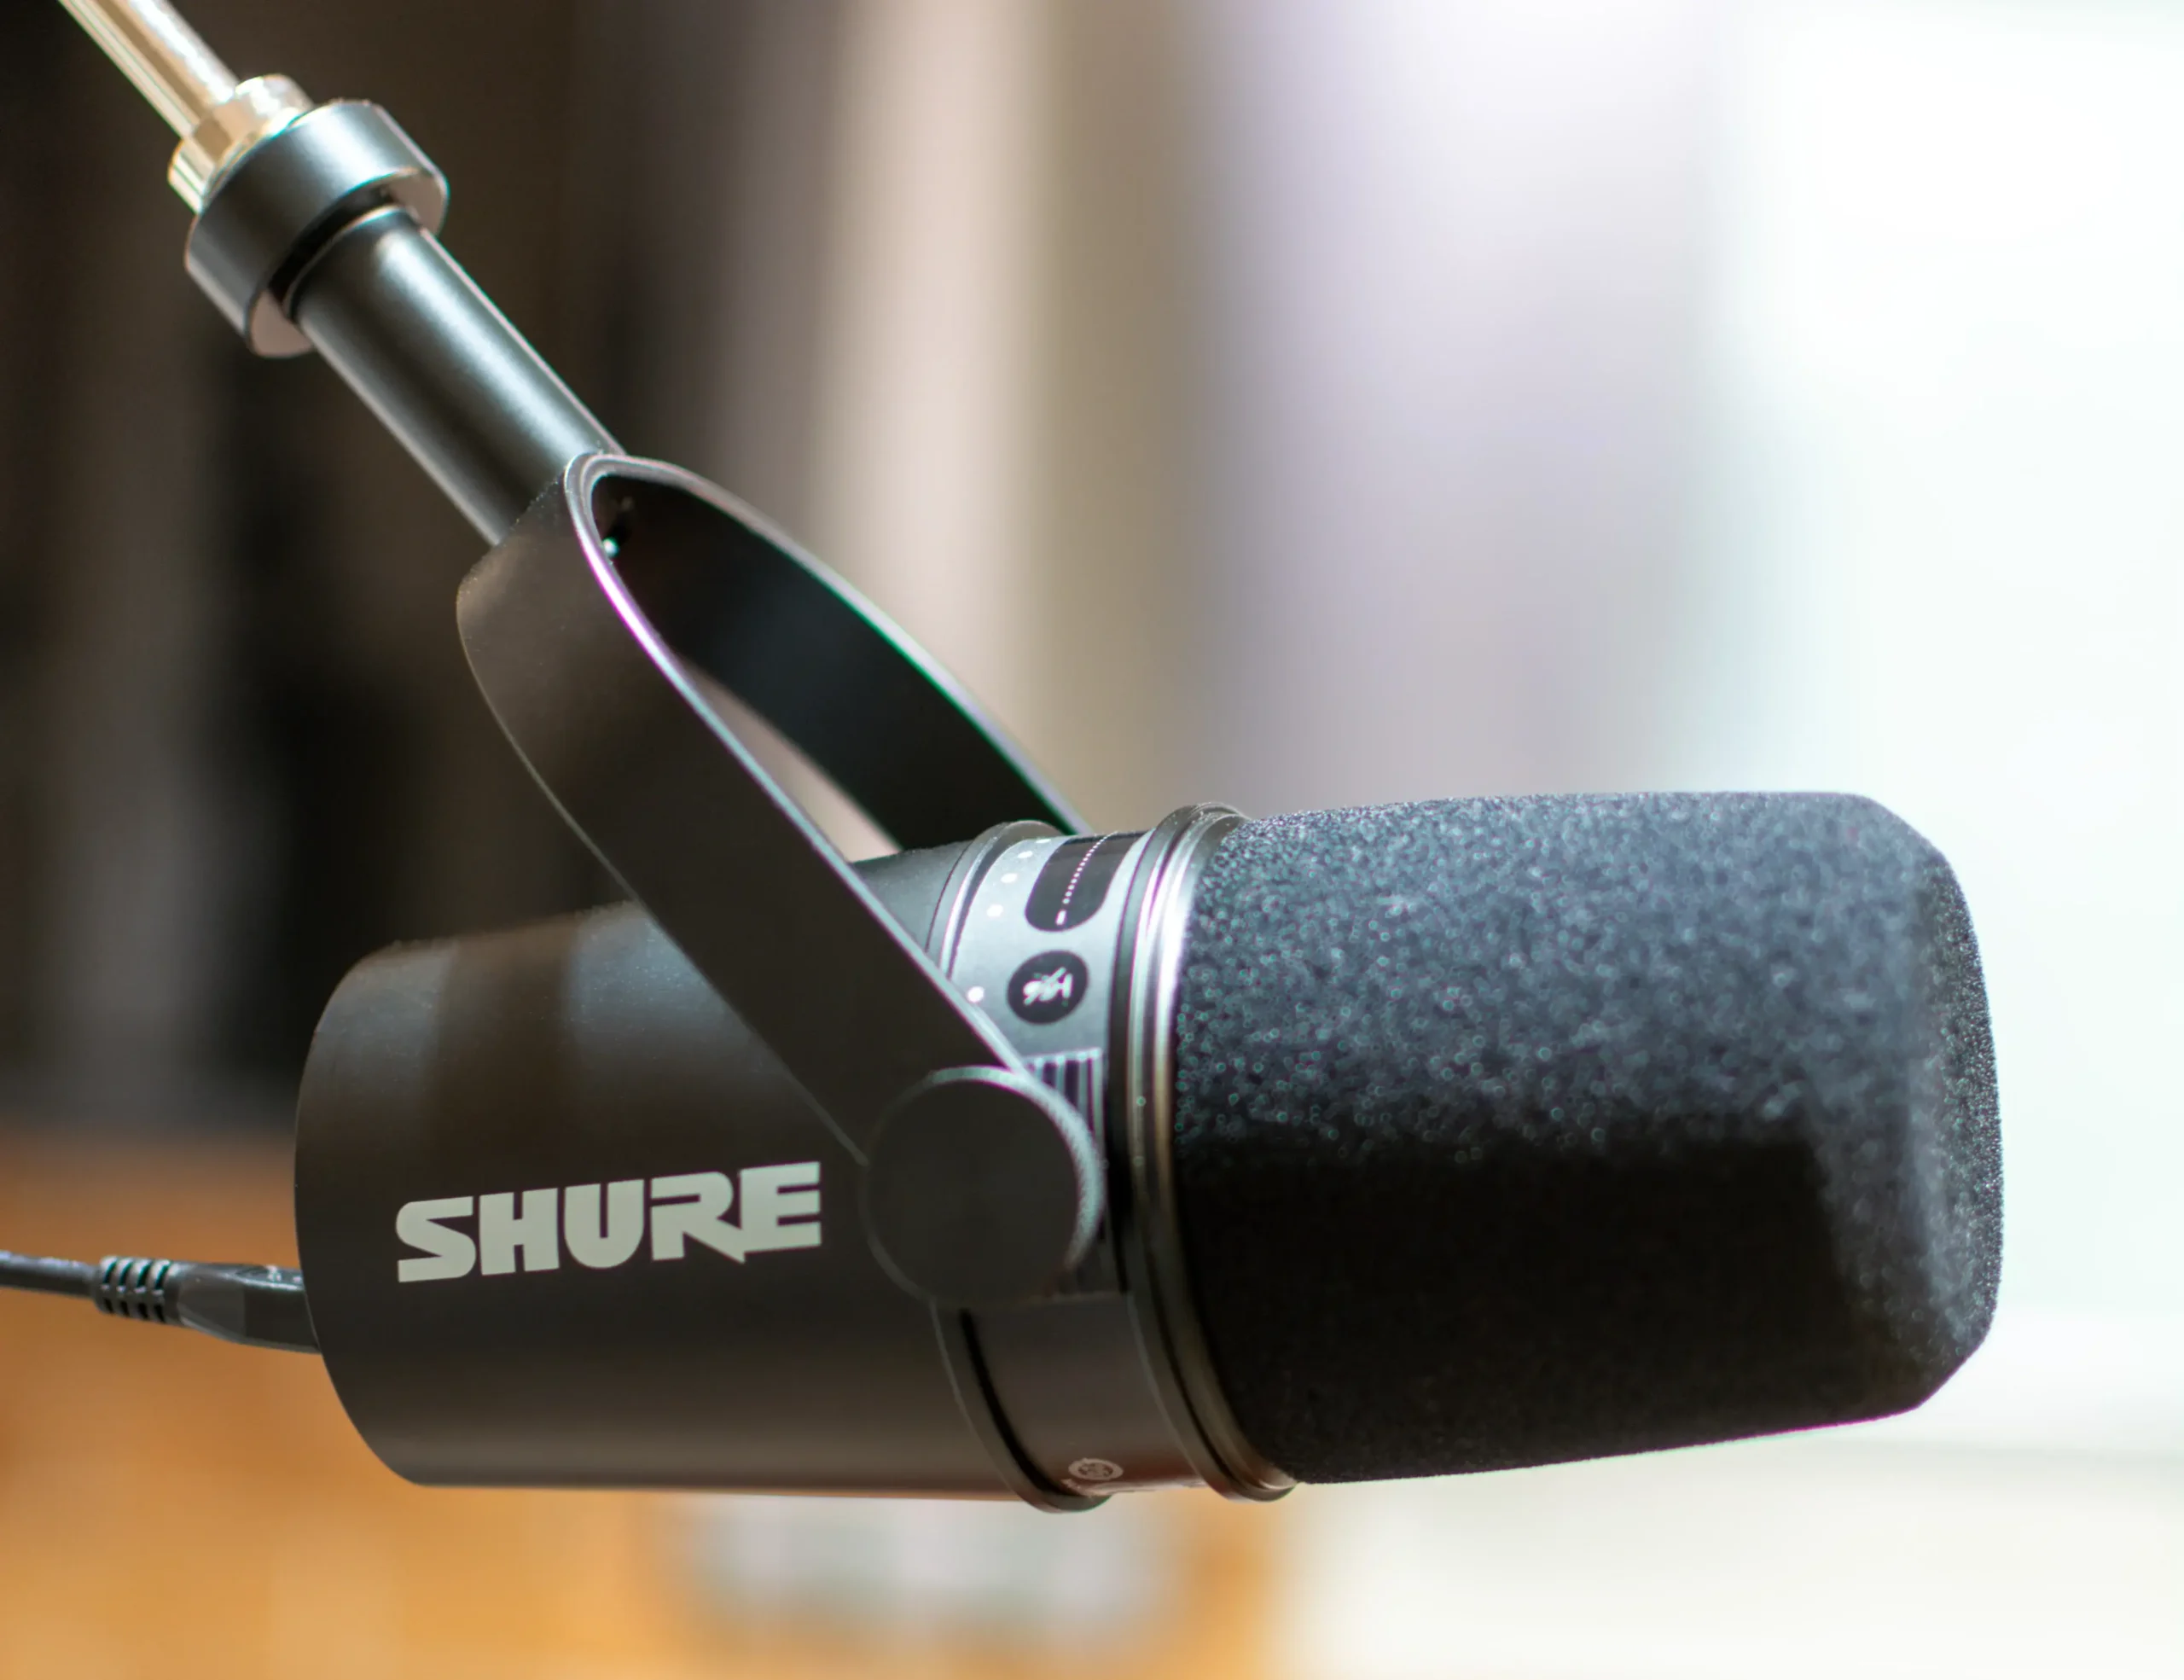
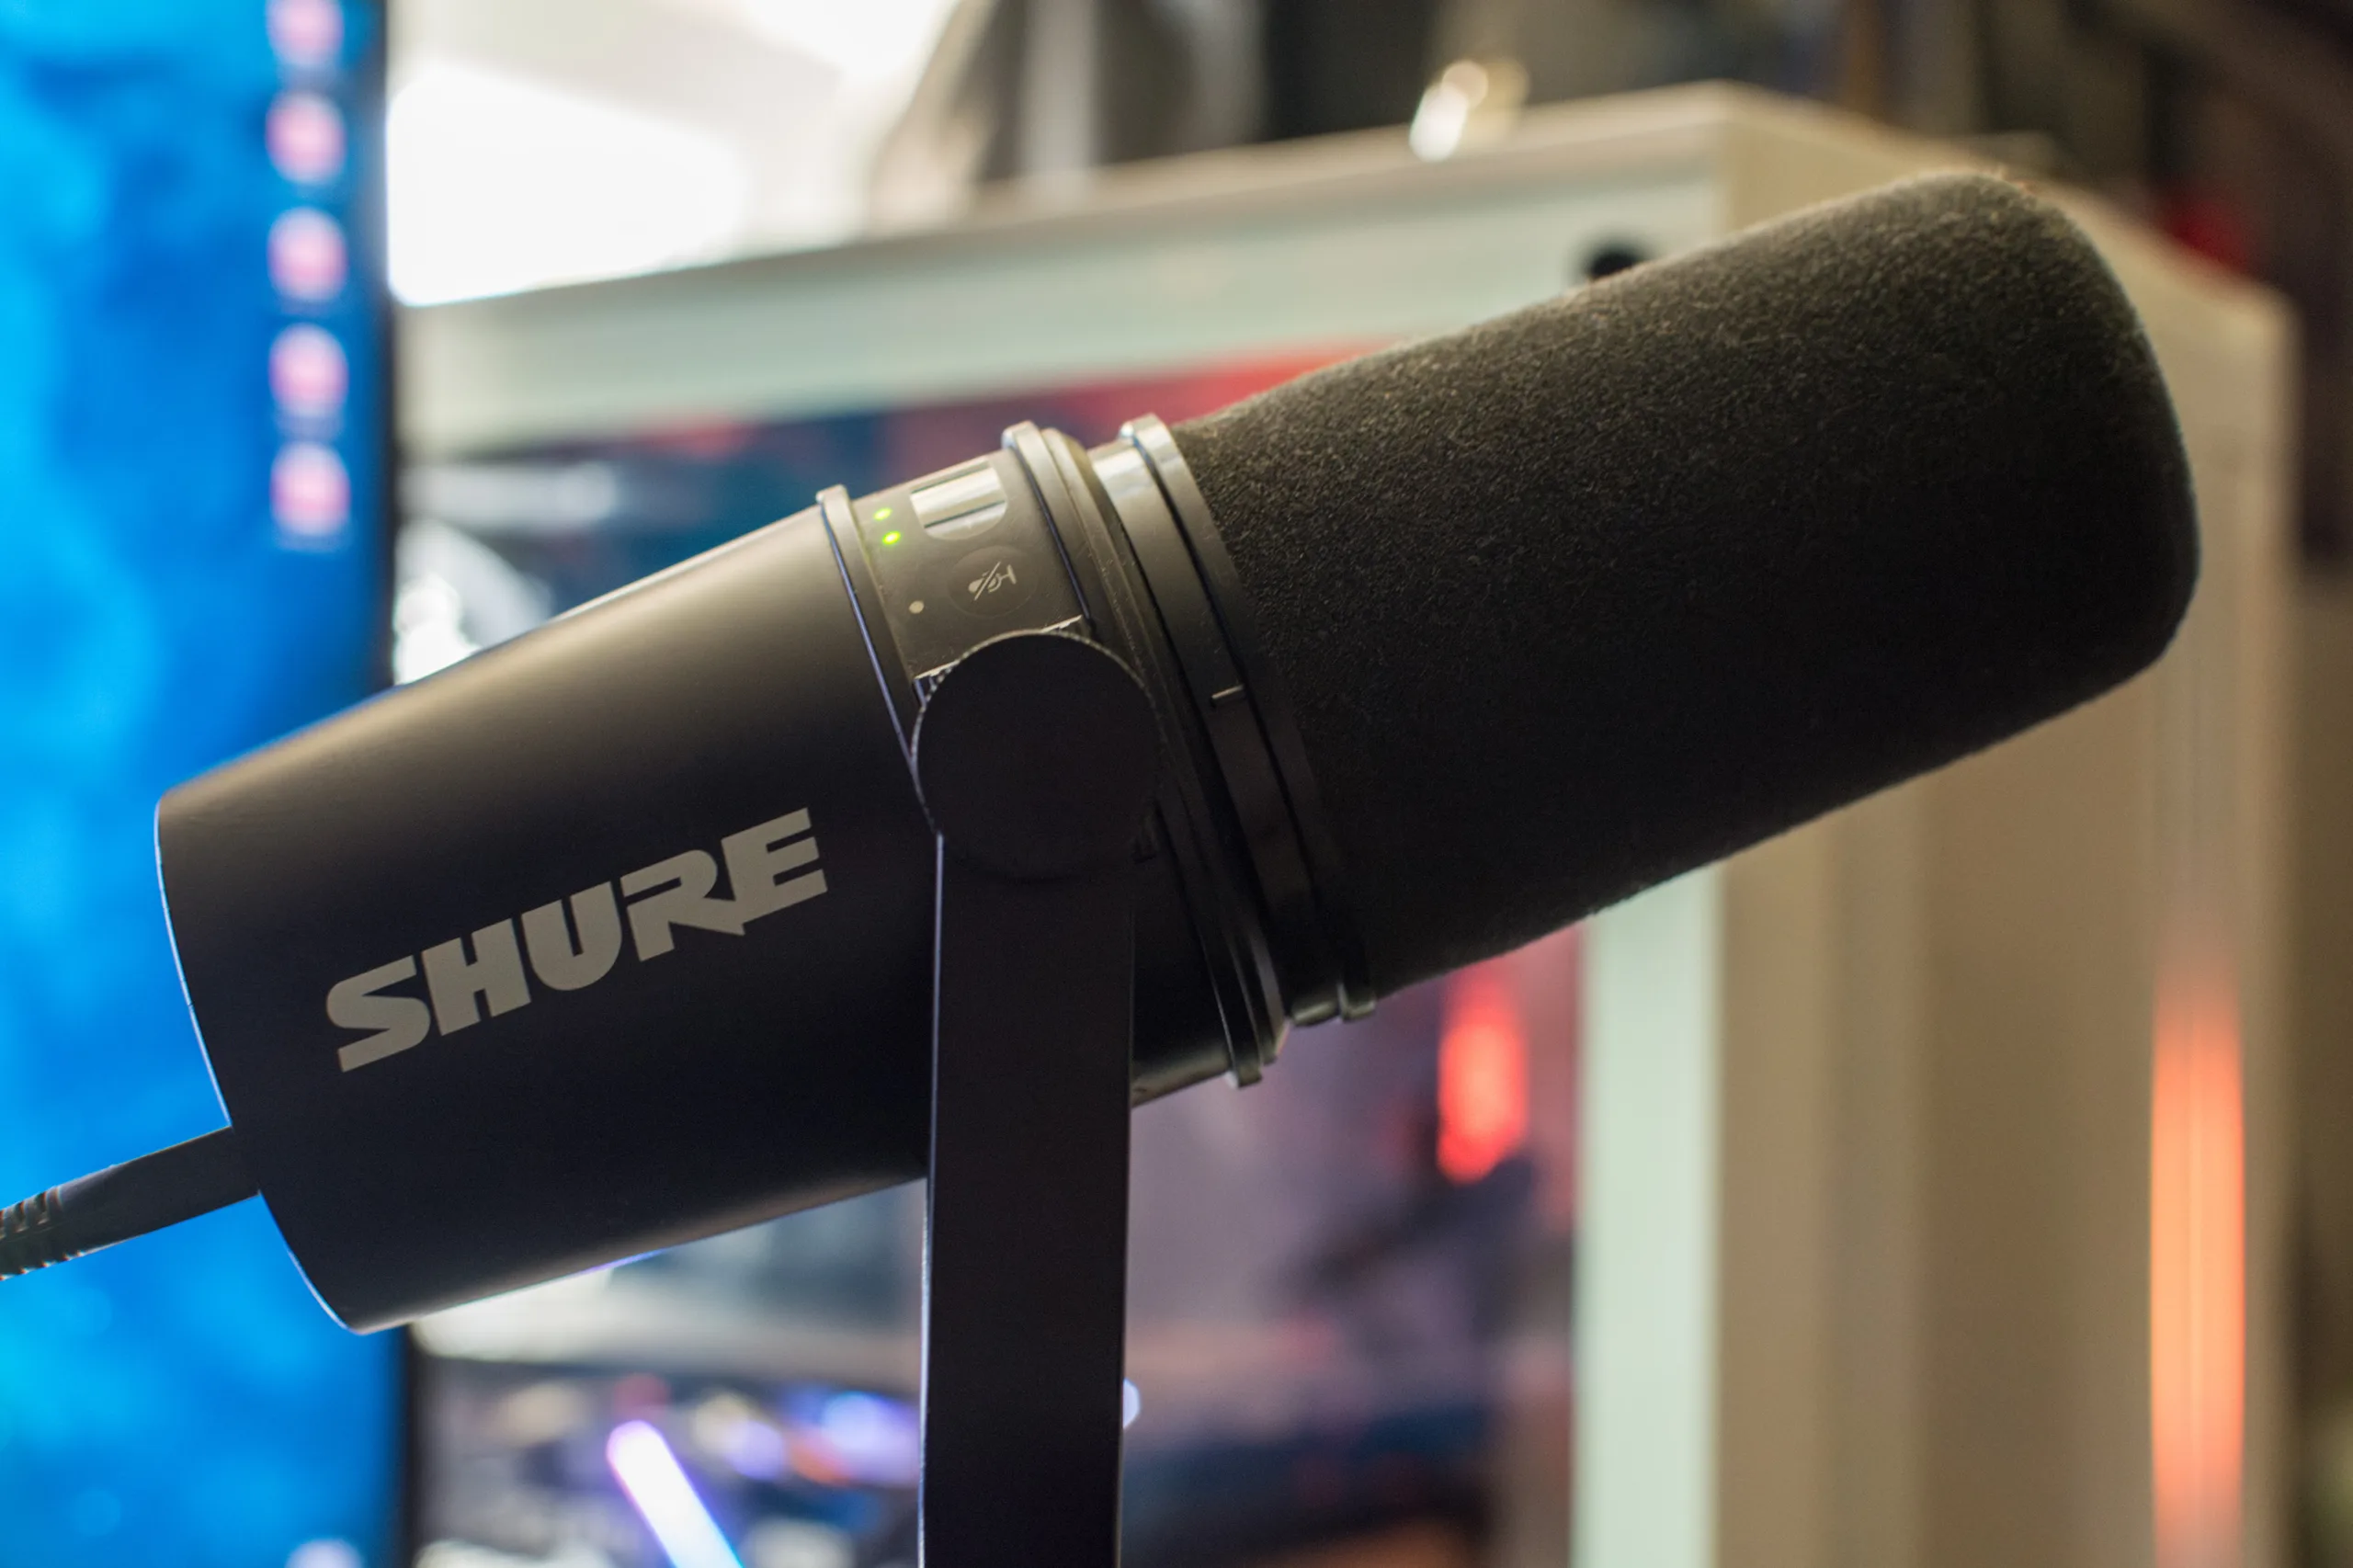
The design and build quality

At first glance, the MV7 looks like a professional microphone that has been built using the highest quality materials. Many components of the microphone, including the body and grille, are constructed from metal. This metal build not only enhances the microphone’s durability but also provides a premium feel. It features a matte finish that comes in dark and white colors, and the grille, made of durable metal mesh, serves to protect the microphone’s internal components.
Shure has placed its logo on both the right and left sides of the microphone’s body, and the touchscreen with all the controls is located just above the device. Behind it, you can find the micro-USB, XLR, and 3.5 mm Jack connections. What helped with the success of the Shure MV7 is probably the first feature: The USB connectivity – but more on that in a bit. End but not least, mounting the Shure MV7 to a boom arm or any desk stand is relatively straightforward.
The touch panel and body controls
If you’re like me, then you probably already want to test the touch panel that comes with the Shure MV7. When I saw it for the first time, I was pretty shure (see what I did there?) this was going to be the number one feature that I was probably going to use all the time. And man of man, I was so right!
In short, you can use the touch panel to increase or decrease the sound of the microphone and increase or decrease the mix control that sends the sound to the microphone and your headphones (if you connected them to the mic using the Jack 3.5mm connection). And while the touch panel is not so touch-sensitive as it seems, taking a couple of times to increase or decrease the sound and mix controls, it provides one specific and very important feature: To mute and unmute your microphone.
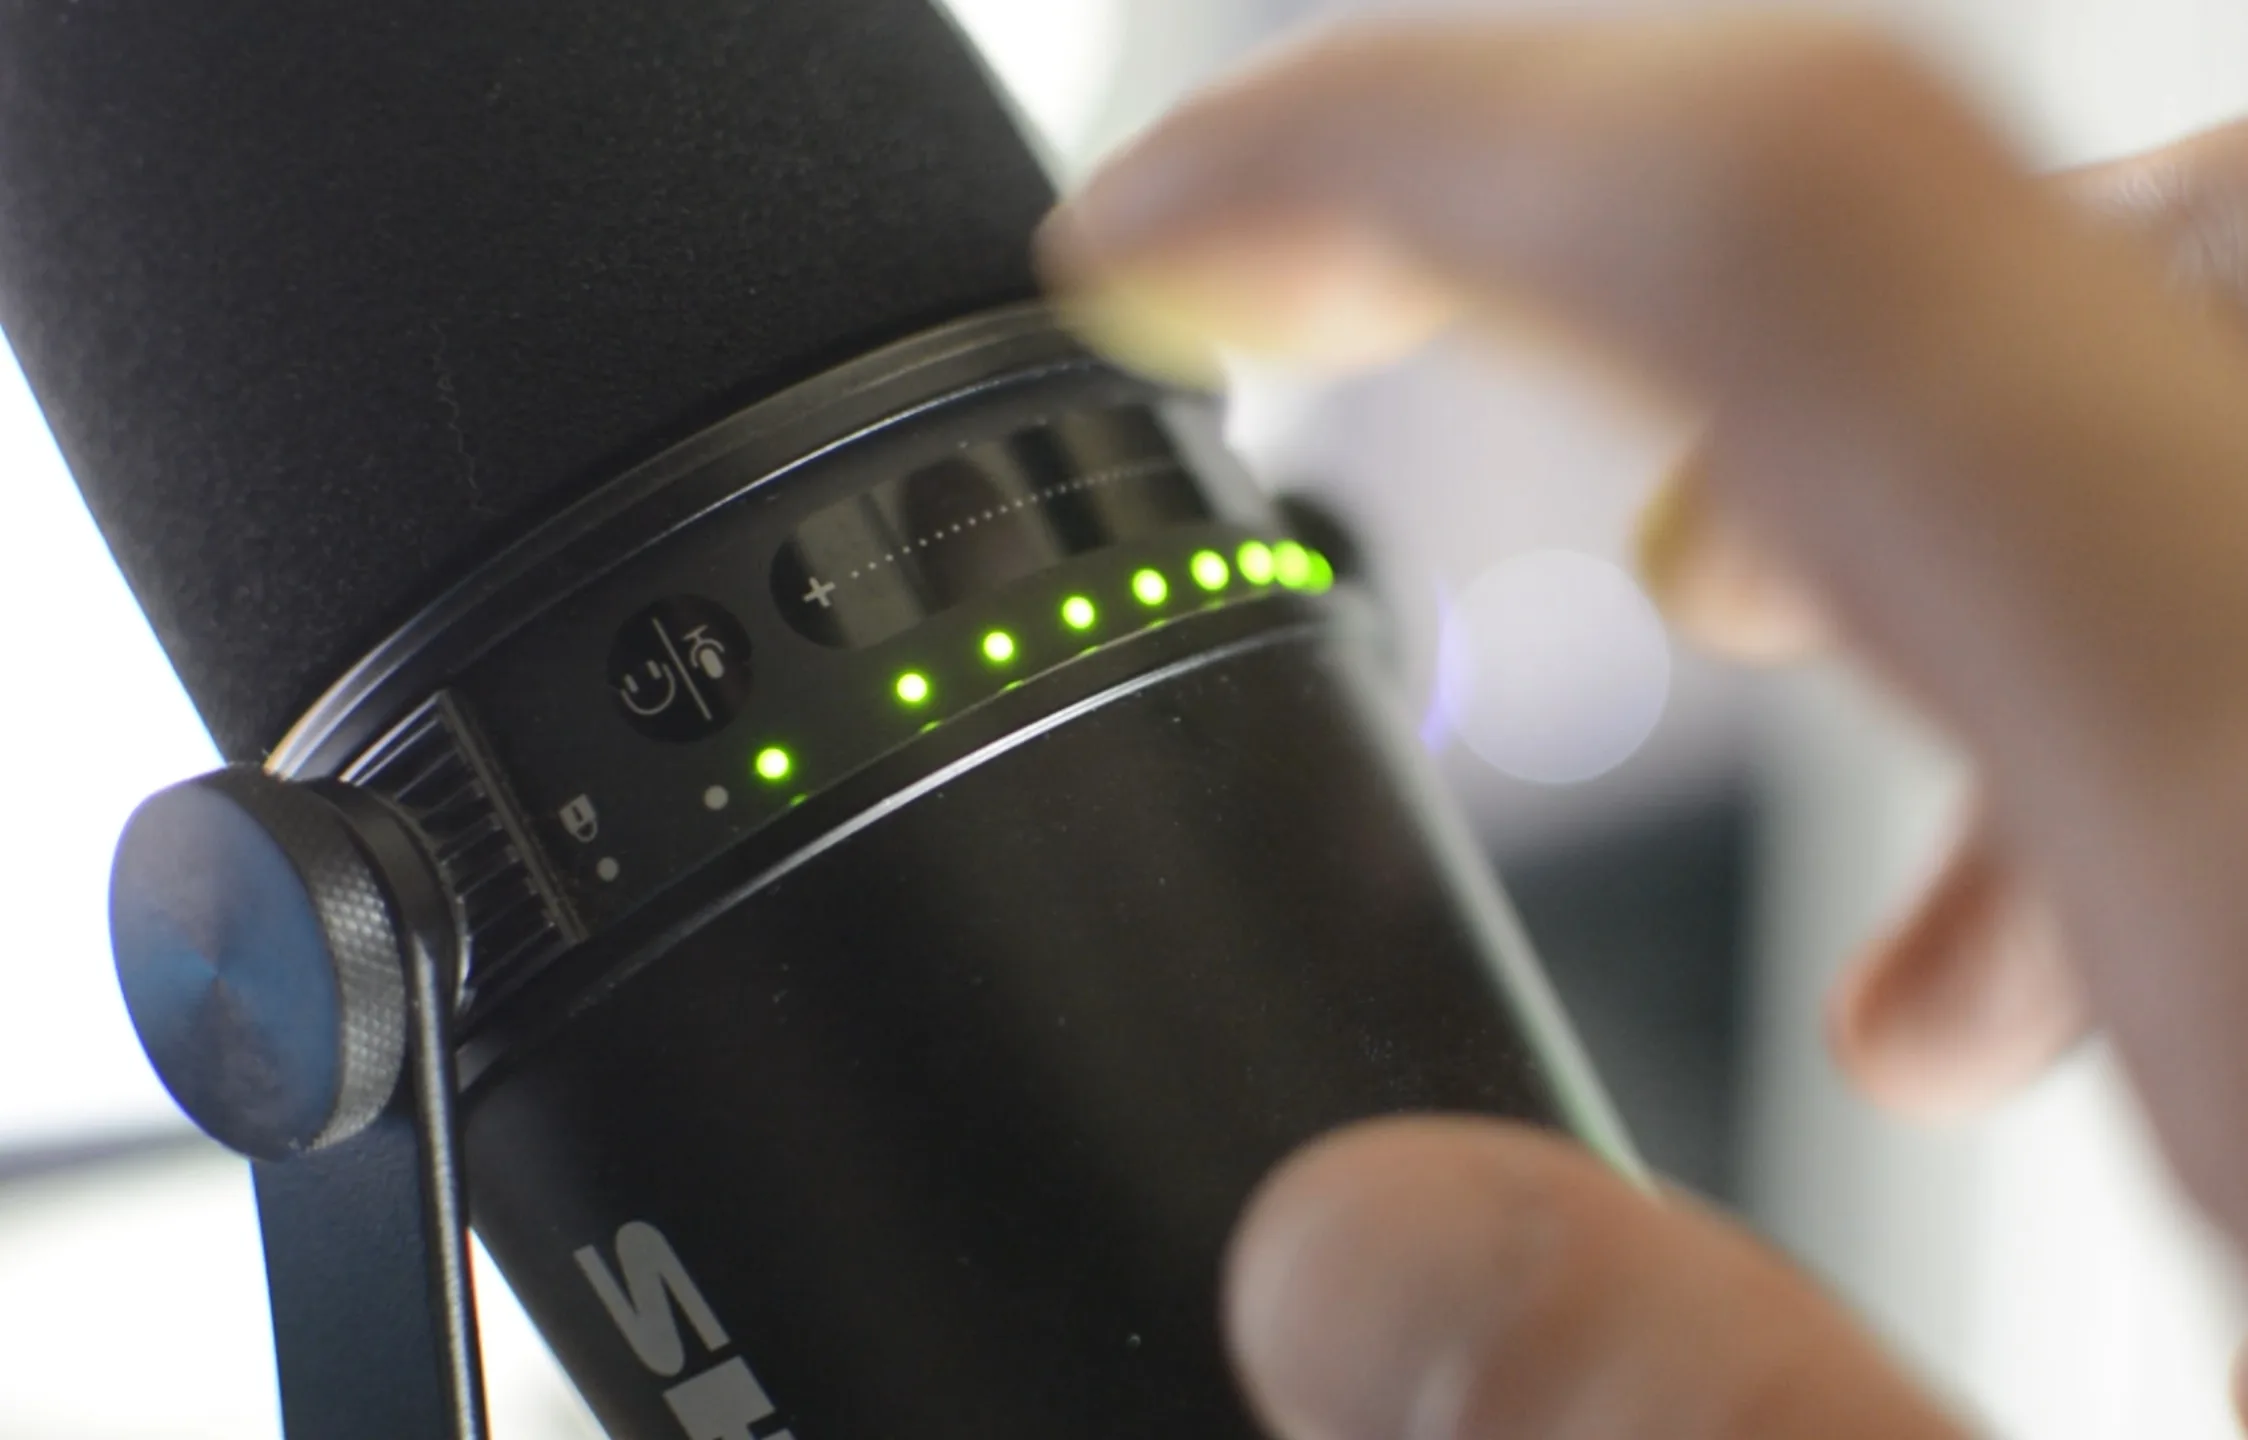
But why are the mute and unmute controls so important in the Shure MV7? You can – per se – mute and unmute any voice or video call with 1 click, using both the app itself and the operating system’s sound controls, so why is this important?
Well, in short, most applications I’ve used can’t detect when the microphone is muted.
That means you can mute and unmute your microphone without anyone noticing it, and you won’t see that little icon in the video call that tells everyone that your microphone is set to mute. Oh, and it only takes a touch to do it!
The micro-USB and XLR connectivity
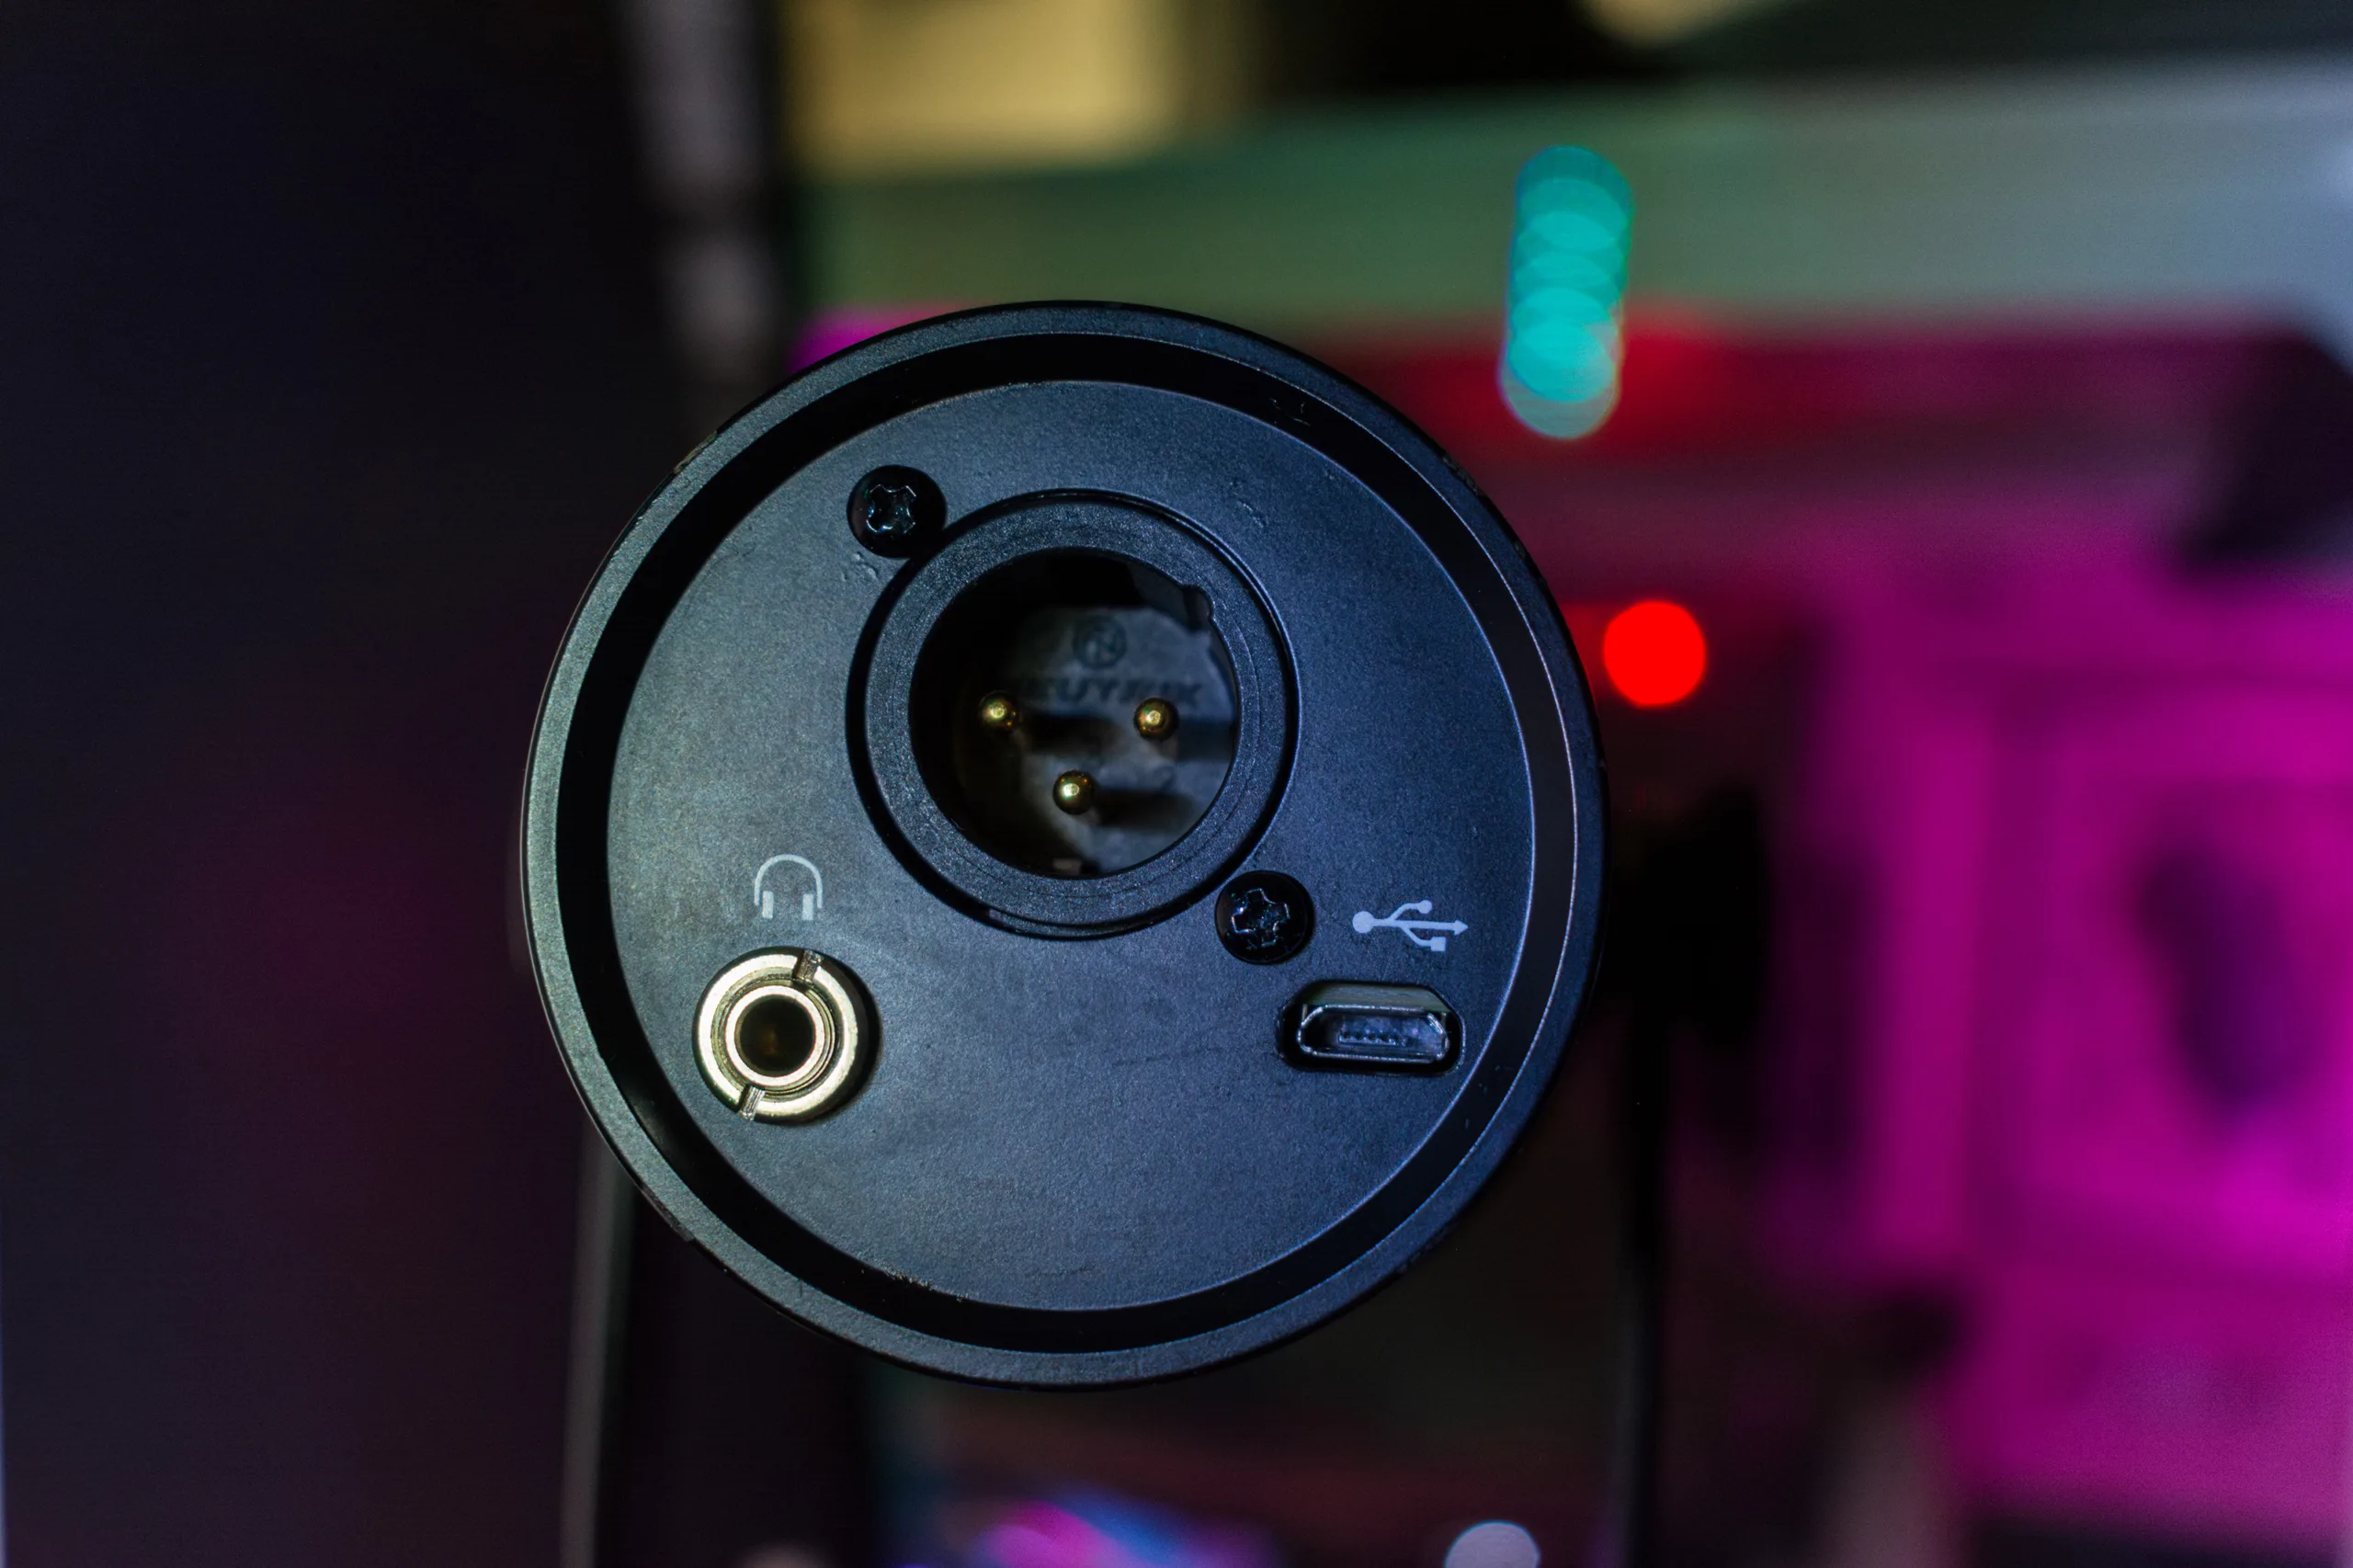
One of the best features of the Shure MV7 is the connectivity options. You can connect the microphone to your desktop PC, laptop, or even to your smartphone and start recording immediately and without taking any further steps. You won’t need to download any drivers, and it’s okay if you don’t have an Audio Card on your PC; it will still work fine.

I’ve actually tested the Shure MV7 USB connection on Windows, Manjaro Linux, and Android (using the Samsung Galaxy S20 Ultra with Android 15 and Samsung’s One UI 6.0), and it worked without any issues. I’ve also used it in various applications and audio editing software, including Adobe Audition, Audacity, Spotify for Podcasters (website), Skype, and WhatsApp, just to name a few. No problems whatsoever.
The connectivity options are very important for one reason and one reason only; You won’t need to spend more money to buy a signal converter or an audio interface to connect your XLR microphone. The micro-USB will take care of everything, making it a great option when it comes to podcasters who are just getting started.
MOTIV Mix App Review

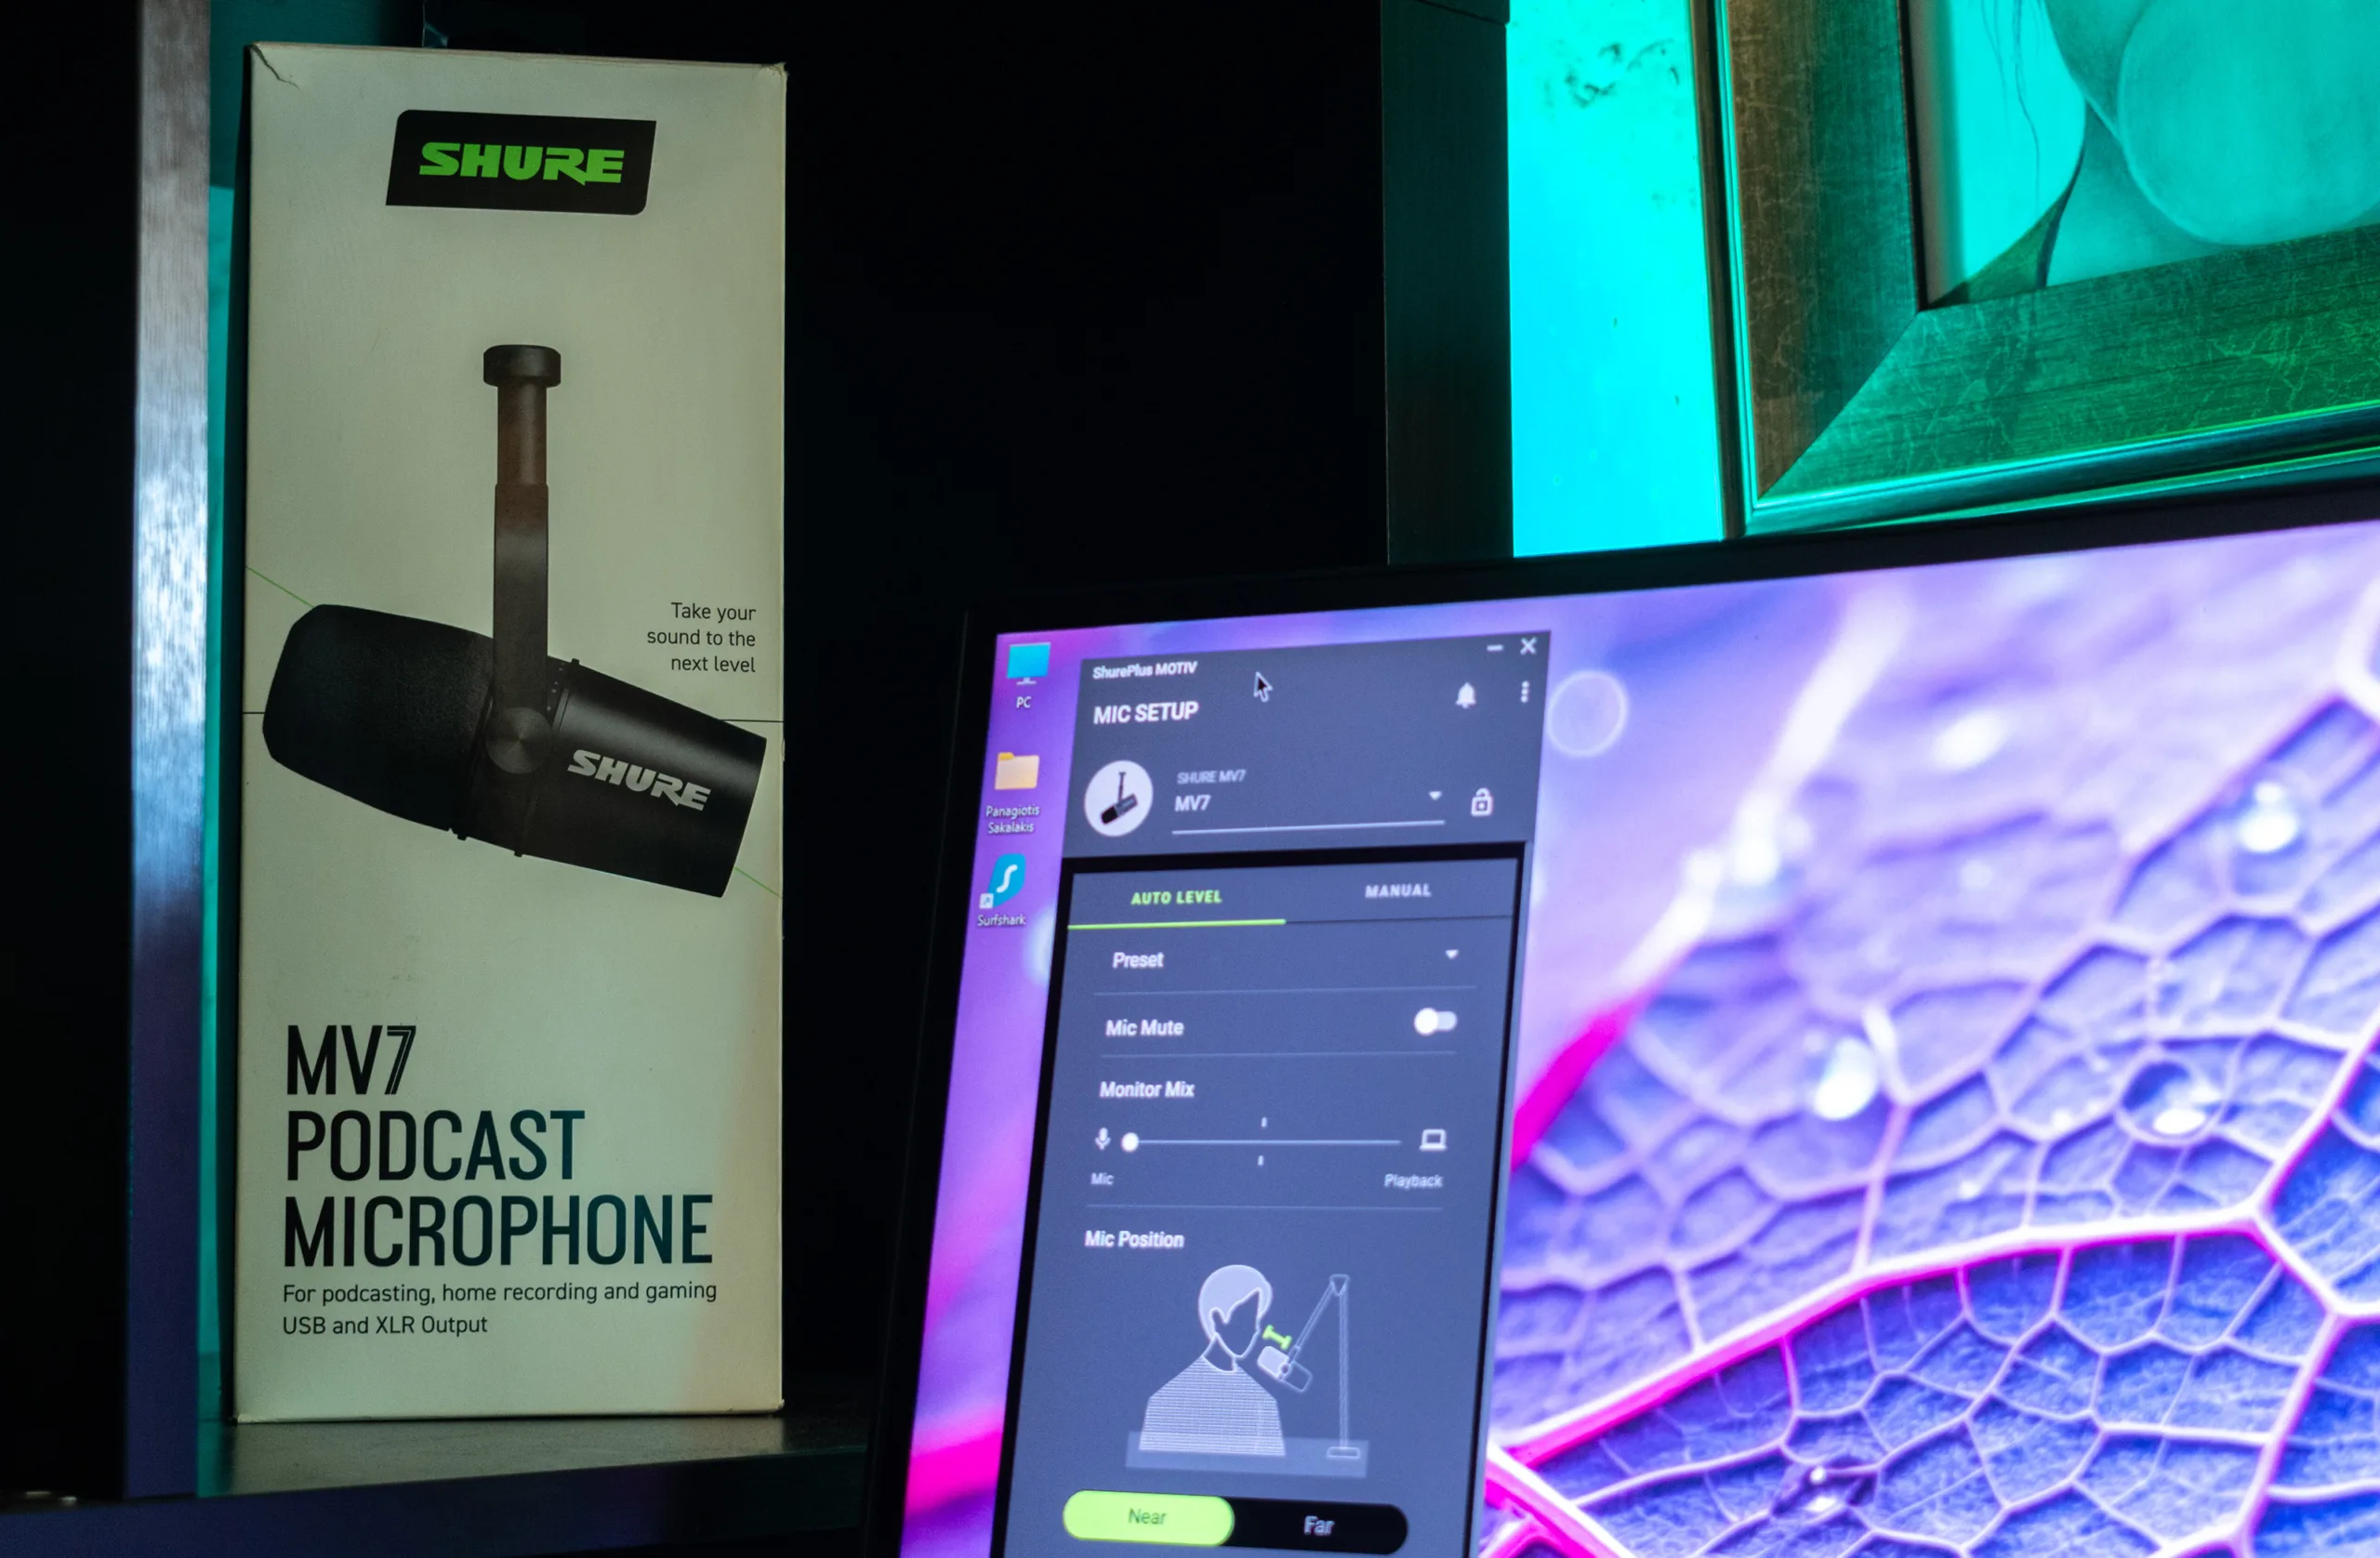
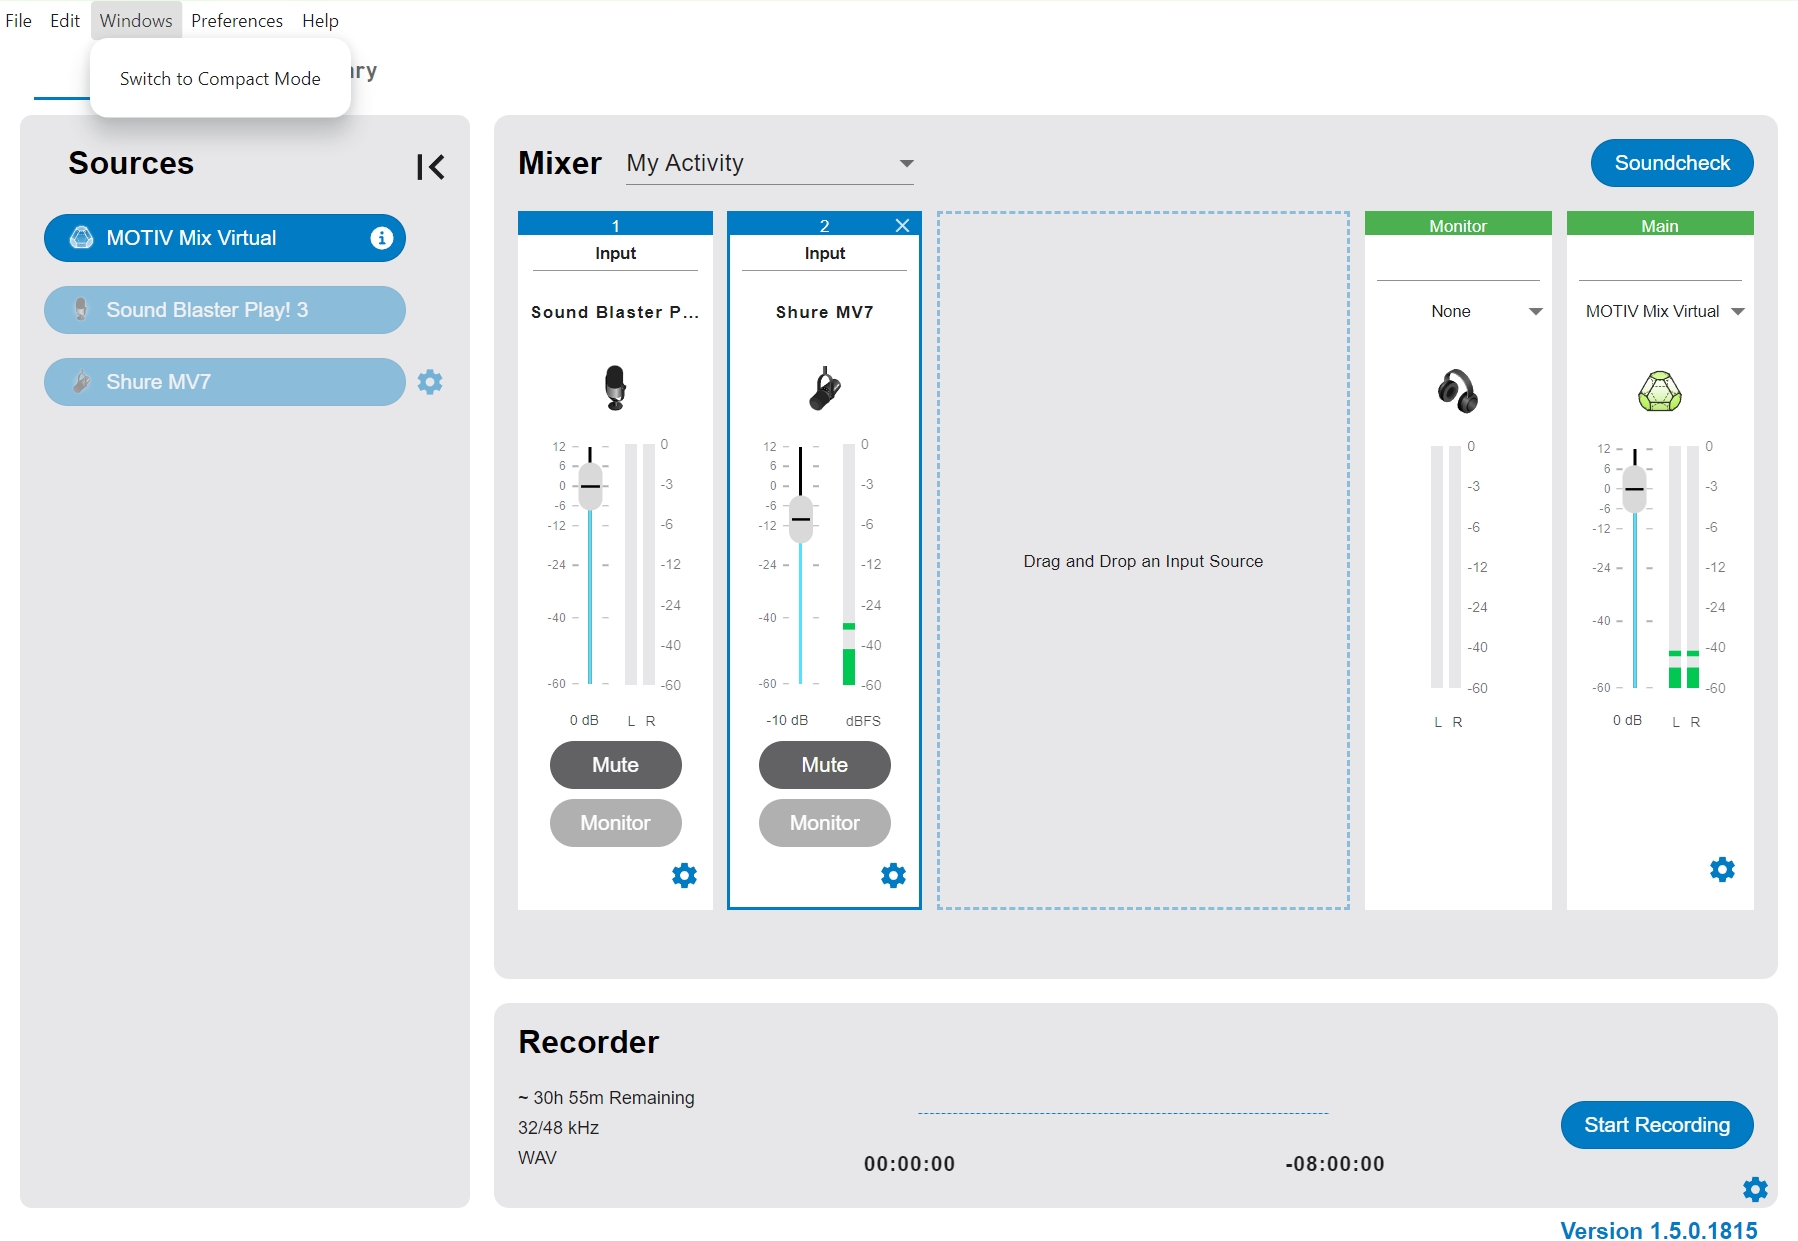
The MOTIV Mix is a companion application that is optional to use but provides a great set of different settings that can make your sound even better with a few clicks. There’s also the ShurePlus Video app, which you can use if you’re a vlogger.
What is the MOTIV Mix?
Available for Windows, Mac, iOS, and Android devices, this app offers a range of features that enhance the recording experience and provide more control over your recordings.
The app allows users to adjust microphone settings such as gain, EQ, compression, and limiter settings. It also provides access to the Digital Signal Processing (DSP) modes that optimize the microphone’s performance for different scenarios, such as speech, singing, acoustic instruments, or loud environments.
Unfortunately, and as you’ve probably already guessed, there’s no version of the MOTIV Mix for Linux, and while I was thinking of taking the chance to somehow install the Windows version on Manjaro, nothing works as well as a native application.
The most important features
The MOTIV Mix comes with two modes: The “Auto-Level” and the “Manual” modes, which make it easier for anyone to get started with Shure’s app.
The “Auto-Level” mode lets you select between “Near‘ and “Far“, depending on your current position and how close your lips are to the microphone. You can set the “Tone“, where “Dark” means a more radio-like voice, “Natural” has no filters, and you can set it to “Bright“, for people looking for a crystal clear voice with less bass.
In the manual section of the application, you have all those options, but you’ll have to set them manually. The Manual options are for people wanting to do more with their microphone, optimize their voice even deeper, and change the settings depending on the type of recording.
Creating your own presets
After you complete all the changes, you can save them and use them with a click of a button using the MOTIV Mix’s presets.
These presets simplify the process of achieving an ideal sound for specific recording situations, and you can create your own based on different scenarios, such as voice-overs, podcast recordings, video calls, and more. You can also change or set a new mode with just 1 click, making the user experience simple, fast, and easy for everyone.
Updating to the latest firmware update
But controls aren’t the only important reason you need to go, download, and install the MOTIV Mix app; You also get firmware updates! Yes, you hear that right, your Shure MV7 microphone will keep getting new firmware updates that bring new features, improvements, and better compatibility with the newer versions of your operating system.
Updating the MV7 using the MOTIV Mix is also pretty straightforward, as the application lets you update the device with a single click.
Editor’s Note
The MOTIV Mix is the newest release by Shure. Before, we had the “ShurePlus MOTIV” app, which was much simpler. Now, you get to choose between a fully minimalistic interface (like the old app was offering) or a studio-like interface with more options.
How to increase the sound volume of the Shure MV7
When a friend of mine used the Shure MV7 for the first time, she was left outstanding by the way the microphone worked and the quality that was provided in her recordings. She was trying to create a professional intro for her podcast channel and wanted her voice to sound as clear as possible. So I gave her my Shure MV7 to test it out and record whatever she needed.
When she recorded her first intro, she couldn’t hear her voice. It was like the volume of the microphone was automatically decreased for no apparent reason. After uploading the recording to Adobe Audition and increasing its volume, we immediately noticed background noise. That was a big issue because if you played her recording after listening to another creator’s recording, you had to increase your device volume to up to 30% just to hear her. So what happened?
Simply put, the Shure MV7 can generate a great and high-quality sound if your device is good enough. If you’re using a 10-year-old laptop, as my friend did, you’ll want to make a few tweaks, such as installing the MOTIV Mix app and adjusting your system’s settings. To get the best out of the Shure MV7 dynamic microphone, you can invest in a good audio interface so you can connect it with its XLR connection.
The first that you’ll need to do is make sure you have adjusted the microphone on the touch panel to have the highest volume possible. After that, you’ll have to check your operating system’s audio settings. In Windows 11, just right-click on the sound icon found in the right corner of the Windows taskbar, and select the “Sound Settings” option. Make sure the volume of the microphone in the “Input” section is set to the highest level. Sometimes Windows likes to decrease the microphone’s volume to a lower number, such as 70% or 80% respectively.
Last but not least, you may see a “Sample Rate Mismatch” error displayed at the bottom of the ShurePlus MOTIV app. If that’s the case, then you may experience very low and distorted frequency, as a pitch shift has happened. To fix that on Windows, you can follow the steps provided by Shure.
Upgrading the pop filter with a better one
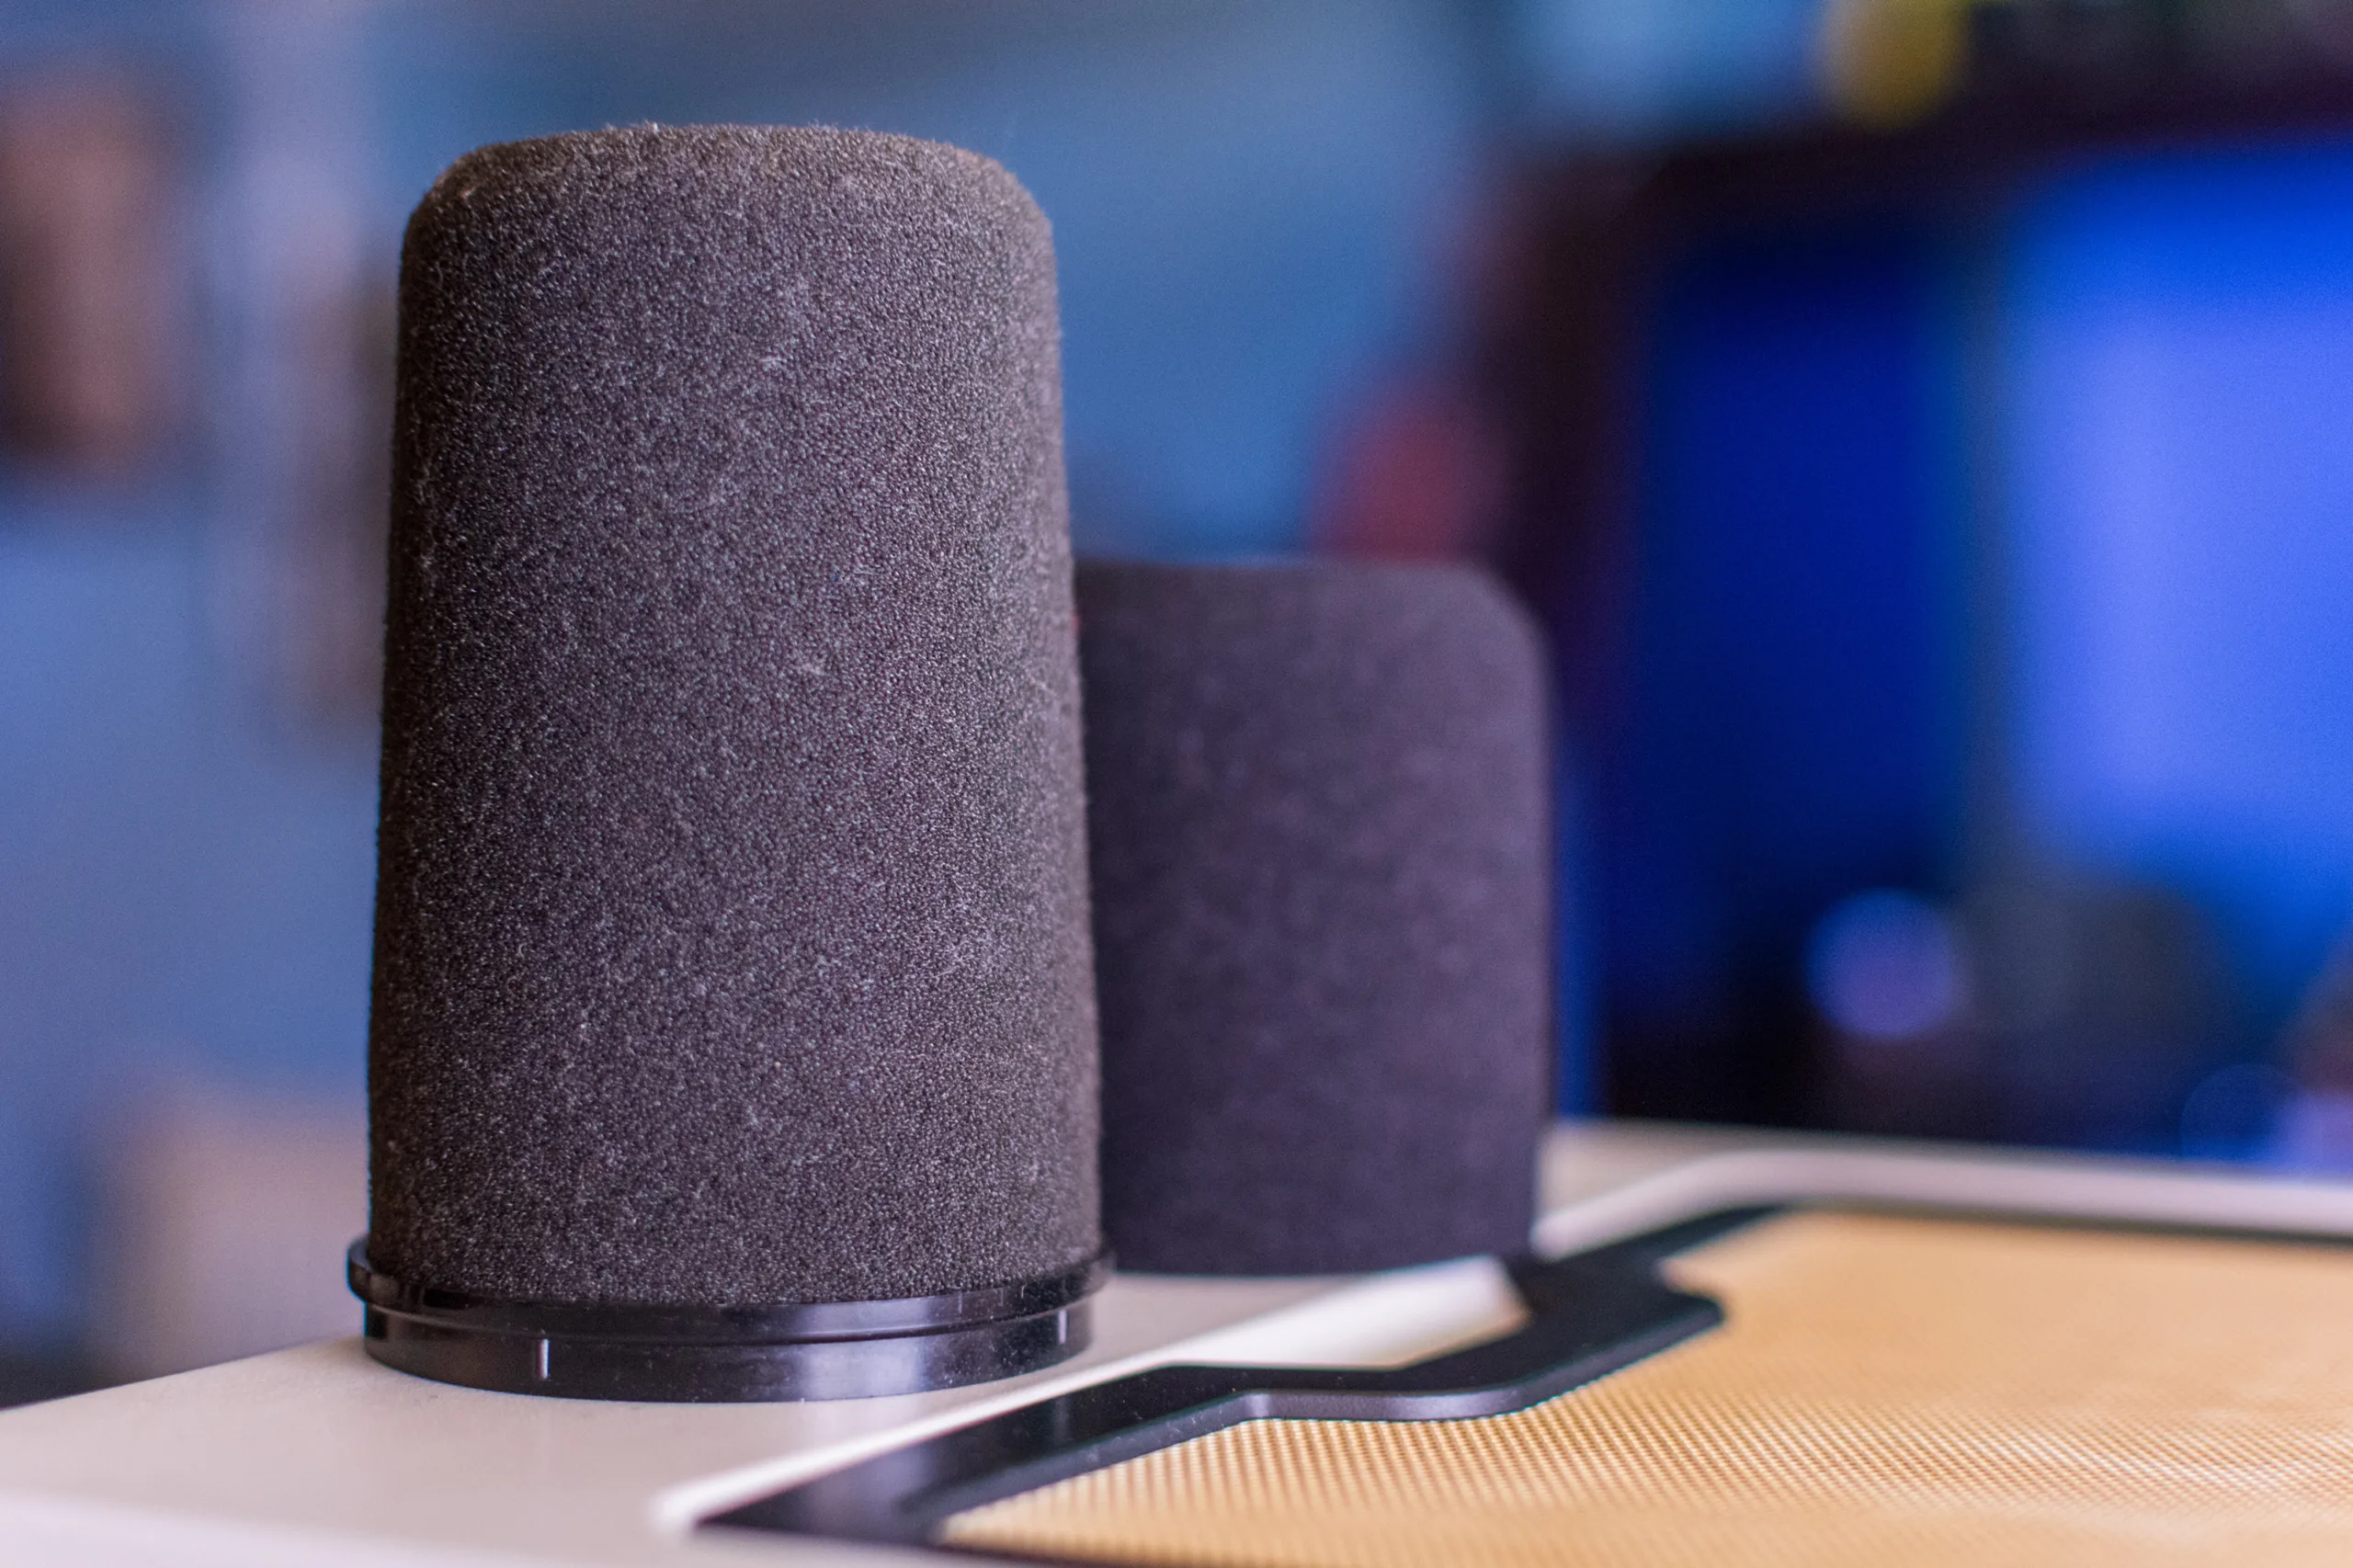
If you’ve already watched or read reviews about the Shure MV7, then you’ve probably already heard about its low-quality pop filter. The question is: Is it bad enough that you’ll need to spend more money for a better pop filter? Yes, yes it is.
The difference between the stock pop filter that comes with the MV7 and the one that comes with the oldest model, the SM7B, is night and day. So do yourself a favor and go grab the SM7B pop filter and upgrade your sound as simply as removing and inserting the new pop filter – links and recommendations can be found at the end of this review.
But let me help you better understand the difference between the stock pop filter and the pop filter that comes with the oldest SM7B microphone by comparing the two in a side-by-side recording comparison.
A simple recording with the stock pop filter that comes with the Shure MV7:
*Hi, this is Panos from TechWise Insider, and you are listening to a test recording I am doing so you can hear how the Shure MV7 sounds with its stock pop-filter.
A simple recording when using the SM7B’s pop filter in the Shure MV7:
*Hi, this is Panos from TechWise Insider, and you are listening to a test recording I am doing so you can hear how the Shure MV7 sounds with the SM7B’s pop-filter.
If you’re new to this and wondering what the hell you’ve just heard, let me help you a bit more: Listen carefully to the “booms” that can be heard during my speech. With the stock filter, we can clearly hear all the “booms” that come with my speech, and if I want to remove them, I have to place the microphone a little farther from my lips, without enabling the “Far” mode in the ShurePlus MOTIV app.
Now go to the second recording and listen to my voice again. You can see that most – if not all – of the “booms” are gone. The voice sounds better, clearer, and more professional, and I can adjust the microphone’s position closer to my mouth or have the “Far” mode enabled without causing any issues.
This also comes in handy when editing your recordings, because no one really wants to spend their time removing “booms” and “baams” and stuff like that from their recordings.
The Pros and Cons of the Shure MV7
My overall experience with the Shure MV7 as a whole is still a happy one. This isn’t just a simple microphone, but a very powerful one that you can use for all your professional projects, from podcasting, broadcasting, voice-overs, trailers, and sponsored ads to gaming and video calling. I’ve mostly used the MV7 for my podcast series with a desk stand and using Adobe Audition. I’ve also used it for many video calls and with OBS Studio every time I record my desktop screen.
I haven’t had any issues with updating or using the MV7 with any software that I’ve used it with, and it has had no problems connecting to any operating system. And while there’s no ShurePlus MOTIV version for Linux, which is no wonder as many companies still do not provide support for our lovely penguin, I had no issues in my recordings and video calls, and Manjaro is automatically detecting the mic in seconds.
Pros
- Supports both USB and XLR outputs for a “plug-and-play” experience.
- Has a built-in headphone output (Jack 3.5mm).
- Works great with some smartphones.
- You can install ShurePlus MOTIV for more controls, including adjusting the tone, gain, limiter, compressor, and EQ.
- It worked great in Windows 11, Linux, and Android in all of my tests.
Cons
- There’s no sock mount in the Shure MV7 that keeps any nocks or bumps if you hit the table accidentally, so you’ll have to purchase a high-quality boom stand such as the Gator Frameworks Deluxe Desk-Mount for broadcasting.
- The sensitivity on the MV7’s touch panel is not that great, often resulting in multiple finger swipes until you increase or decrease the microphone’s volume or monitor mix.
- The micro USB output is somewhat outdated, and the Lightning cable for iOS devices is sold separately. It would be better if it had a USB-C output instead.
- It also has a limited frequency response of 50Hz to 16kHz, and it’s not recommended for singers, as it lacks the warmth and richness of the oldest SM7B.
- The pop filter is not that great, and most users had to purchase the pop filter that comes with the oldest SM7B.
- There’s no version of the ShurePlus MOTIV app for Linux.
As you can see from the pros and cons, the Shure MV7 is a great and powerful microphone made for podcasters, voice-over creators, YouTubers, gamers, etc. But it also comes with its own disadvantages, such as the not-so-sensitive touch panel and the sock mount that keeps out of your recordings any nocks or bumps. It may also not be suitable for singers looking for a warmer and richer sound, and I won’t even get started with the choice of using a micro-USB and not USB-C.
Other than that, I wouldn’t have chosen another microphone for my podcasts and videos, and I am pretty happy with the way the MV7 works. It provides high-quality recordings, an easy way to adjust its settings with an almost cross-platform app, and having a micro-USB connection is a great way to easily connect and use the microphone in almost any device.
Get the most out of the Shure MV7: Best Upgrades & Equipment you can buy
If you’re up to grabbing the microphone today, or thinking of getting it but still looking for what’s available at this price range, it’s always good to know how much more money you will have to spend to get the most out of the Shure MV7, from the sound quality to investing in a reliable desk stand or arm boom.
You can find all my personal recommendations for the extra upgrades and equipment you can buy to make your life a whole lot easier, but please make sure to take your time and research every product listed below, and make sure it meets your needs.
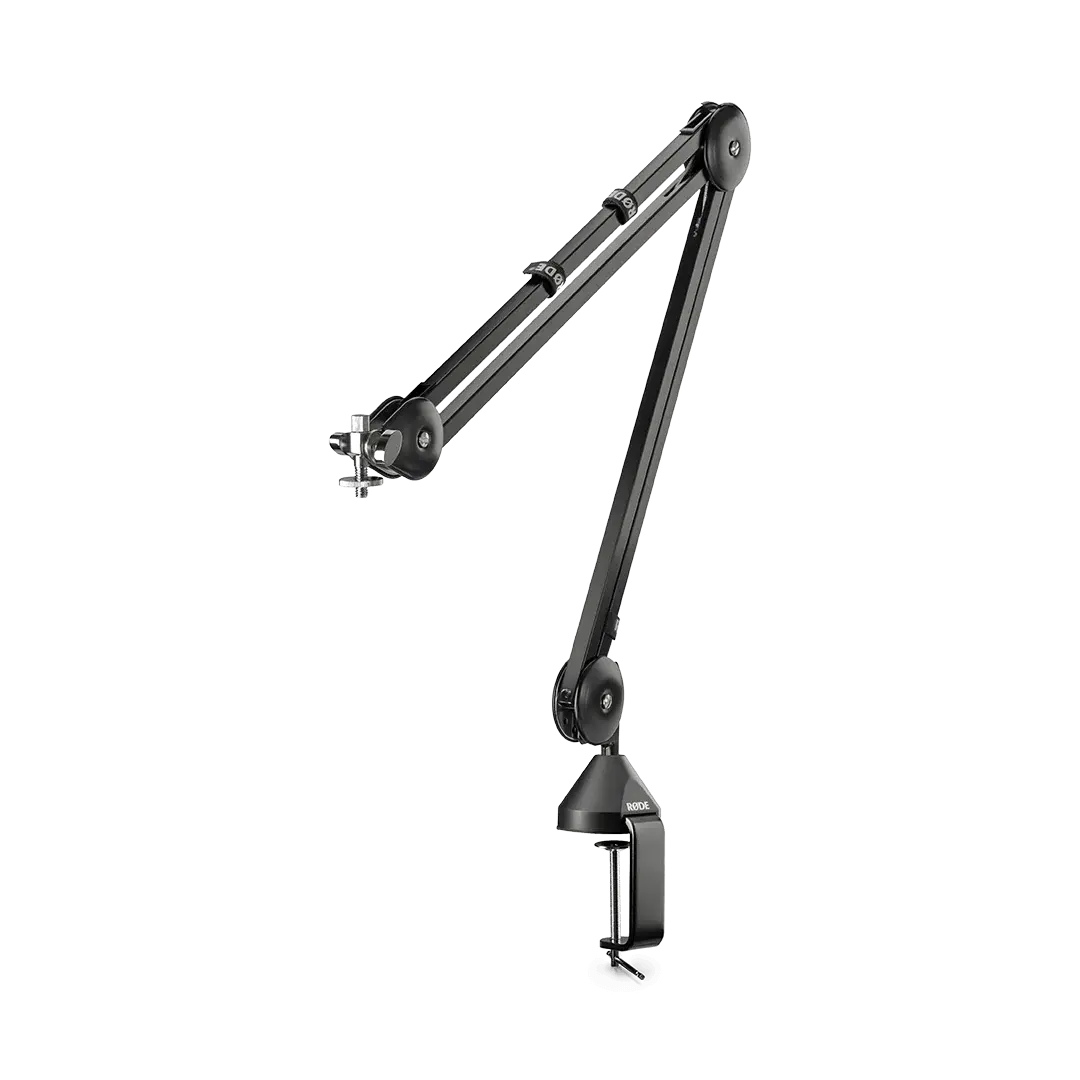
1. RØDE PSA1 – Best Arm Professional Studio Arm
The Rode PSA1 features an innovative parallelogram spring design for precise mic placement and ultra-smooth movement with 360-degree rotation, and it comes with damped springs for completely silent operation with superior isolation from keyboard, mouse, and desk noise with integrated cable management for both USB and XLR cables.
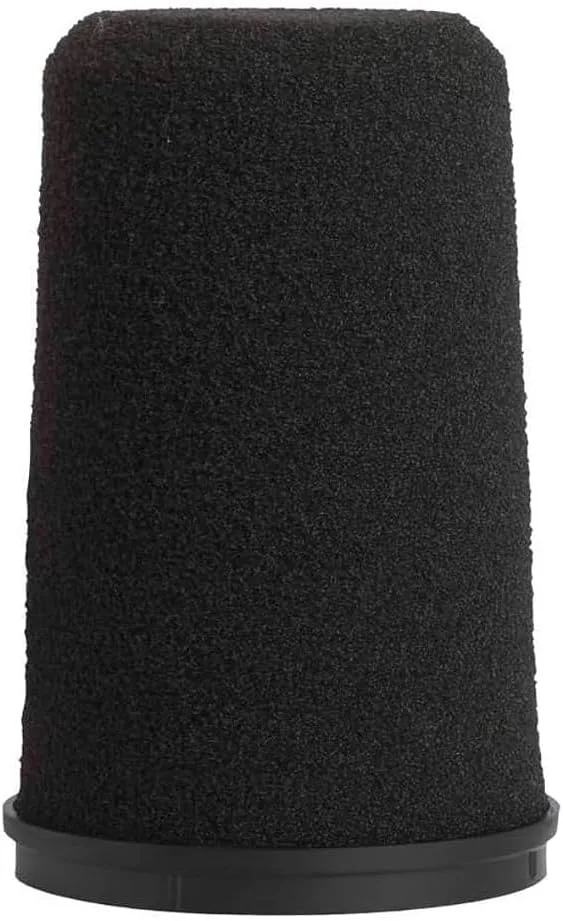
2. Best Windscreen for Shure MV7
By now, you already know that one of the disadvantages of the Shure MV7 is the windscreen (also known as ‘pop-filter’). The pop filter that is included with the MV7 is pretty bad for the price range of the microphone, but you can easily replace it with the Shure RK345 pop filter. You can grab one from Amazon for less than $20,00, and it will get rid of all the unwanted breath, wind noise, combating plosives, and clicks.
The description of the Shure RK345 pop filter doesn’t mention anything about compatibility with the MV7. They do mention that you can use the [RK345] pop-filter for the Shure’s SM7, SM7A, and SM7B microphones, but the MV7 is not presented in any description. And although that’s the case, it perfectly fits in the Shure MV7, so don’t be afraid to grab one and start recording. You will also find lots of people in the comments who are owners of the MV7 and are currently using the RK345 as a replacement.
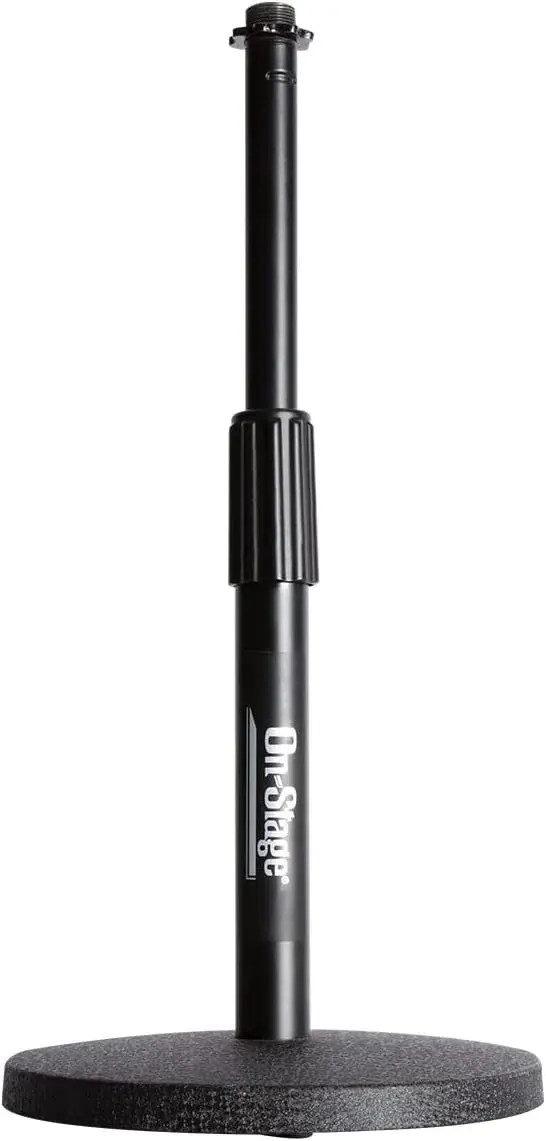
3. OnStage DS7200B – Best Desk Stand Shure MV7
Quick Tip: When I was traveling from Copenhagen, Denmark, to Göteborg, Sweden, I got stopped at the airport by security. The same happened while traveling from Sweden to Monaco Airport, where I also got stopped by security. Both times I was asked to remove the desk stand from my bag and place it in a different box (those where you put your stuff to get scanned by security). So bear in mind that you’ll have to remove the stand while moving from security.
Should you buy the Shure MV7?
“Should I buy the Shure MV7?“ Well, that depends on the kind of your recordings. If you’re looking for a professional microphone that can handle anything from podcasting, broadcasting, and voice-overs to gaming, video calls, and YouTube videos, the Shure MV7 is a powerful choice that will not disappoint.
But if you’re a singer looking for a warmer and clearer sound, it may be wise to look for another microphone.
My personal opinion? If you like what you hear, go and grab it. It’s a professional, great-looking, versatile, and micro USB/XLR microphone that you’ll be able to use in almost any PC (not caring about the operating system), probably in your smartphone, and it comes with a companion application [ShurePlus MOTIV] to adjust the sound with just a few clicks.
Have any questions about the Shure MV7? Don’t hesitate to leave your comment at the end of this review, and I’d be more than happy to reply ASAP! Already have the MV7? I’d love to know what your experience was with Shure’s dynamic microphone and if you faced any issues during your recordings!