
If you want to start a new WordPress site, whether it’s a blog, portfolio, business website, landing page, or an e-commerce store for the first time, chances are that you’re stuck at choosing a web hosting provider, a site to get your domain, how to configure all of that, and stuff that usually scare you away.
- Why we’re choosing Hostinger
- Why Choose WordPress Over Other Platforms?
- What Exactly Are Web Hosting Platforms And Do I Need Them?
- How to create a WordPress site with Hostinger in 13 steps
- Visit Hostinger
- Choose a plan
- Verify your new account
- Start configuring your Hostinger account
- Skip Hostinger’s next steps
- Get a new domain name
- Enable Hostinger’s CDN (optional)
- Install WordPress
- Create a WordPress admin account
- LiteSpeed & Object Cache, SSL Certificate, and HTTPS
- Visit your new WordPress website and access the login page
- Login to WordPress as an admin
- Enjoy WordPress!
- Where to find free and premium WordPress themes
- Frequently Asked Questions
I’ve been working as a web developer for over 17 years now, mostly building websites upon WordPress, and I’ve purchased countless web hosting plans, VPS and dedicated servers, and nowadays, cloud plans. I’ve also written many times in the past about the easiest, fastests, and most affordable ways to start a WordPress site.
In this guide, we’ll be doing exactly that, but with Hostinger, one of the most popular hosting providers at this moment, and known for giving one of the best first-time offerings.
Why we’re choosing Hostinger
One of the best things that I like most about Hostinger is the interface they’ve built over all those years. Although it wasn’t perfect at first, it’s not a highly recommended choice for beginners who’ve never built a site with WordPress before.
There are multiple reasons why I like the way they’ve built everything, but the best one? Providing a quick and painless automated tool that simply lets you choose a domain name, install WordPress, and access your admin account within minutes.
Hostinger is also known for giving some of the best offers and coupon codes, especially for their new clients. Don’t rush away to get a plan before looking at their offers, discounts, and coupon codes, which they often update and release new ones.
On the technical side of things, they offer a technology that’s called “LiteSpeed“, and they automated it using the “LiteSpeed Cache” plugin for WordPress. That means, in simpler words, that once your WordPress site has been installed, the company also automatically installs and configures the plugin to optimize your site for faster loading speeds.
Why Choose WordPress Over Other Platforms?
There are plenty of options when it comes to building a website without touching a single line of code, from using a website builder like Squarespace or Wix to a CMS platform like WordPress or a blogging and newsletter platform like Ghost. You can also use (just don’t) AI-based builders, but good luck with that.
If hiring a professional isn’t in your plans, doing it by yourself should be easy, fast, and painless. Now, if you want something simple, then sure, go ahead and use whatever works for you. But if you need a more complex website, full freedom, and ultimate control over everything, then WordPress is a one-stop solution.
You can build blogs, portfolios, e-commerce stores, business websites, landing pages, online course selling sites, charity sites, donation pages, or even a whole forum or community with members, topics, badges, and so much more.
What makes WordPress truly awesome and powerful it’s its own community. There are thousands upon thousands of available free and premium themes to design your site, plugins to extend its functionality, patterns and blocks to make your life easier, tutorials and solutions for almost any problem you may face, and a huge community along with a forum to ask for your help.
What Exactly Are Web Hosting Platforms And Do I Need Them?
Web Hosting platforms (providers) are simply companies that offer their own customized servers that you can rent and use to run your websites. Most of them offer optimized WordPress plans, typically called “Managed WordPress” or “WordPress Hosting”, which let you automatically install and configure WordPress.
Each hosting provider is different. Some are cheaper, others have faster servers, some luck proper support, others offer more options, and the list goes on and on.
For a new and small WordPress site, the only thing that you need to start as cheaply as possible is a shared or managed hosting plan that’s optimized specifically for WordPress. They’re usually fairly affordable, starting from $7,00 per month, but you can get a way better offer as a new client most of the time (as we’ll see in a bit).
How to create a WordPress site with Hostinger in 13 steps
Hostinger has made the whole process of getting a web hosting plan, along with a domain name and installing WordPress, easy, fast, and truly painless. Just select a web hosting plan, complete the registration and payment, choose a domain name, install WordPress, and login as an admin to your new site.
-
Visit Hostinger
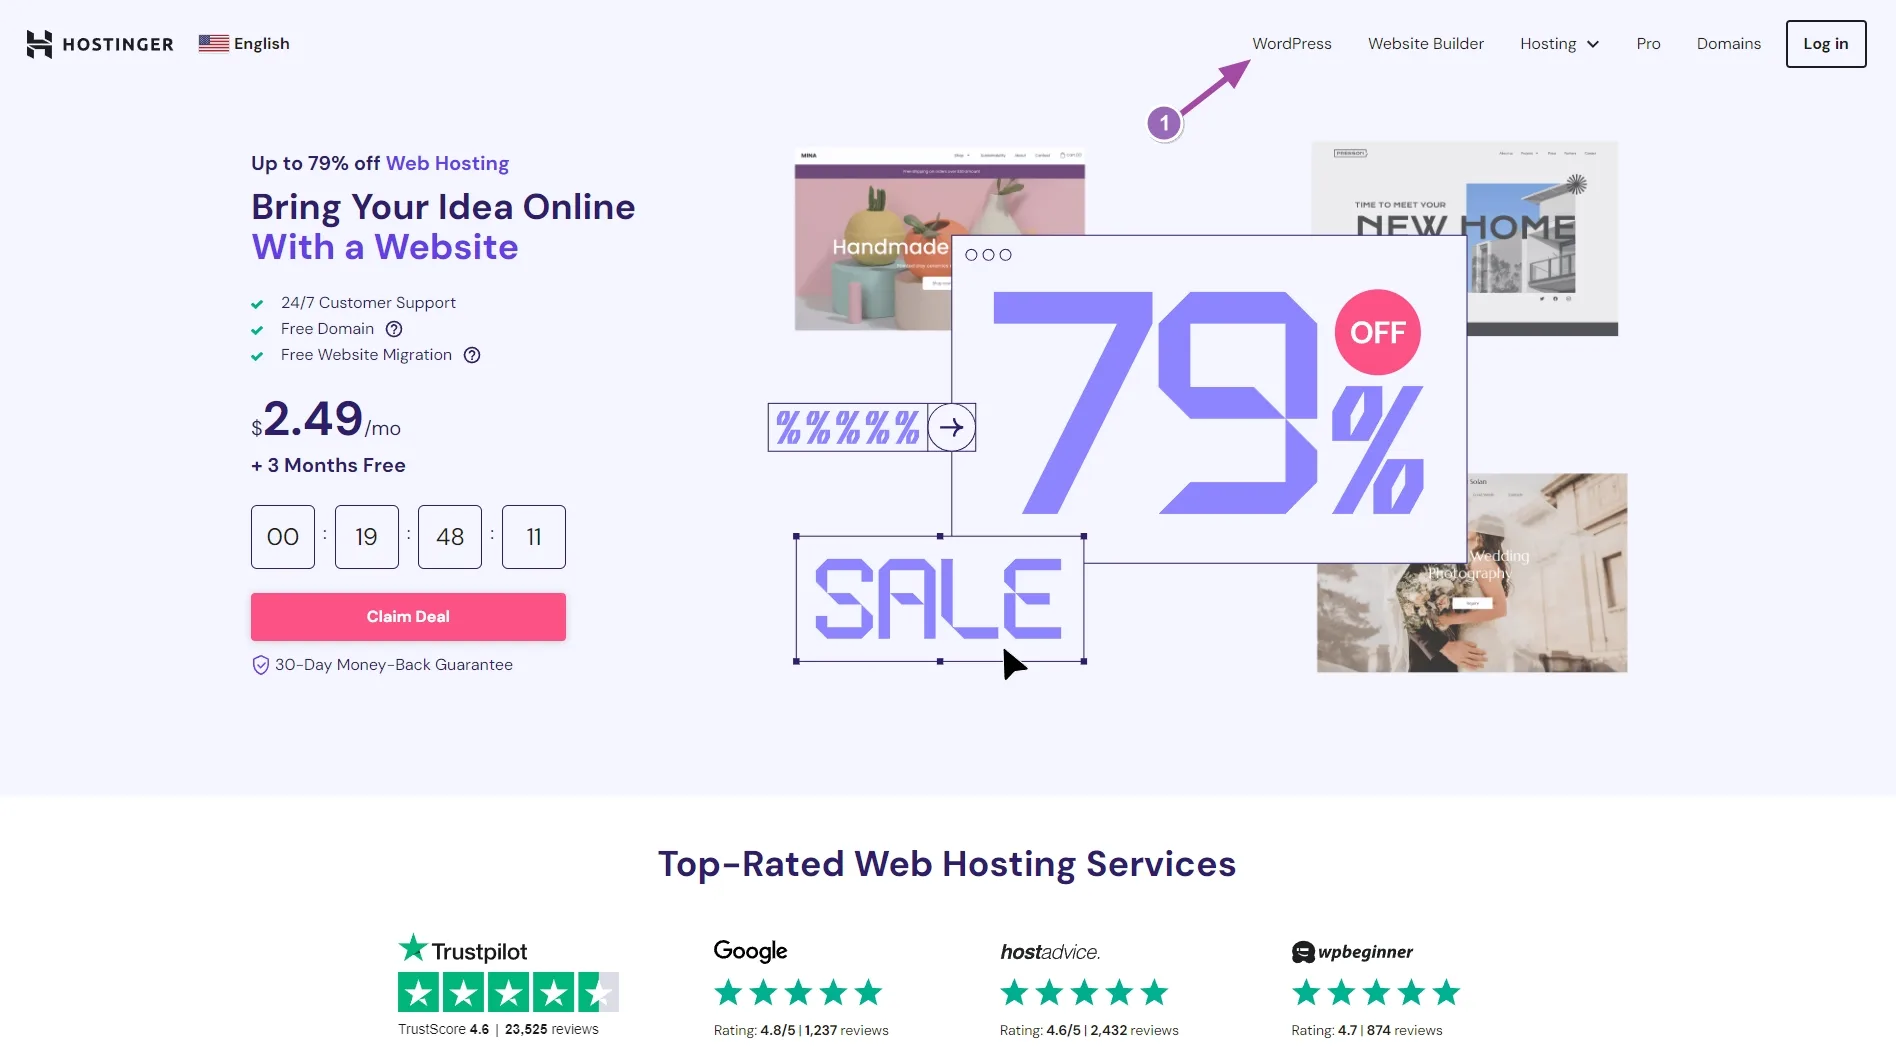
Head over to Hostinger.com and from the top menu select “WordPress“.
-
Choose a plan
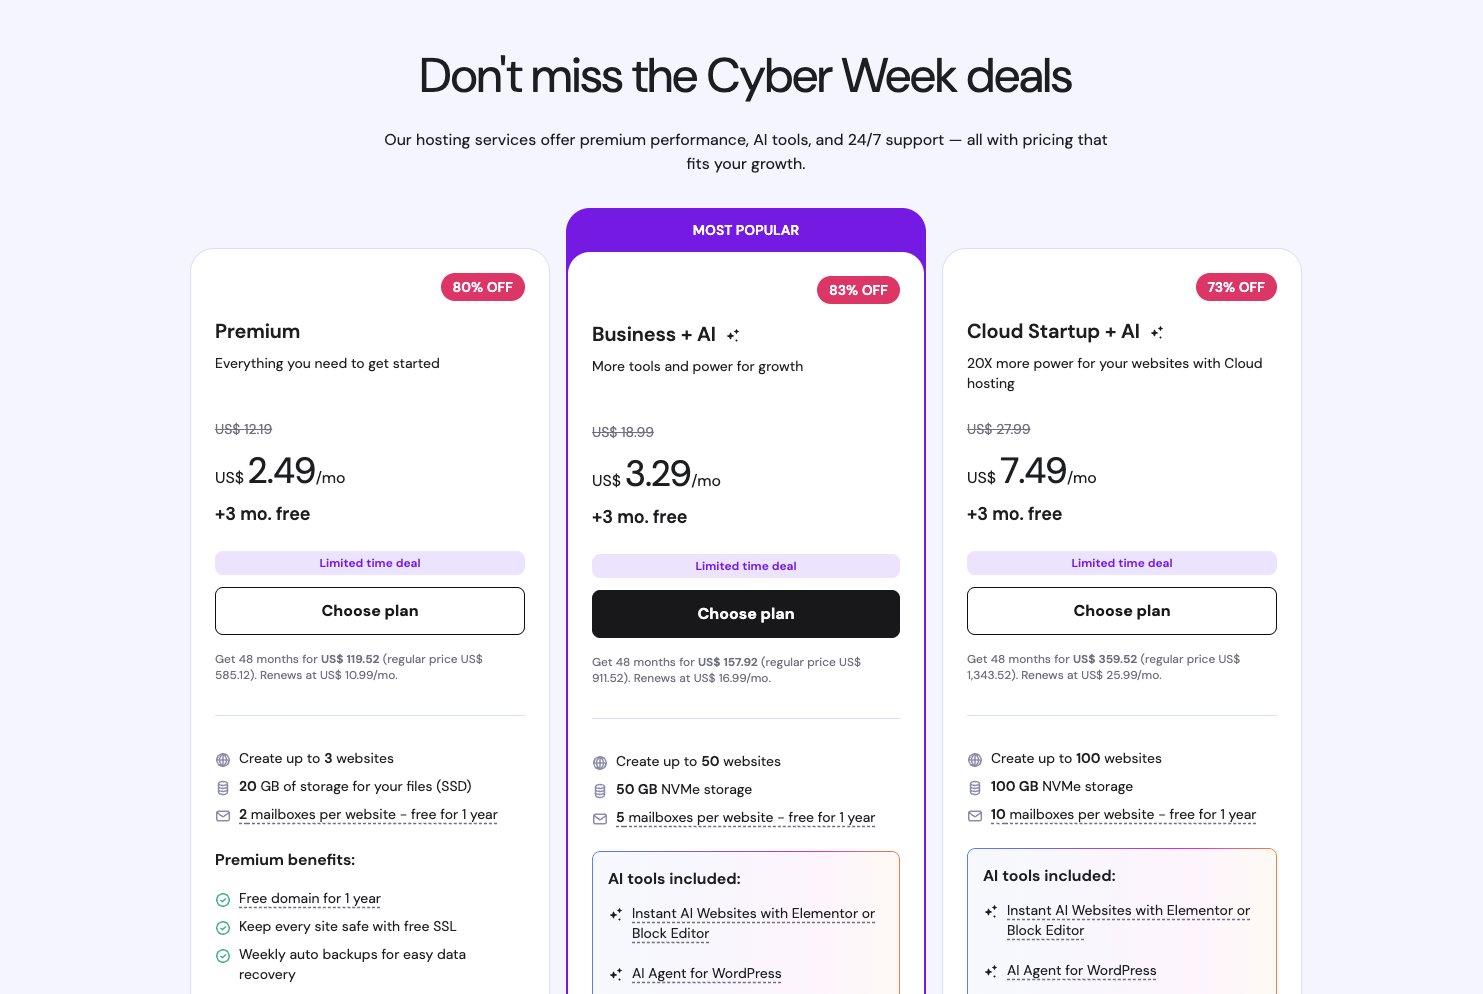
Scroll down until you see Hostinger’s three basic WordPress Hosting plans. Choose one of the plans by clicking on the “Add to card” button (I’ll go with the second one that includes a domain name), and complete the registration and payment.
-
Verify your new account
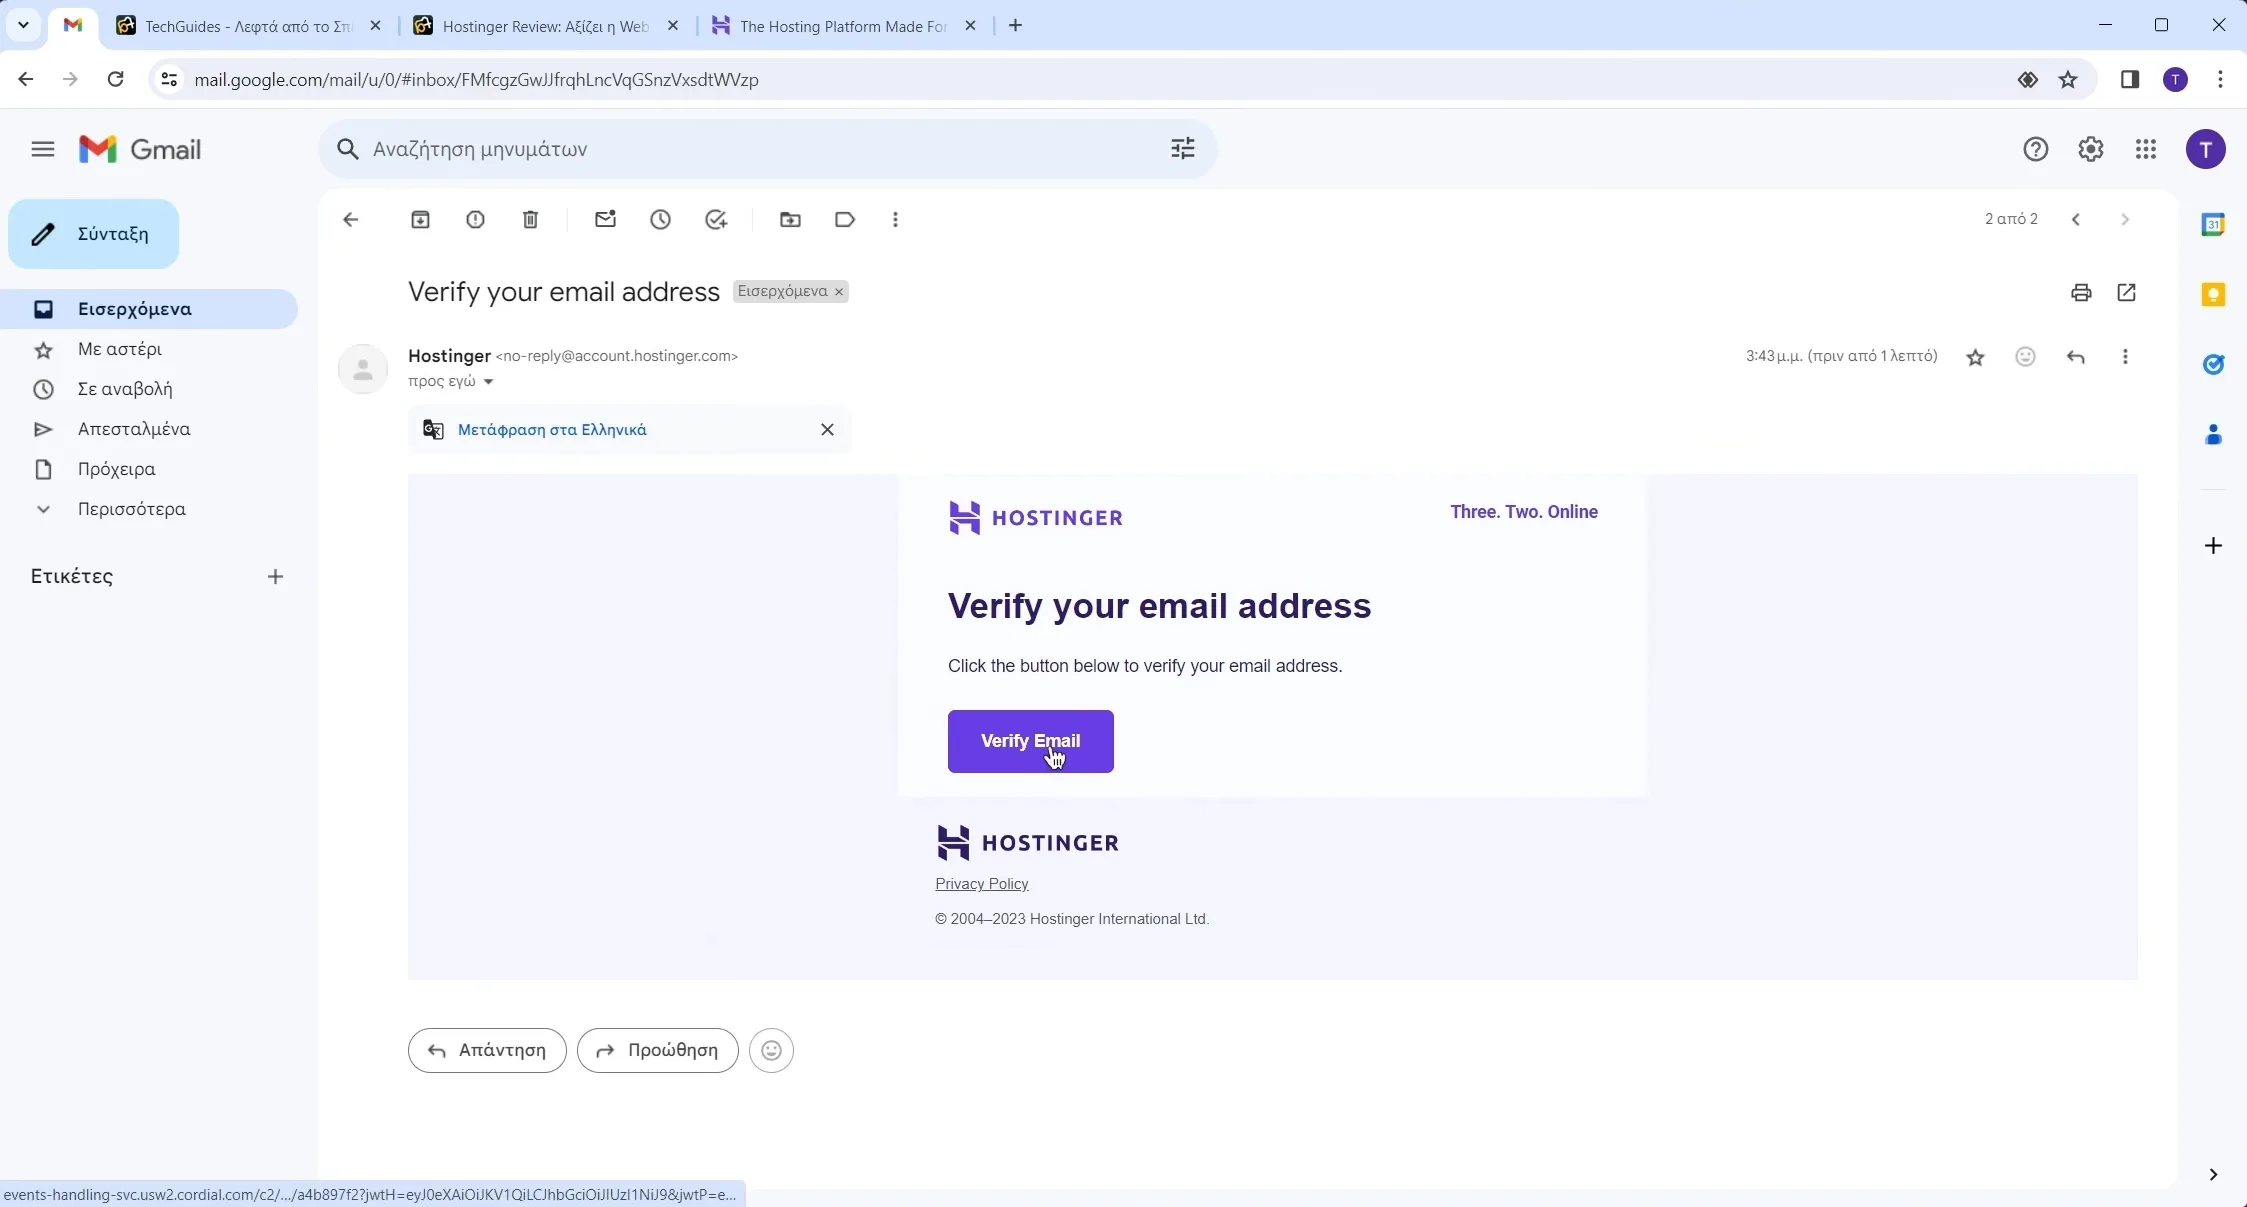
A few seconds later, Hostinger will send you a few emails, and one of them is for completing your account’s verification. Click on the “Verify Email” button (or right-click and copy the URL address if it’s not working) to complete the verification.
-
Start configuring your Hostinger account
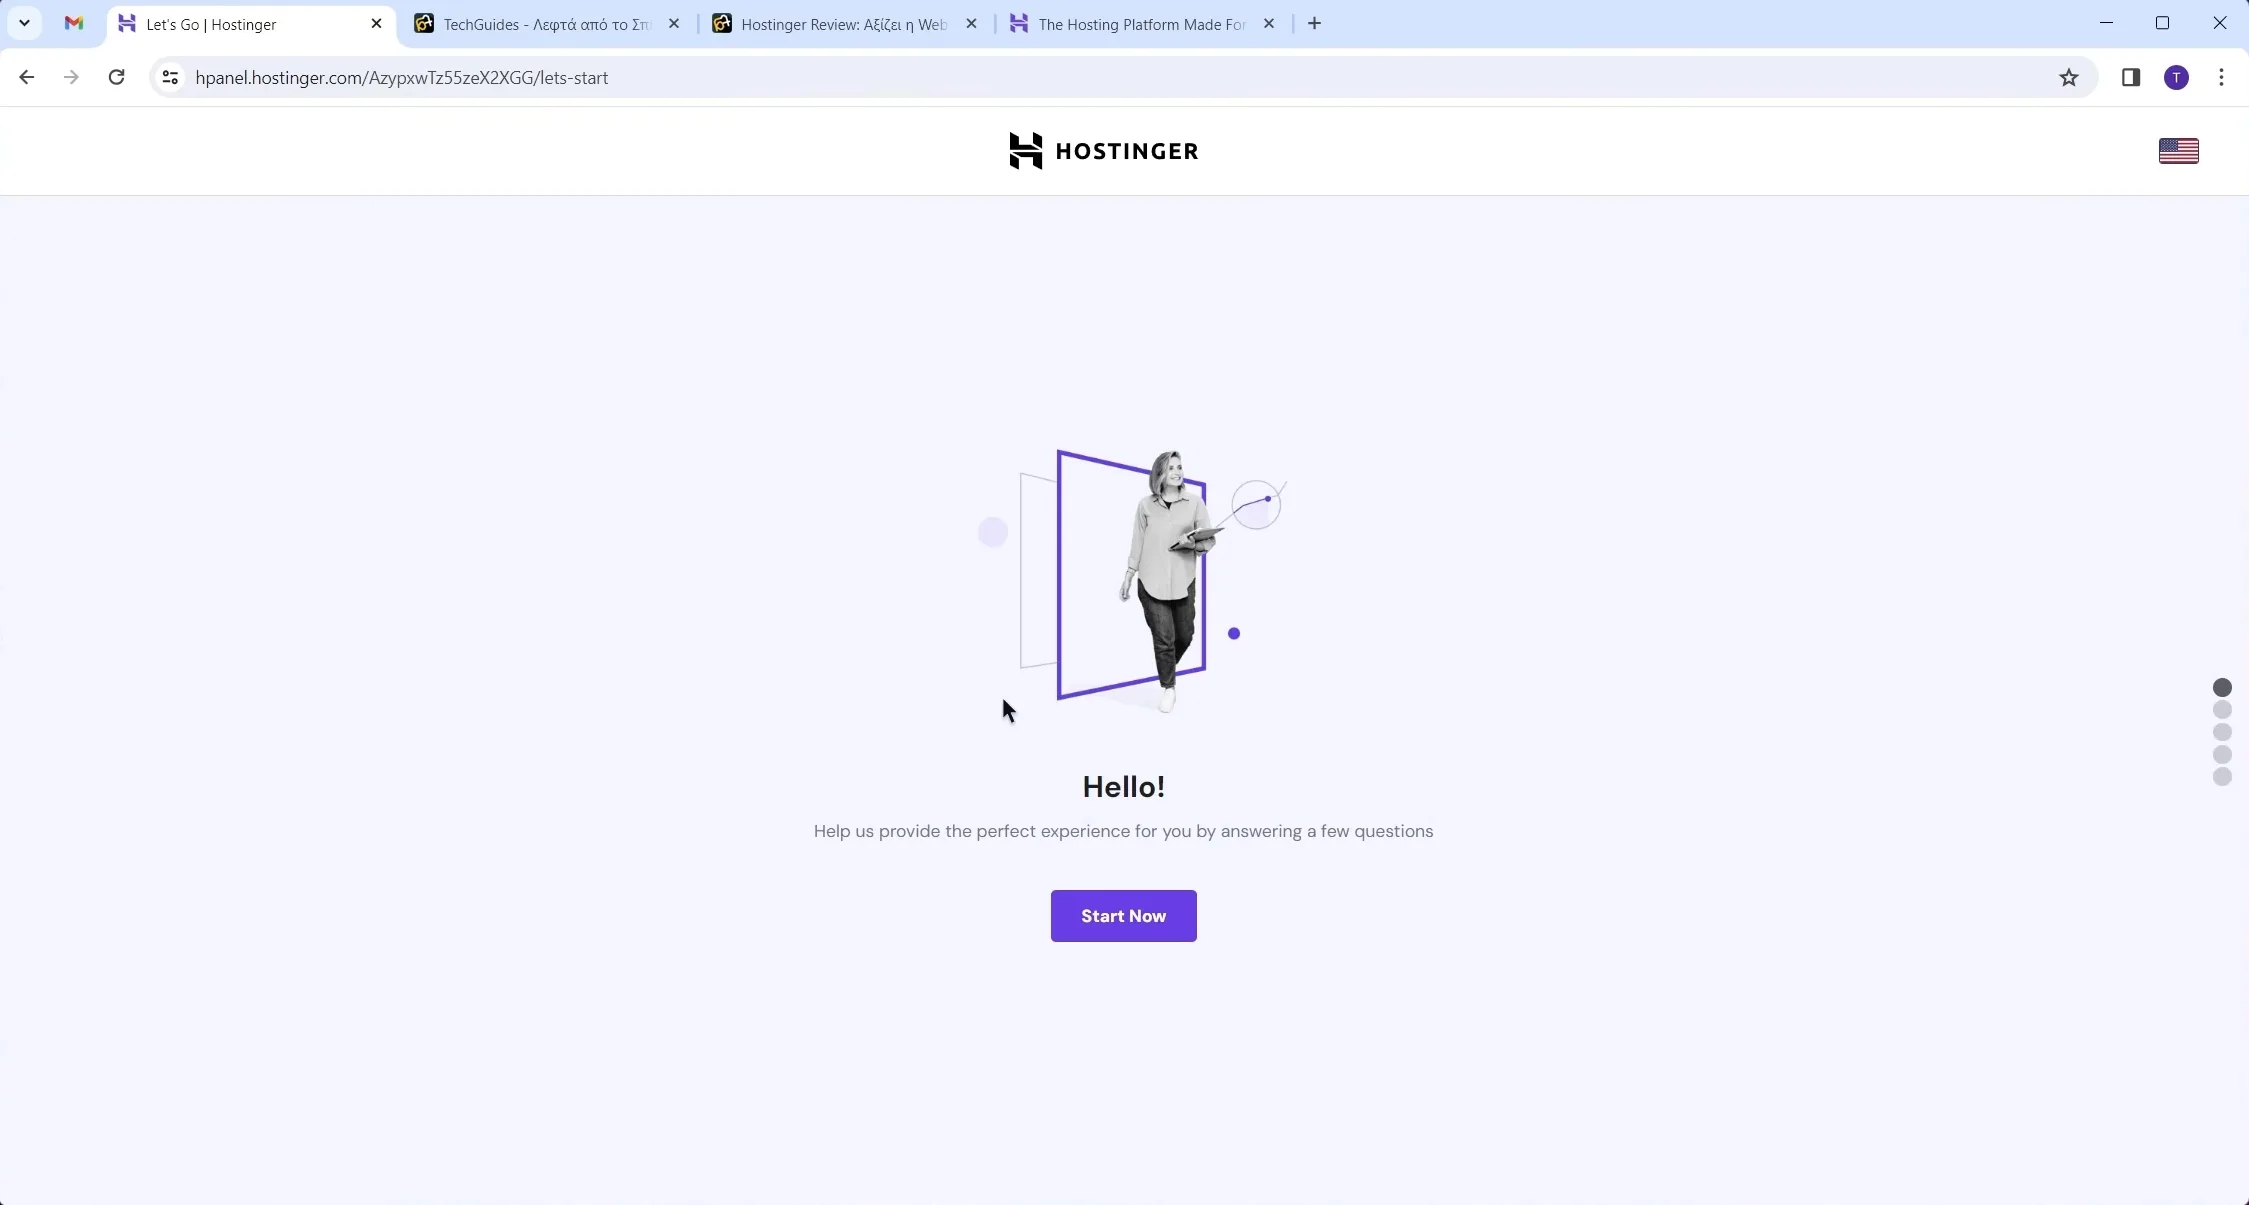
Once your account is verified, you’ll be redirected to the “Hello!” page. Click “Start Now” to continue.
-
Skip Hostinger’s next steps
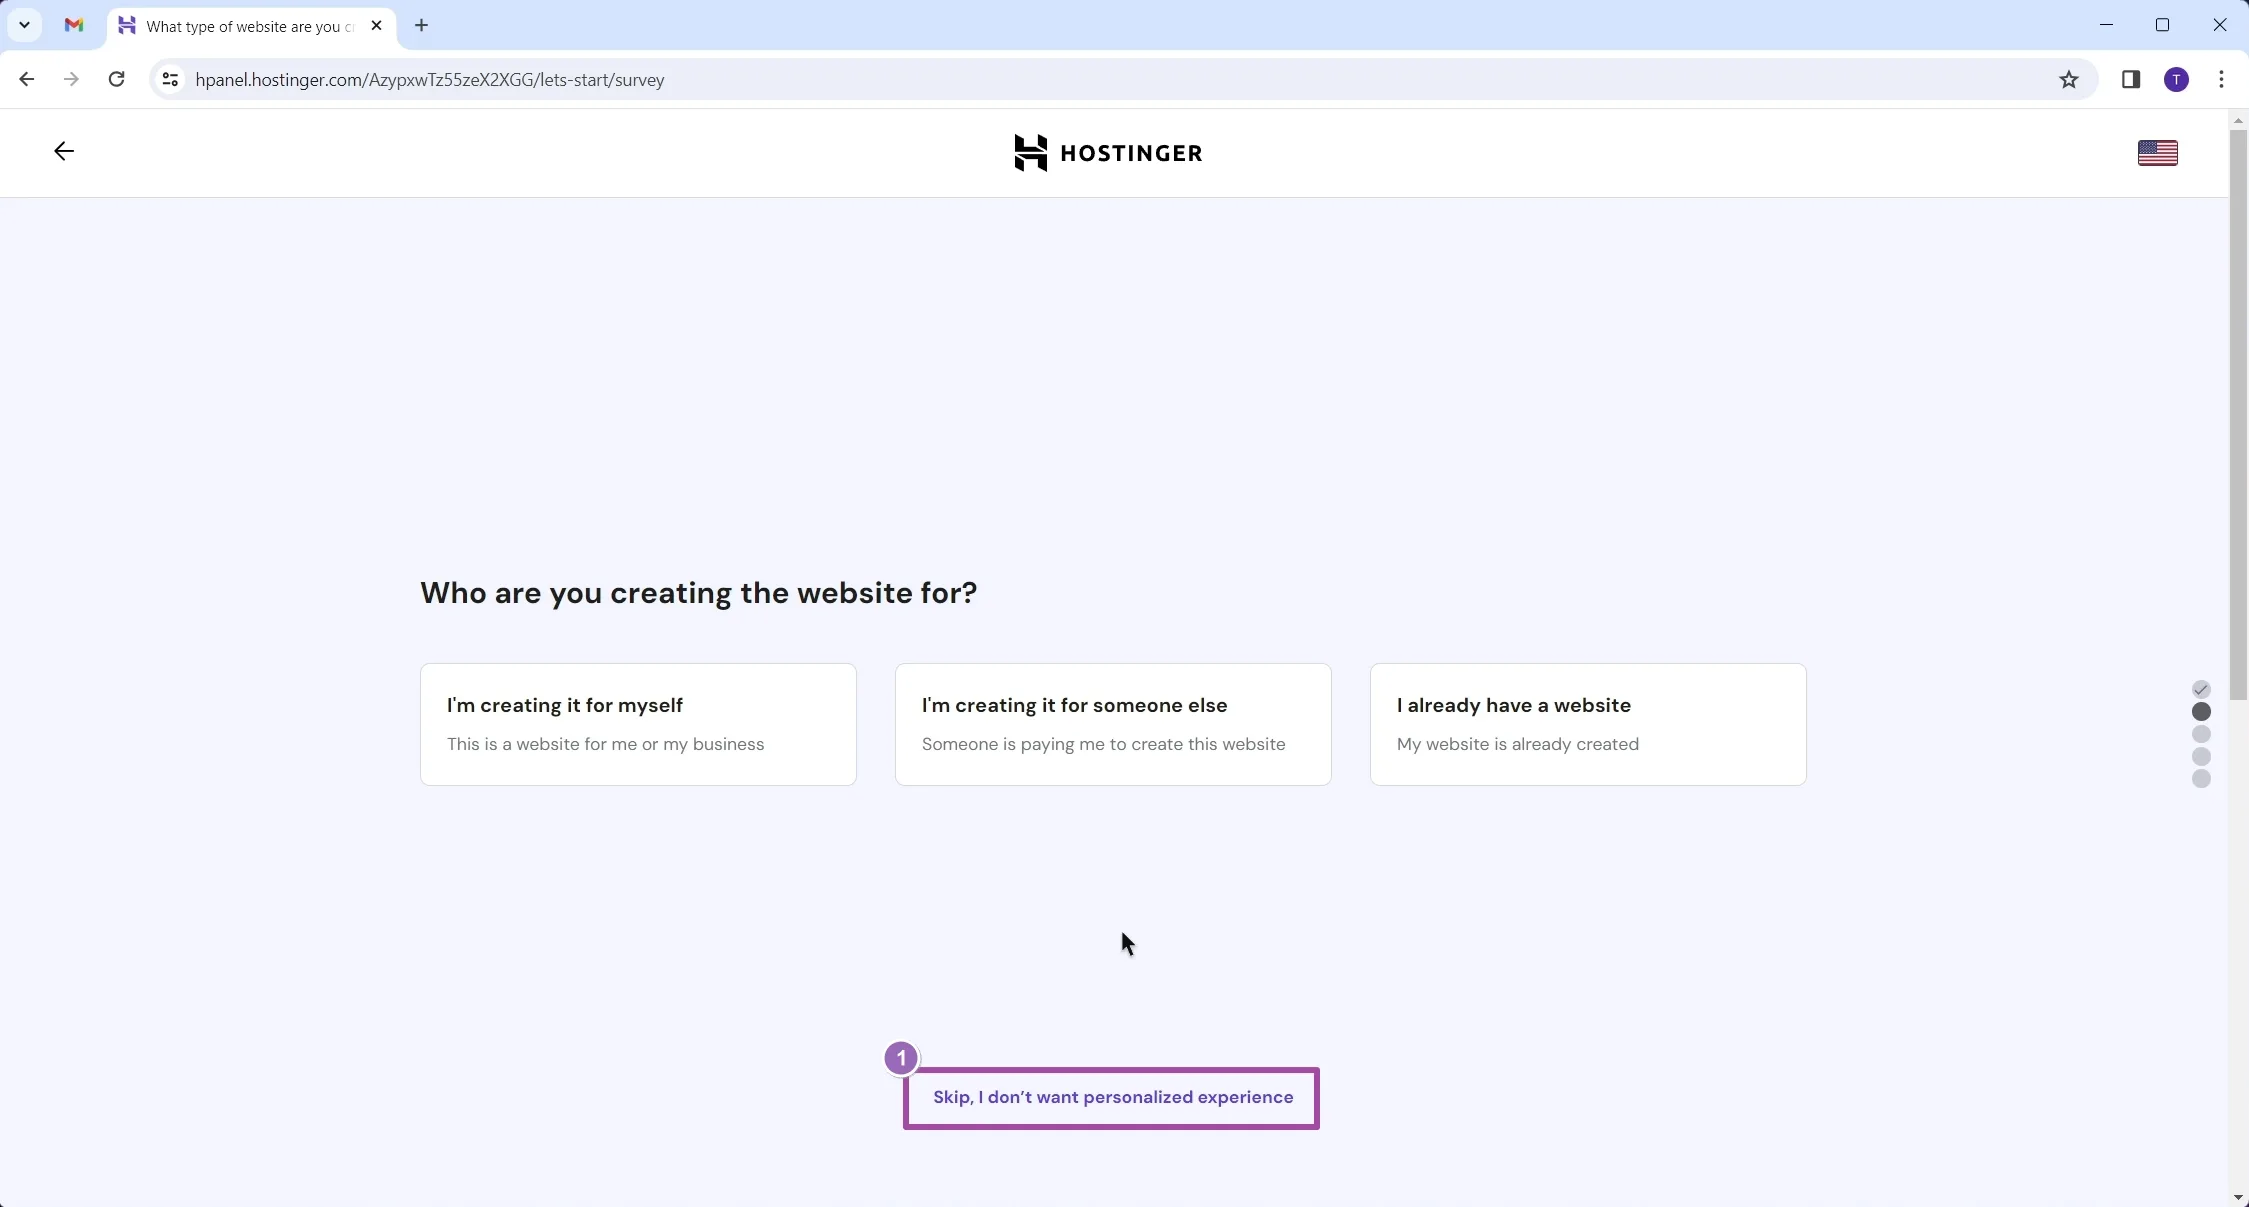
On the next page, just simply click on the “Skip, I don’t want personalized experience” option below. Continue clicking on the “Skip” option until you’re on the page shown below.
-
Get a new domain name
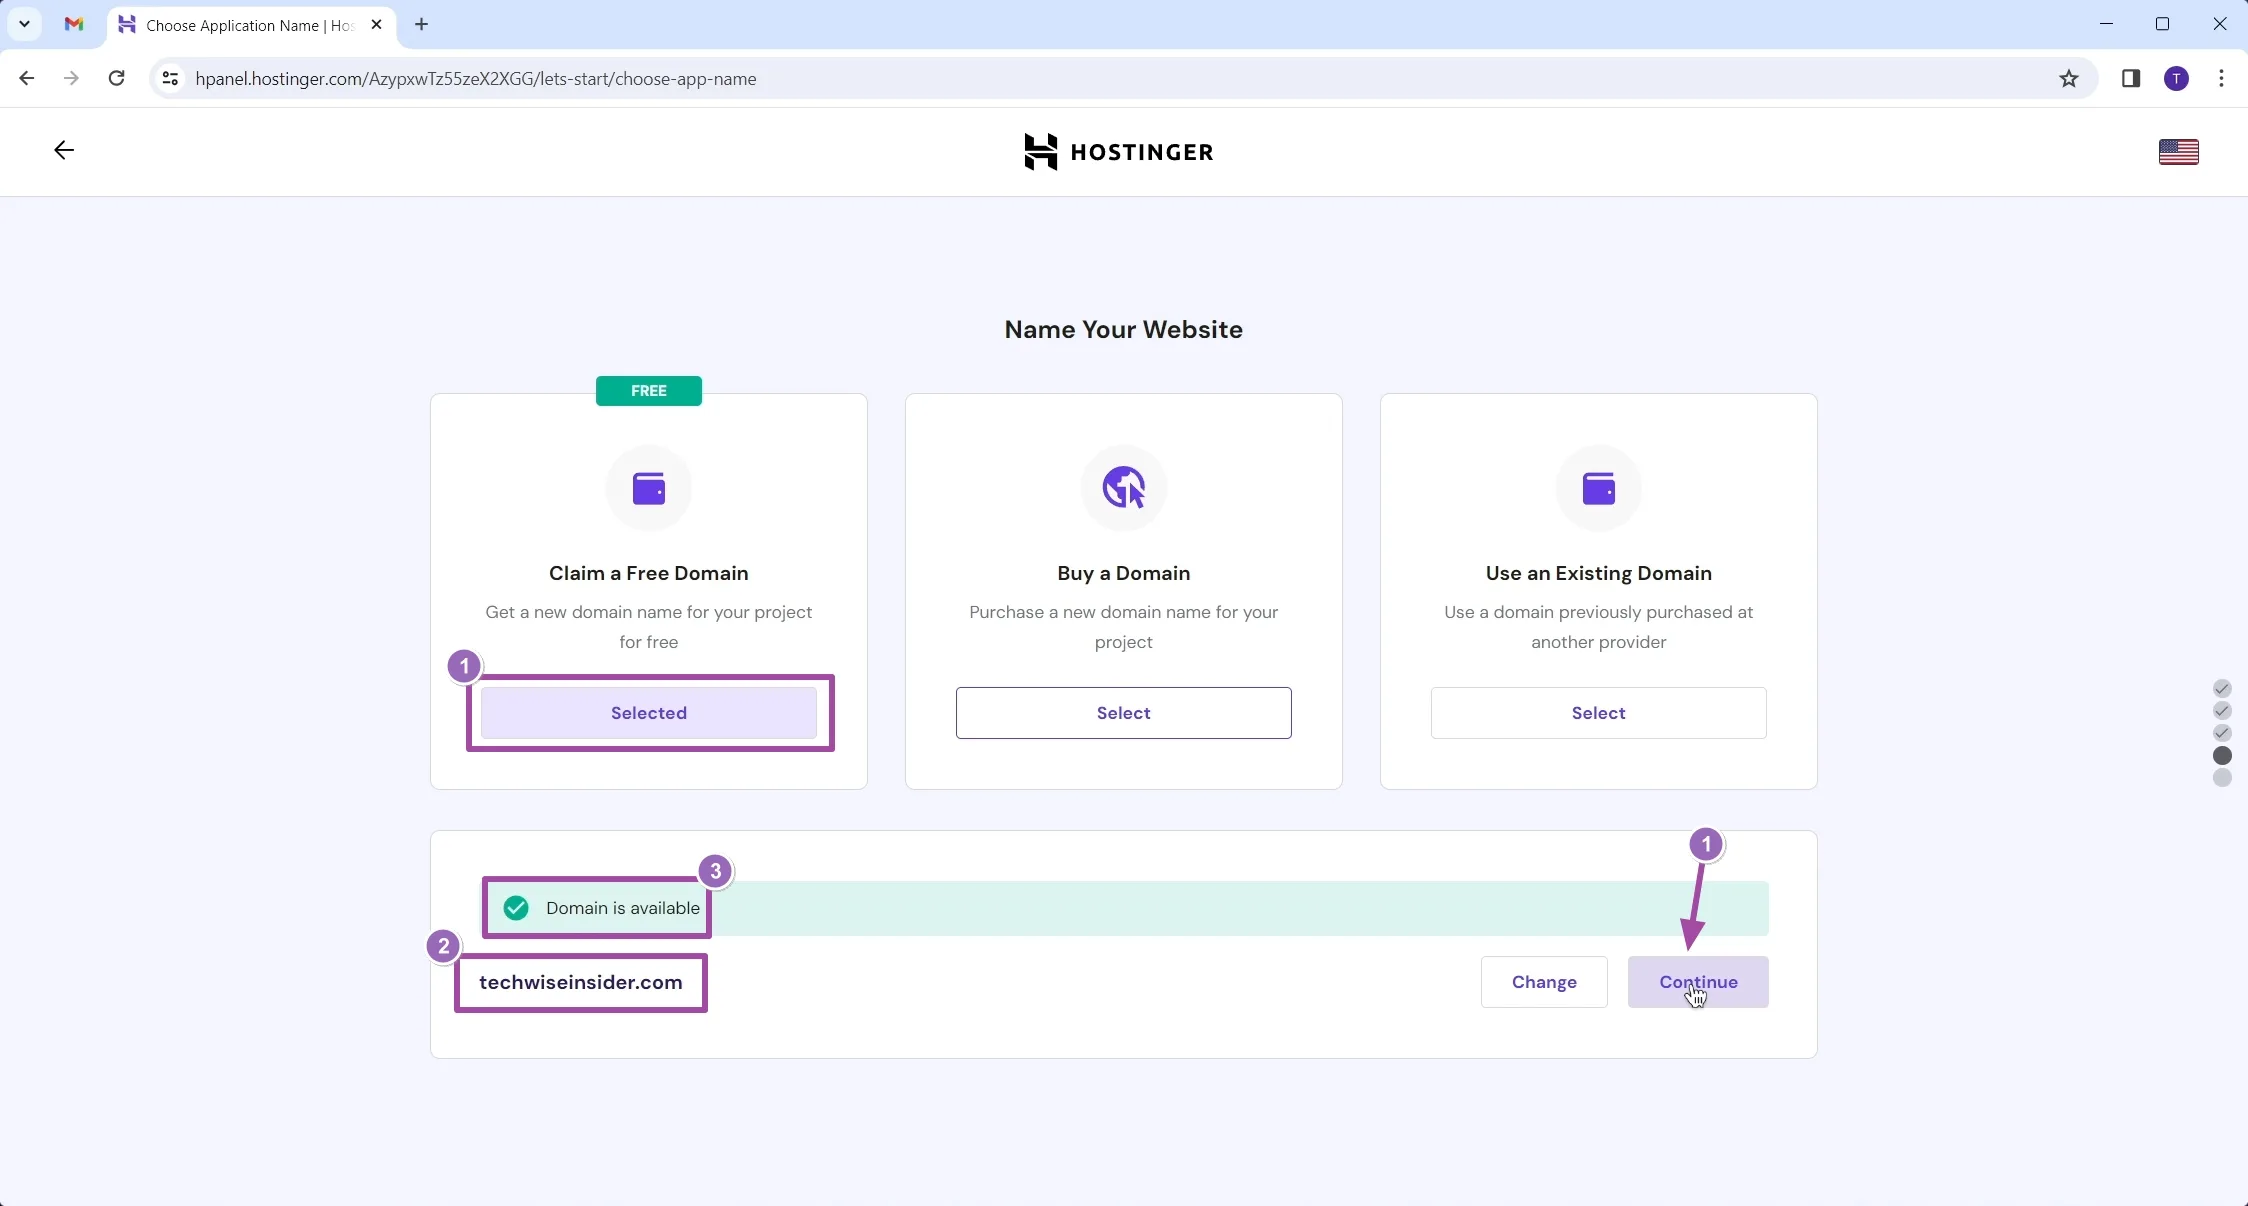
It’s now time to select our default domain name. Click on the “Select” under the “Claim a Free Domain” (or click on the “Buy a Domain” if your plan doesn’t include one), type the name that you want to purchase, choose the extension (e.g, .com, .co, .eu, .org), and if it’s available, complete the purchase.
-
Enable Hostinger’s CDN (optional)
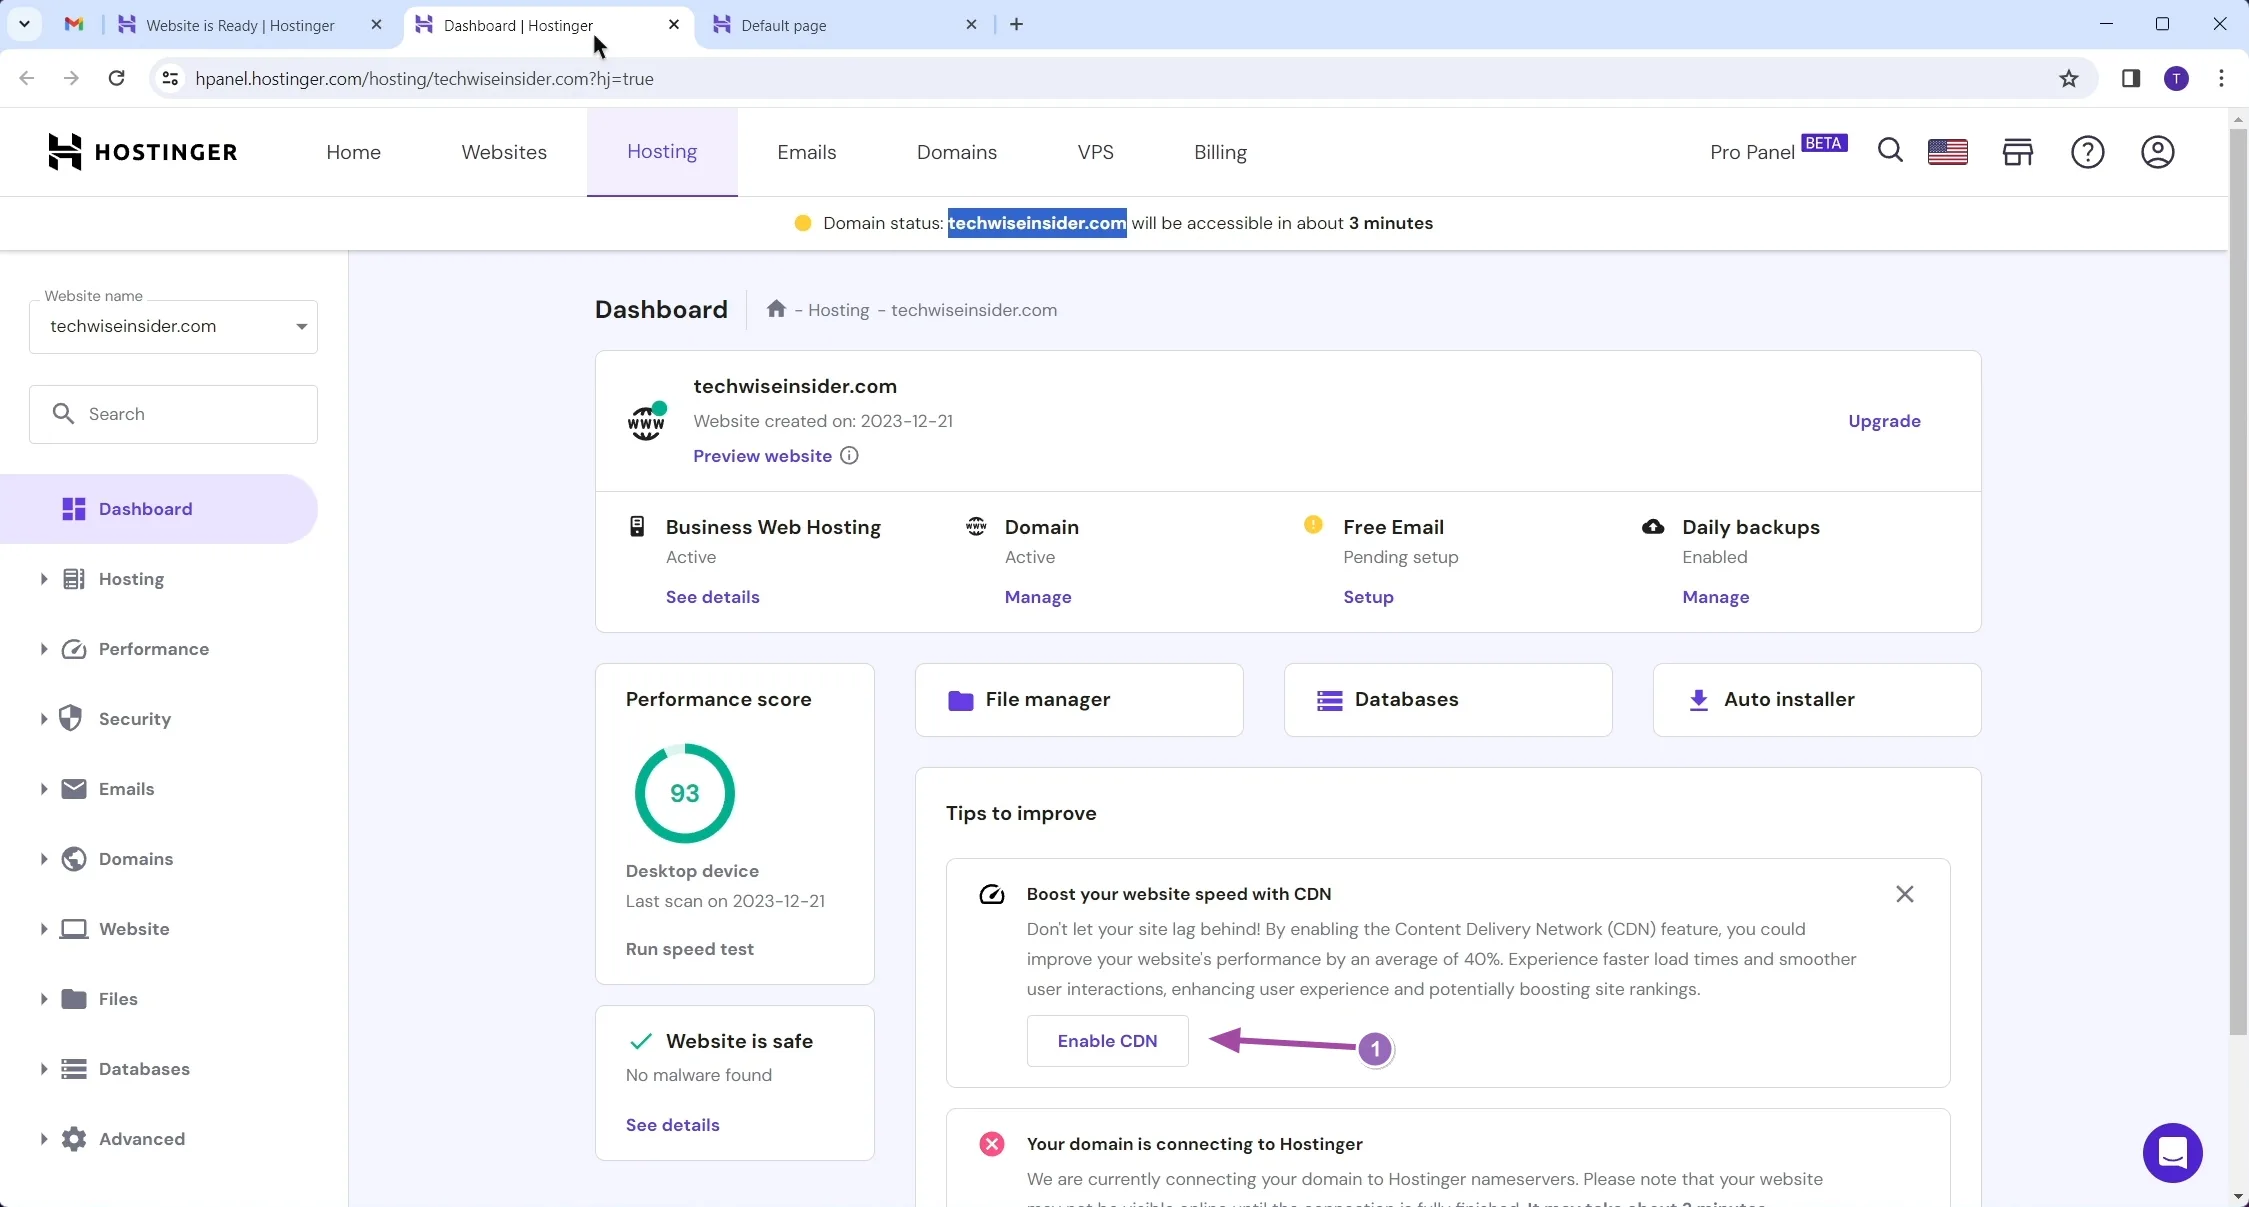
If you have a plan that includes the company’s CDN, go ahead and click on the “Enable CDN” button that’s been showing up in your account’s Dashboard.
-
Install WordPress
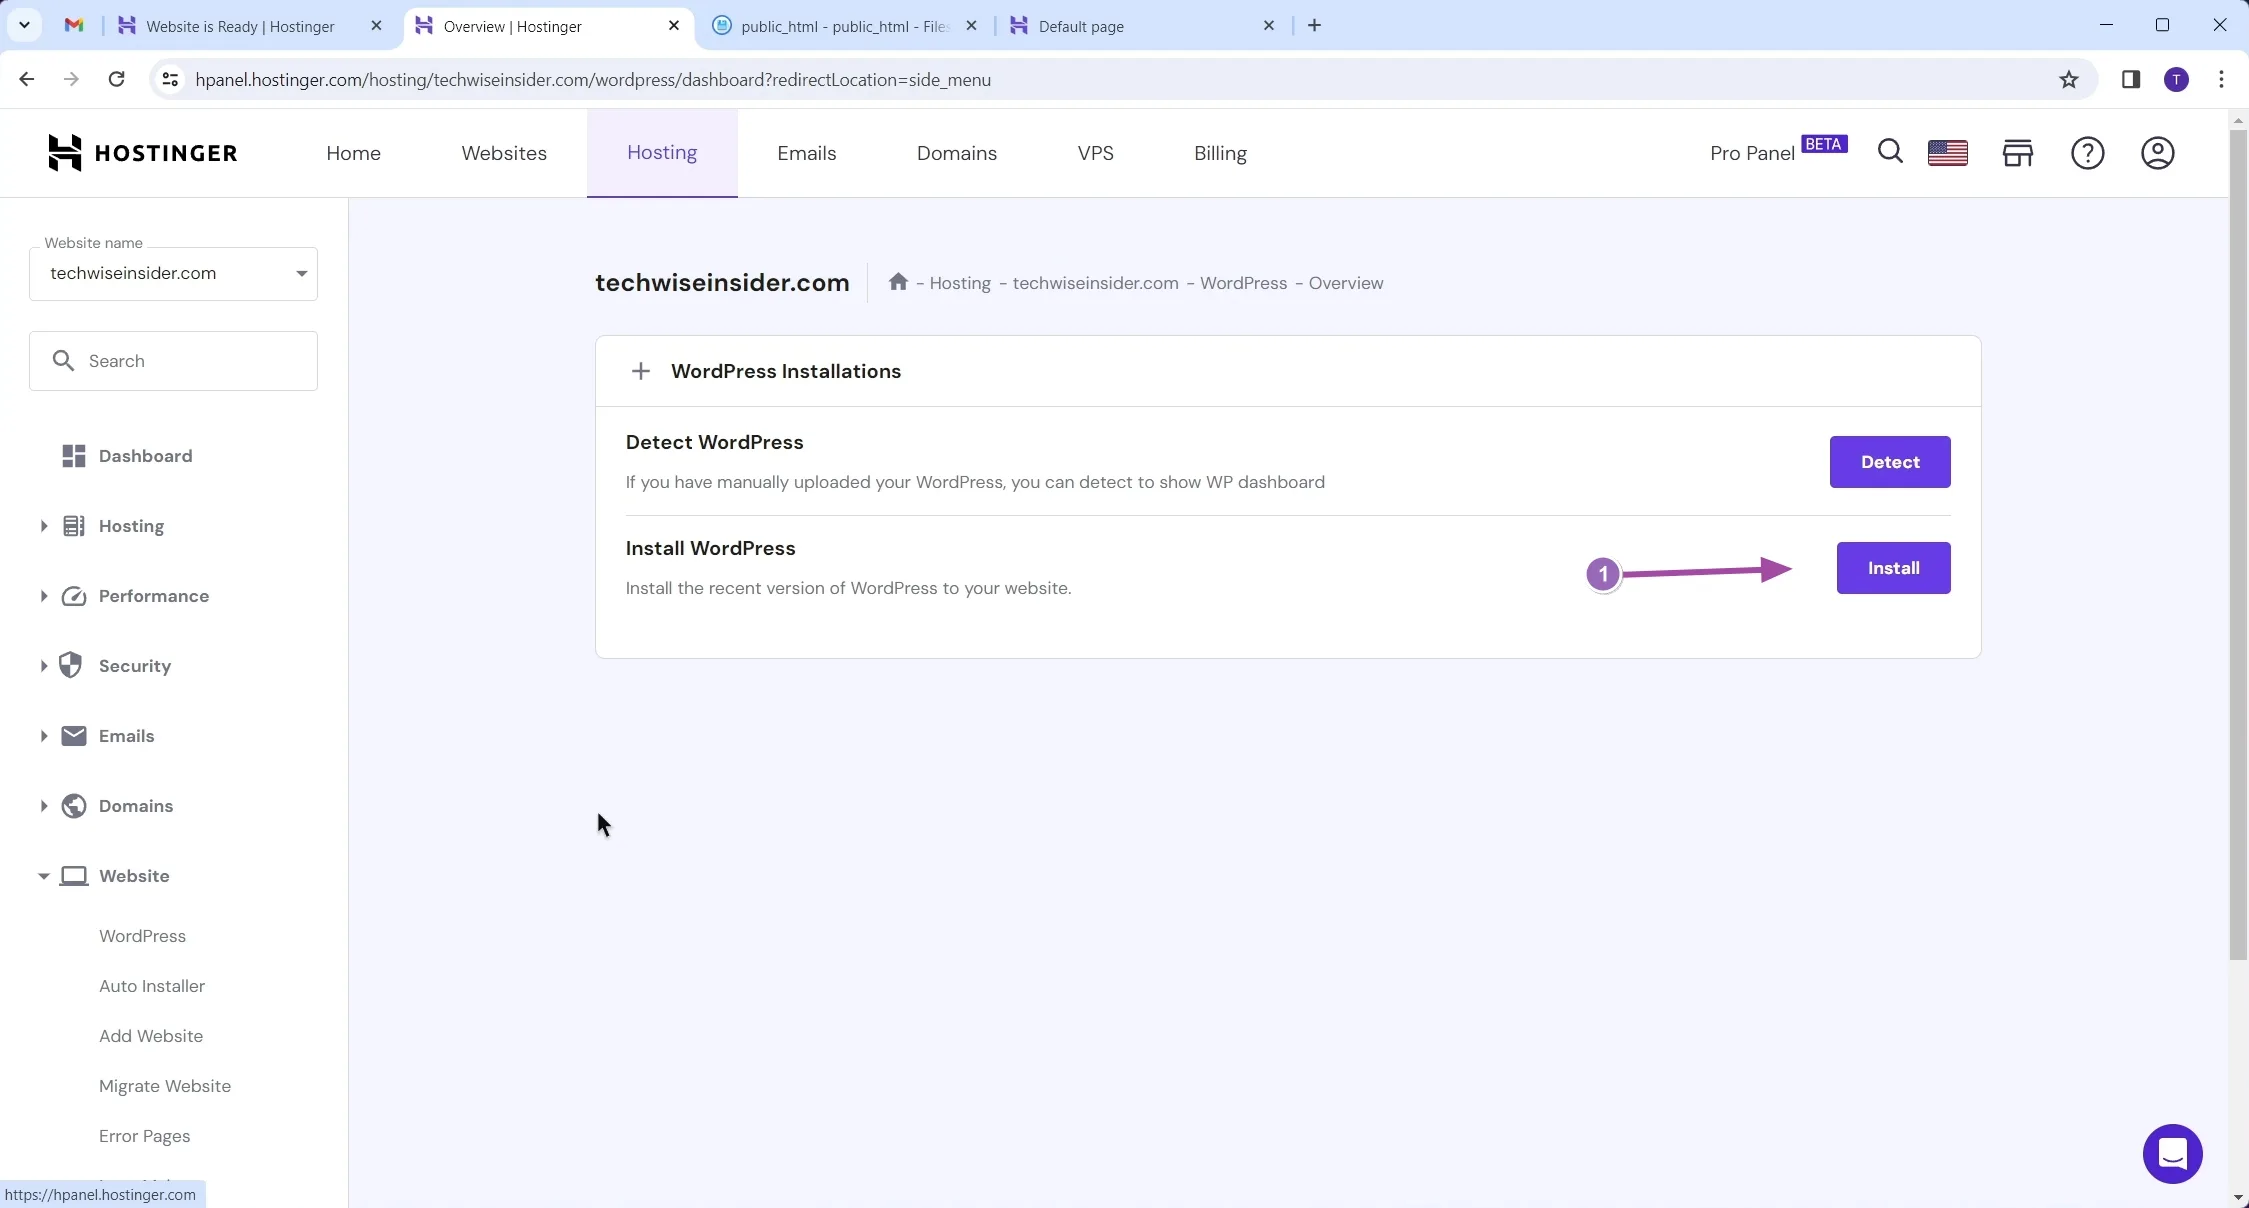
From your account’s Dashboard click on Website -> WordPress. Once you’re on the page shown above, just click on the “Install” button.
-
Create a WordPress admin account
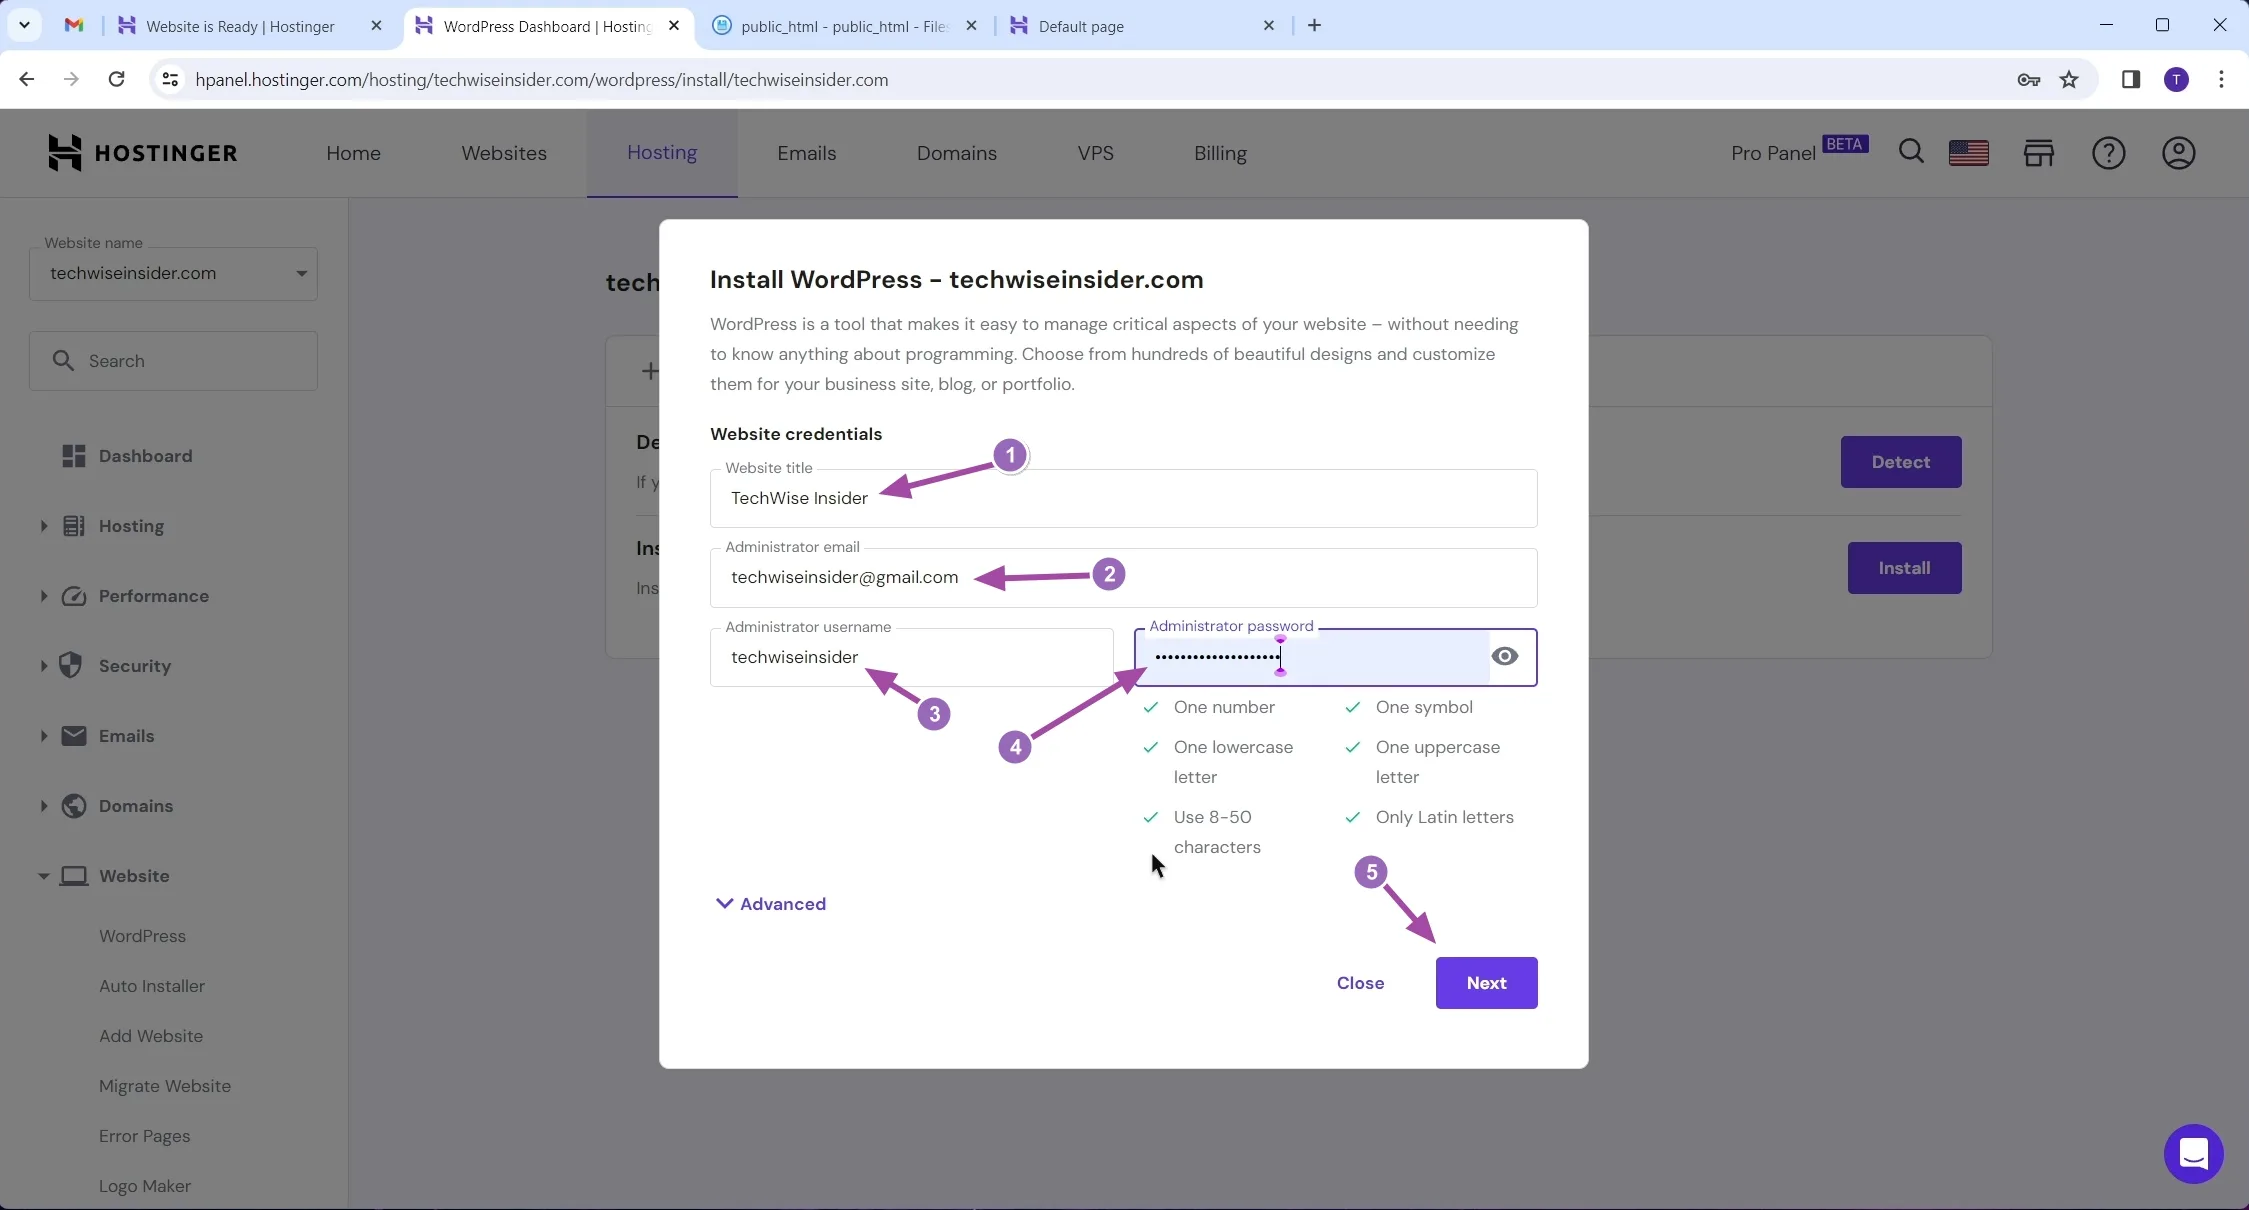
This is where you add your website’s title (you can change it later) and create your admin account by providing a username and a strong password. It’s absolutely crucial to add a really strong password for your admin’s account. Click “Next” to continue.
-
LiteSpeed & Object Cache, SSL Certificate, and HTTPS
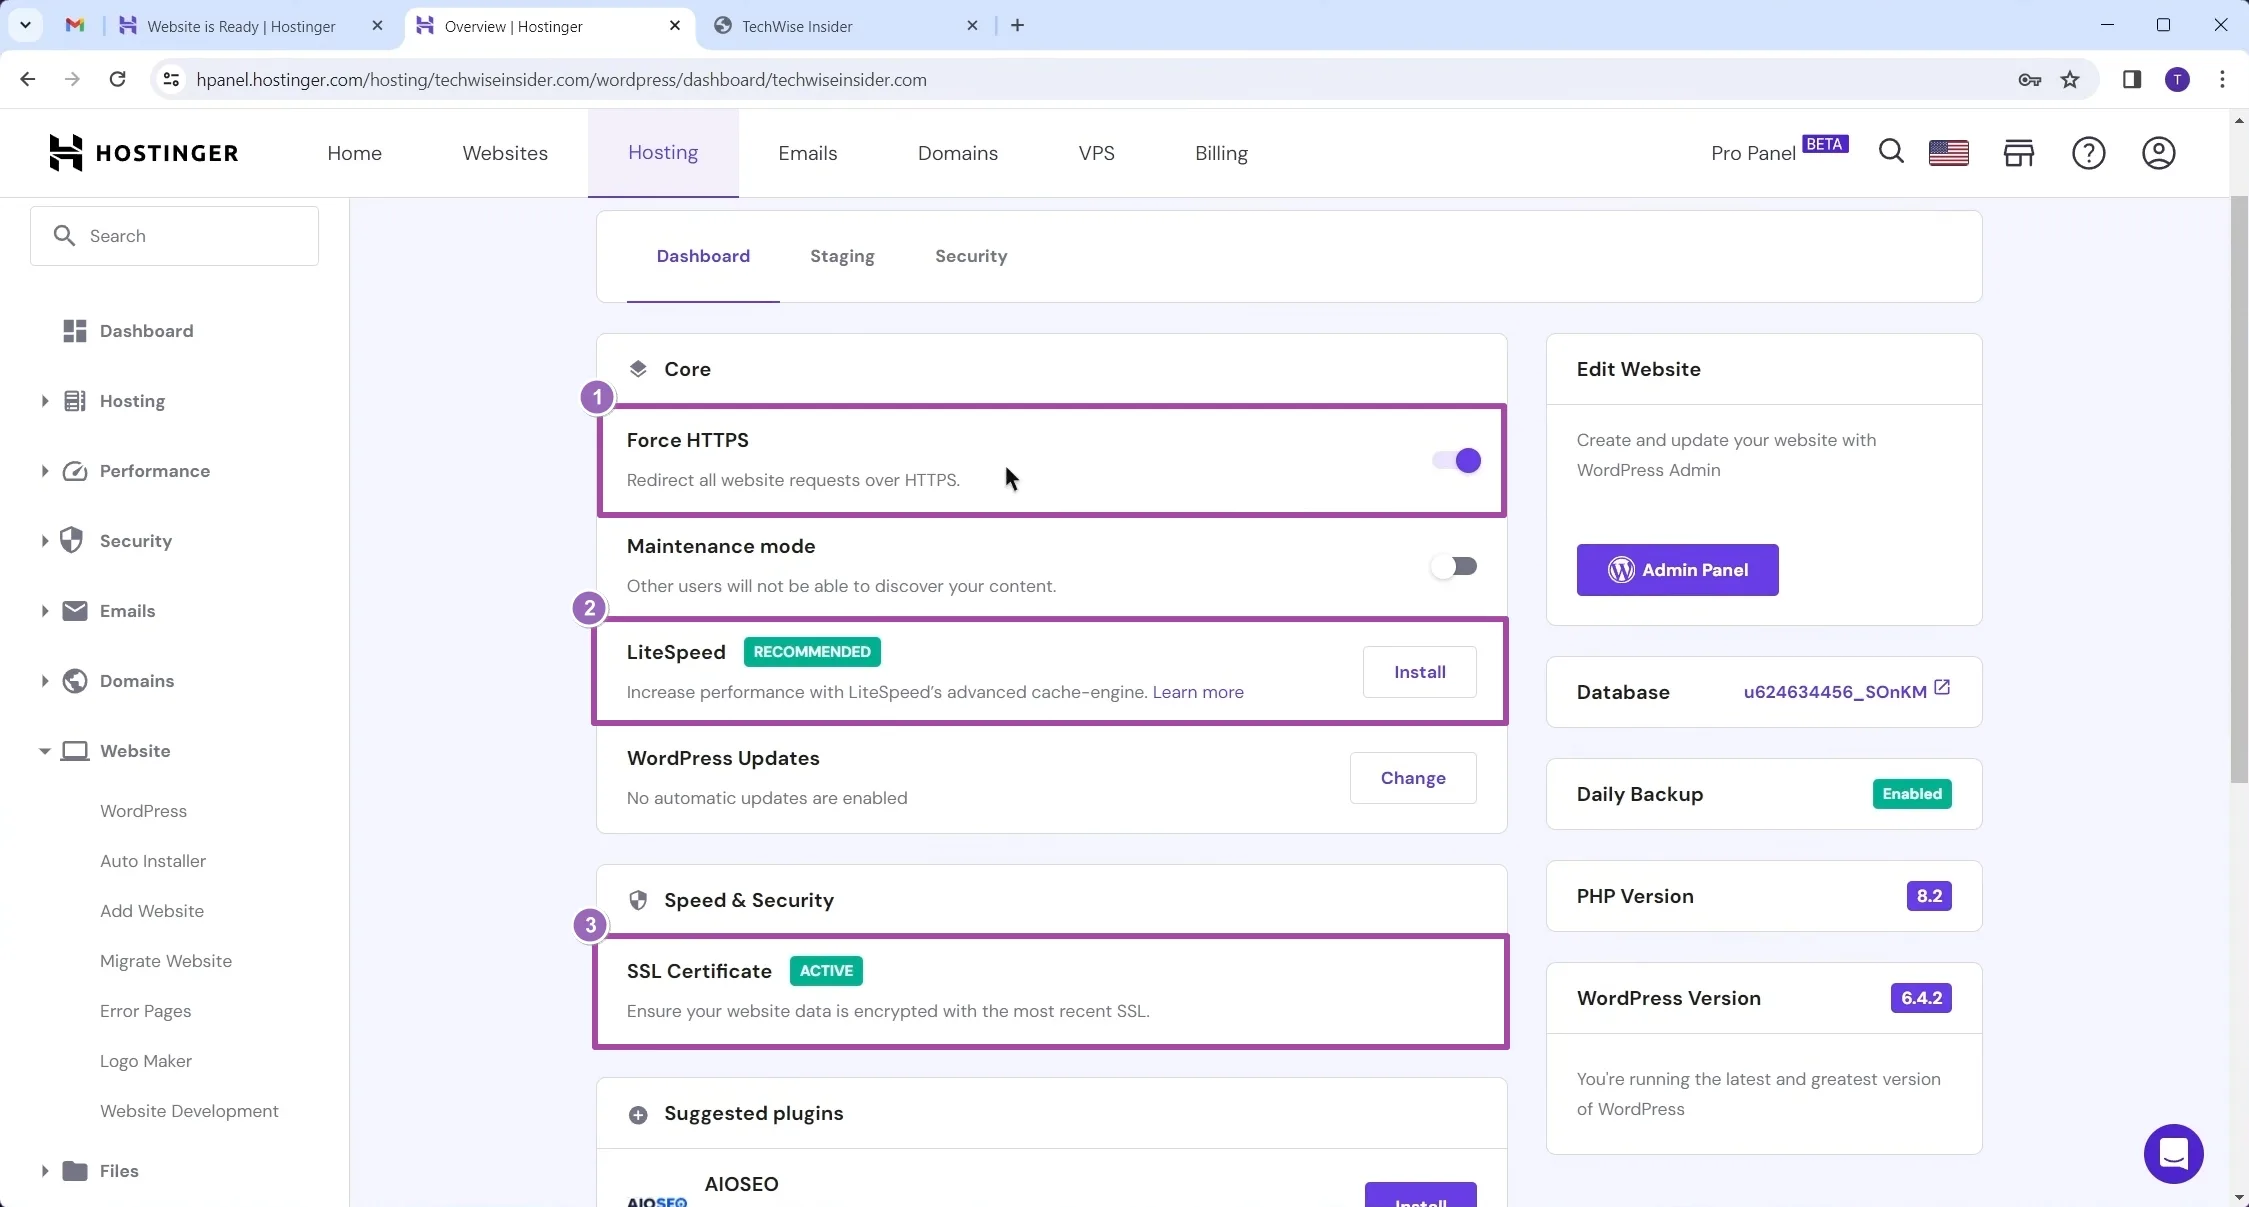
To make our new WordPress website as secure and as fast as possible, we have to enable a few very important things first. Head over to your account’s Dashboard, and enable the “Force HTTPS“, “Object Cache“, and “LiteSpeed“, and install an “SSL Certificate“. Some of them (or all of them) may already be enabled; in that case, let them be as is.
-
Visit your new WordPress website and access the login page
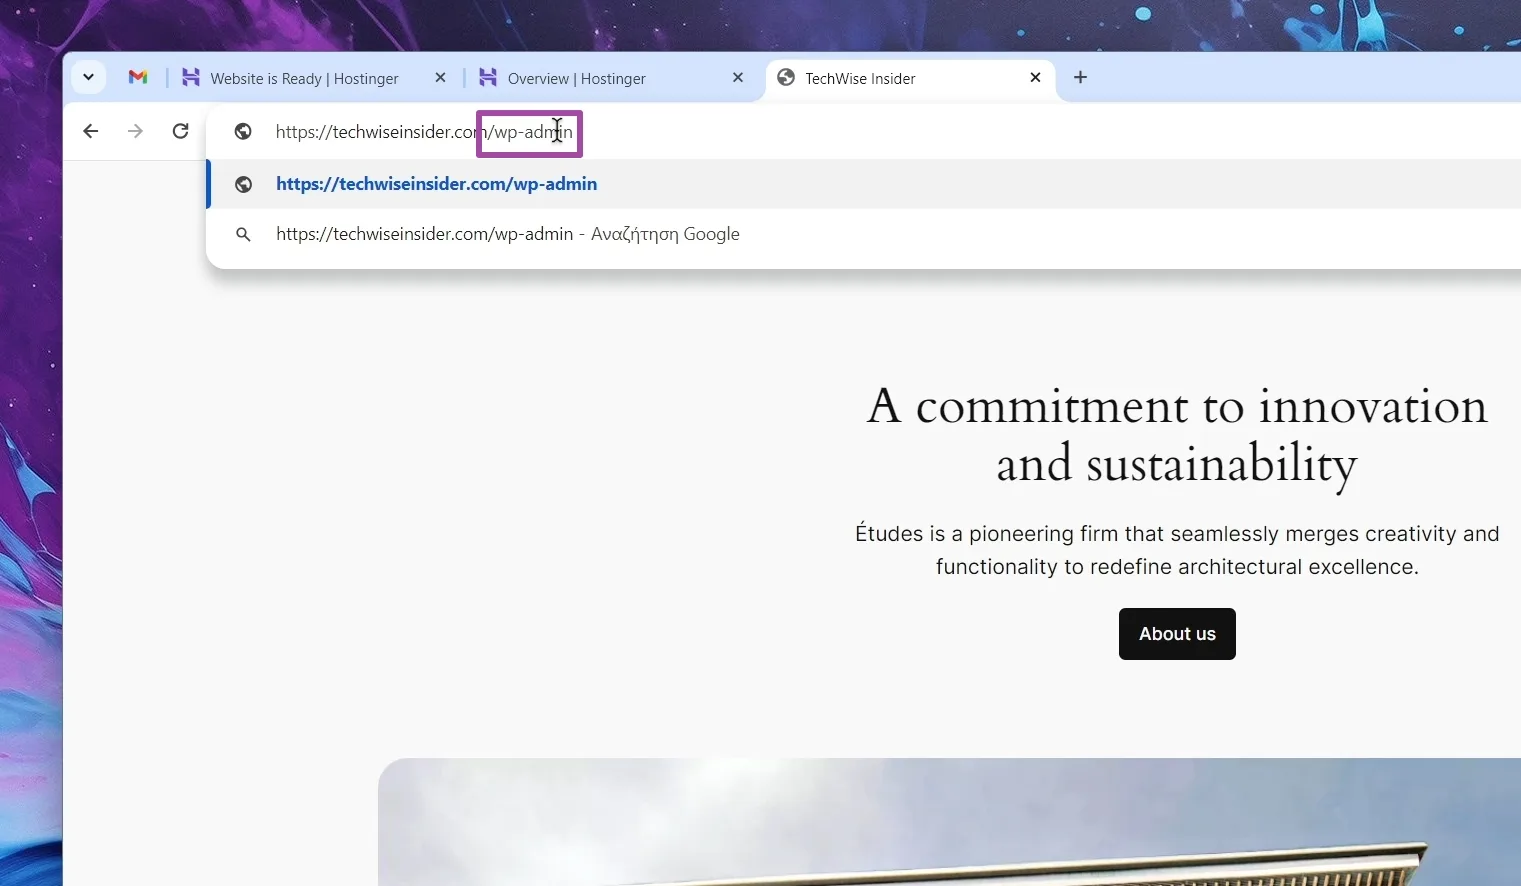
Type your domain name into your browser’s address bar and hit Enter. To access your WordPress Dashboard, you’d have to login first. To do so, just add the
/wp-adminat the end of your URL (e.g,example.com/wp-admin), and hit Enter. -
Login to WordPress as an admin
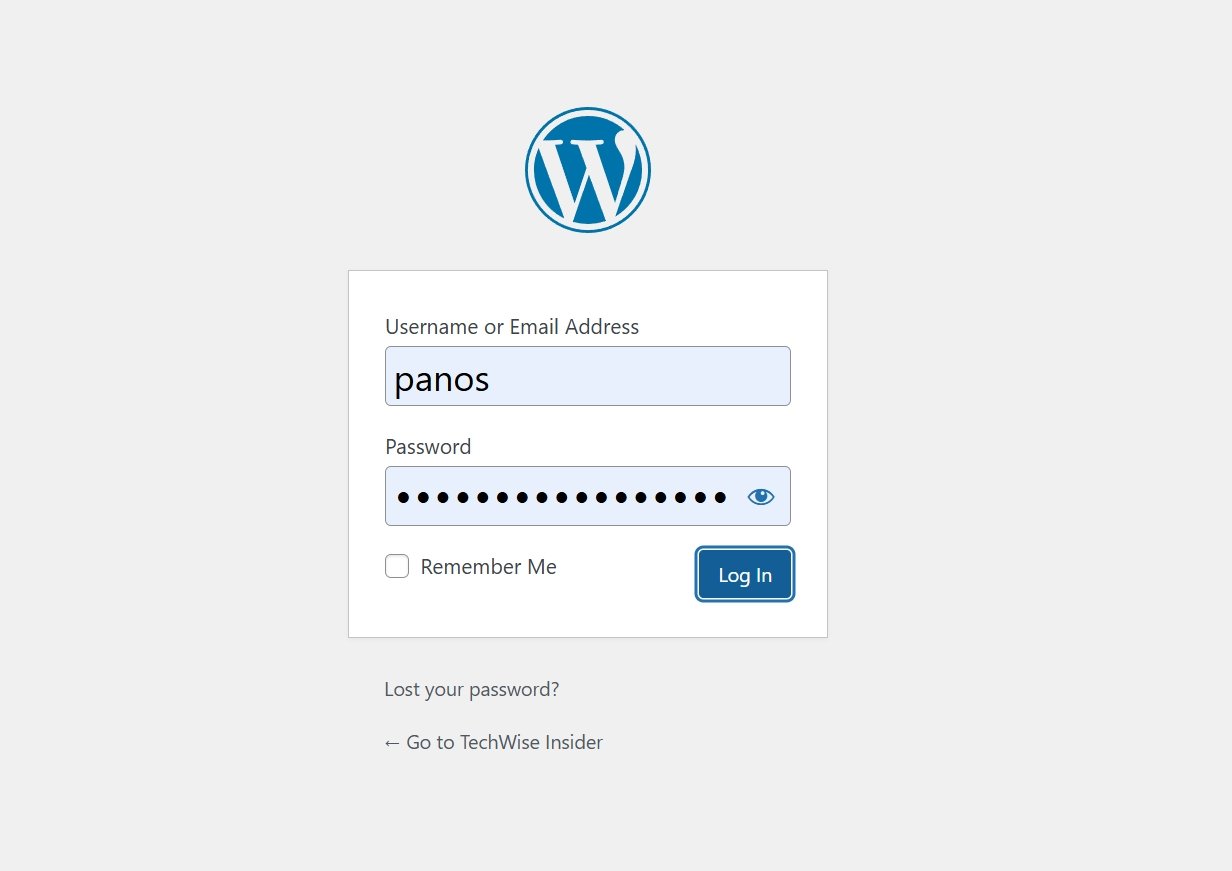
Use the username or email and the password that you set earlier during the installation process, and click on the “Login” button.
-
Enjoy WordPress!
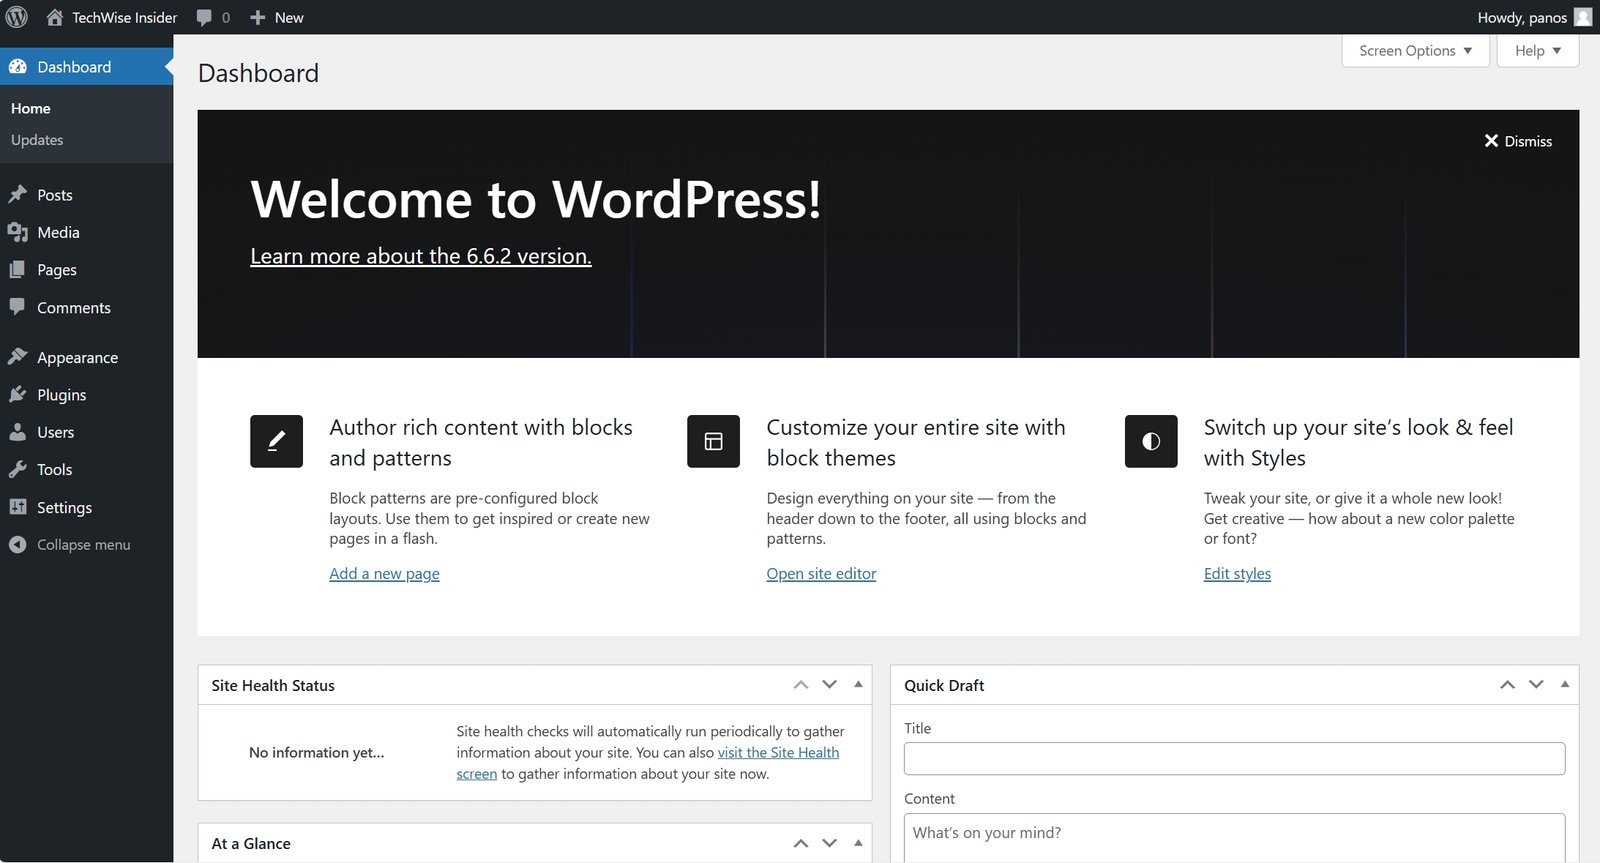
If everything went all right, you should now be logged in as an admin to your new WordPress website.


It’s always recommended to go to Settings -> Permalinks and make sure that your URL structure is set to “Post name“. This is the easiest way to make sure that our links won’t be huge and unreadable, but short and well-structured. Hostinger may have already done that for you, but take a quick look either way.
Where to find free and premium WordPress themes
There are tons of places that you can get professional-looking themes, some of them completely for free, others freemium (with some features locked in their Pro versions), and some premium (one-time payment or subscription-based).
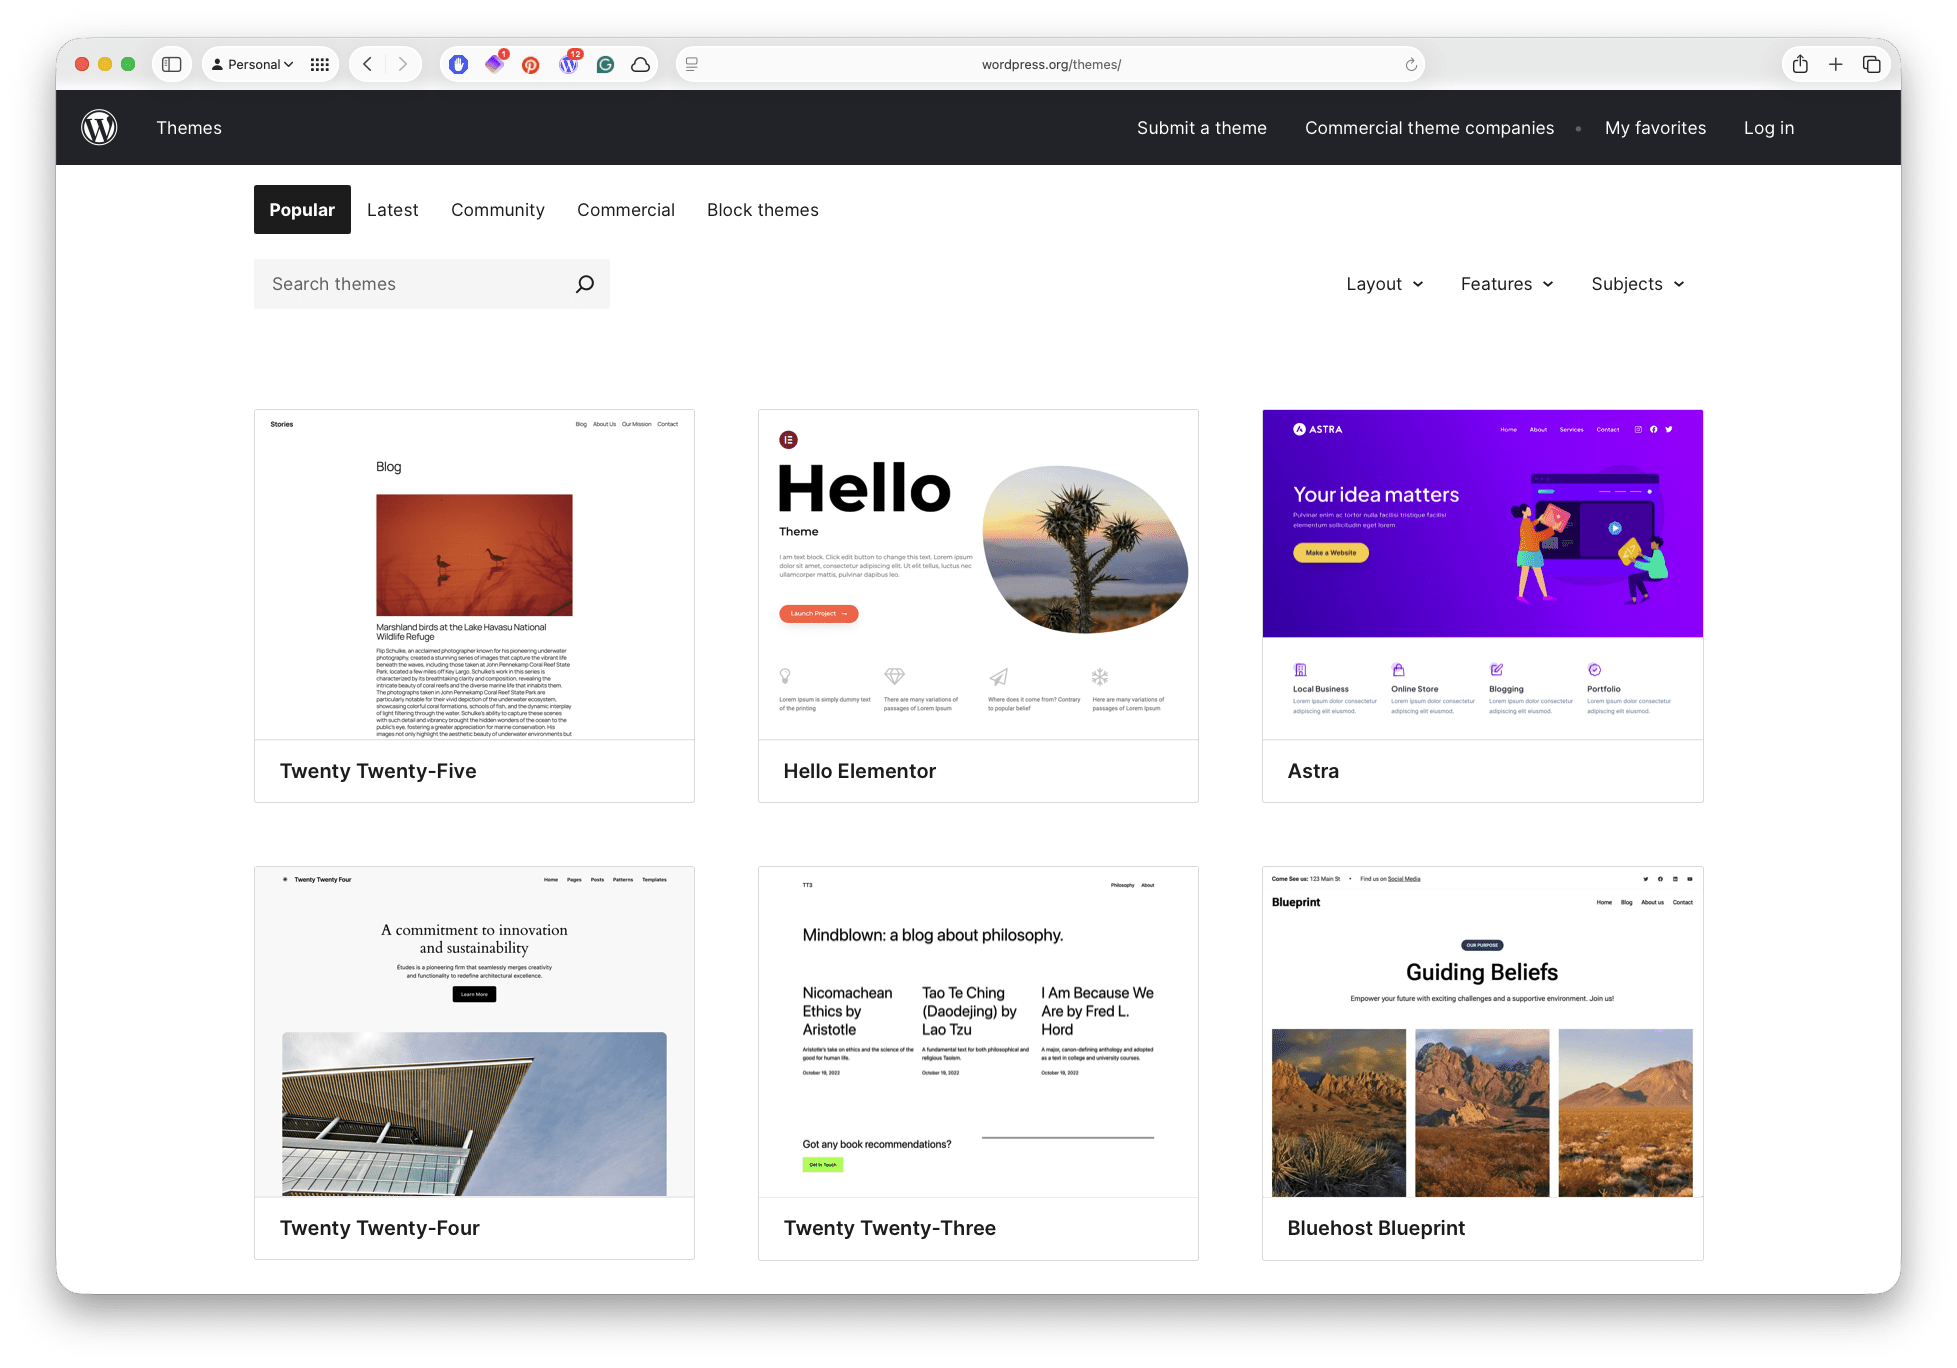
You can start by looking at the official theme library on WordPress.org. It has countless free and freemium themes that you can choose from.
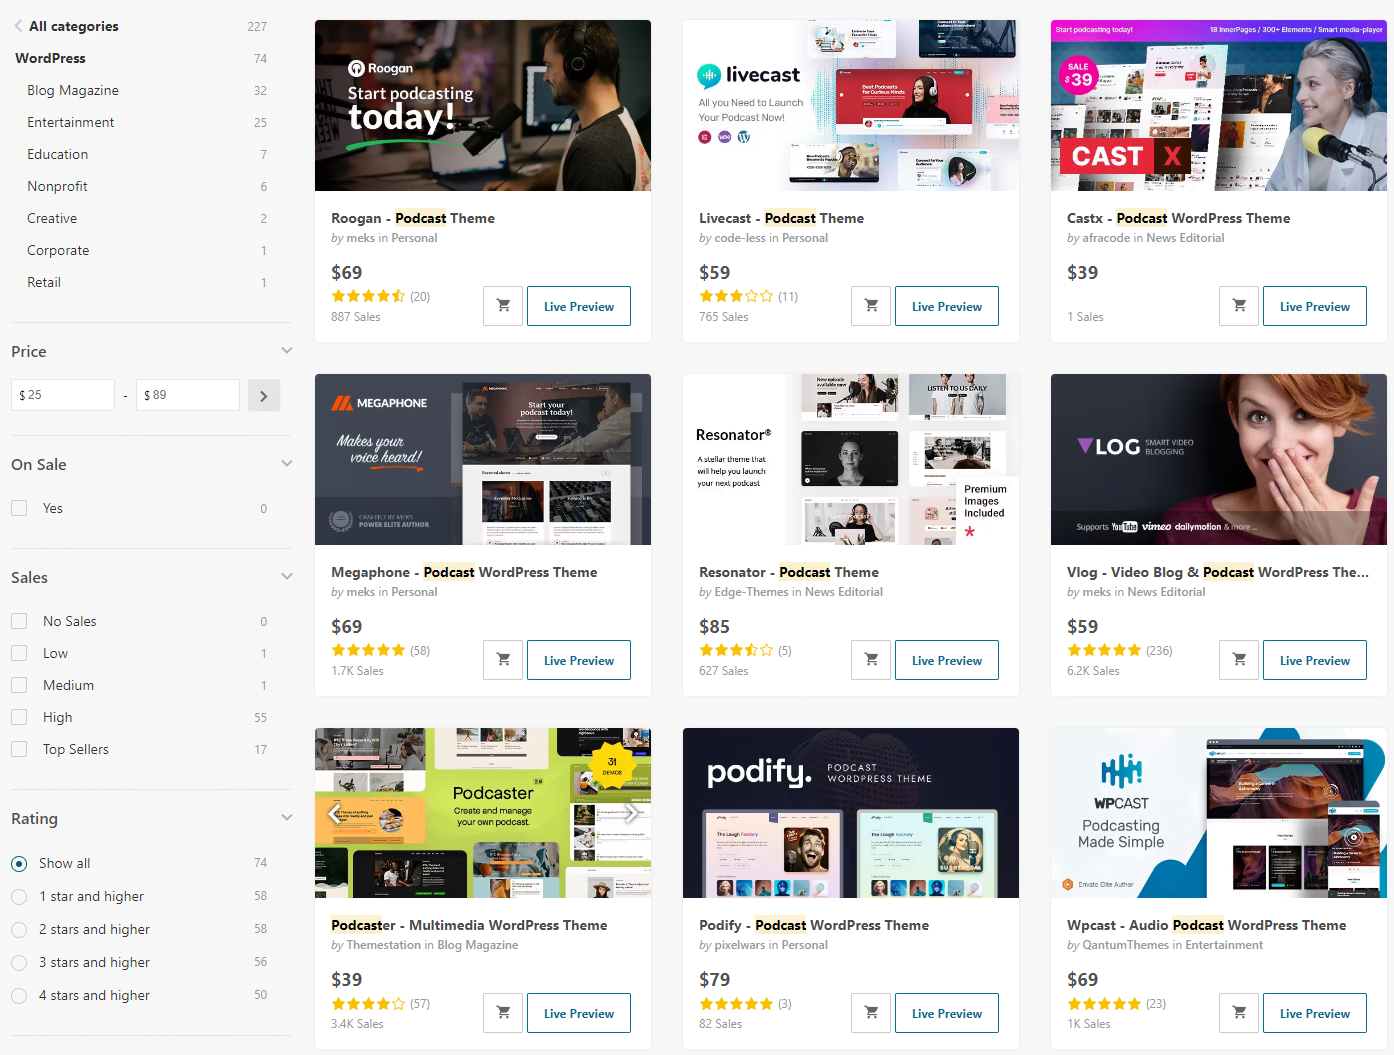
If you’re looking at building something serious, a premium theme is usually your best bet. The most popular marketplace that’s filled with WordPress themes right now is ThemeForest (but feel free to read my review first):
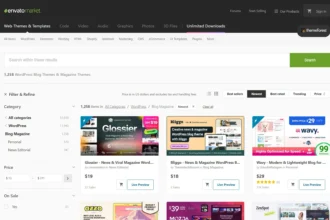


Another marketplace to get premium WordPress themes is Creative Market, known for offering free weekly digital material. If you want to completely build something by yourself without many limitations, take a look at GeneratePress and GenerateBlocks.
Frequently Asked Questions
Why does my new WordPress site has another domain?
Typically, new domain names need from 24 to 48 hours until they become available worldwide and fully active. The same goes whenever we make a change to our DNS or Nameservers. In any case, Hostinger often automatically uses a temporally domain to allow you to work on your site as you’re waiting for your domain name to become available.
Why does my browser warn me that my site is not secure?
There are two reasons why your browser is warning you about your website not being safe, and usually, it’s either because your domain is still not active or because your SSL Certificate couldn’t be installed. Head over to Hostinger and check your SSL status, and redo the installation if it failed the first time.
Can I get my domain from another provider?
Yes, you can get your domain name from another provider (e.g, Namecheap) and then connect it to your Hostinger plan. The company already explains how to do that (it’s fast and easy).
Helpful Tip: To customize your premium theme, make sure that you’ve checked the “Documentation” that is included in all the themes that you buy. Documentations are important as they provide step-by-step instructions on how to make changes, customize, and even make your theme faster.
If you purchased a theme from a marketplace, you’ll also get free technical support for the upcoming months, so go ahead and ask all of your questions.
See? It’s not that bad now, isn’t it? In just under 15 minutes, you can log in to your new WordPress website and start customizing it. You don’t need to have any coding skills, as there is a plethora of available themes and plugins you can use to create a beautiful and professional website.
Have any questions? Use the comments sections at the end of this guide, or find me on your favorite social media websites.


Wow, what a comprehensive guide! I’ve been considering starting my own website for a while now, but the technical aspects always seemed daunting. I purchased a domain name and hosting from GoDaddy a few years ago after reading a tutorial but the steps were different when I tried to follow them and I stopped trying and lost the plan I bought. Thankfully your guide provided the exact same steps and I am already writing my first blog post so thank you very much!!
I’m working on a food blog, what is the best way to customize my food recipes? I’d love some recommendations as I am a beginner in blogging.
Hey Jess, thanks for your nice words and I am sorry you had such an experience in the past. Hopefully, that’s all in the past now, and you can design and bring your project to life soon enough. The right way to insert any recipes into your blog posts – including all the technical aspects behind it, including the Markup Schema so Google and Bing can display your recipes in specific ways in search results – is by using a recipe plugin.
Here’s how to create your first recipe:
Login to WordPress Dashboard.
Go to Plugins -> Add New and search for the “WP Recipe Maker” plugin that has been created by Bootstrapped Ventures.
Click on the “Install” button, wait a few seconds, and click on the “Activate” button.
Awesome, the plugin’s now ready! To add a new recipe, go to WP Recipe Maker -> Manage -> Create Recipe.
A pop-up window will be displayed, make sure you have filled all the available fields (or the most important ones) and click on “Save“.
To add the recipe to your blog post, just go and edit it, insert a new block, and search for “WPRM Recipe“.
Click on the “Insert existing recipe“, select your recipe, and click on the “Insert” button.
Done!
Let me know if you need more help! 🙂