
If you upgraded to Windows 11 and you’re facing low-performance issues with the operating system, there are a few simple tweaks that you can try to make your PC/laptop faster than ever before. These changes and tips are great when it comes to fixing the most common issues with Windows 11 performance drops, but they won’t do much if you running on low-spec hardware.
- 1. Update and restart your PC
- 2. Debloat Windows 11 by deleting unnecessary apps
- 3. Disable startup programs
- 4. Automatically archive your infrequently used apps
- 5. Deactivate the visual effects
- 6. Clean up temporary files
- 7. Change the Power Mode settings
- 8. Reset Windows 11 from Settings
- 9. Upgrade your RAM
- 10. Upgrade your Hard Disk with an SSD
- 11. Roll-Back to Windows 10
From a new release to being one of the newest, modern, and most stable operating systems, Windows 11 has come a long way. The operating system may still be under development by Microsoft, but that doesn’t mean it’s fast, and it’s surely not a great fit for everyone.
Here’s how to fix any low-performance issues that you may be experiencing, increase speed, and maybe lose a bit of smoothness along the way.
1. Update and restart your PC
The first option may be the most obvious of all, but it actually works most of the time. When a new update is released for Windows, performance improvements may be a part of those changes, and many times weird bugs get fixed that increase the overall speed of your operating system, without doing any changes.
To make sure your Windows 11 is up to date:
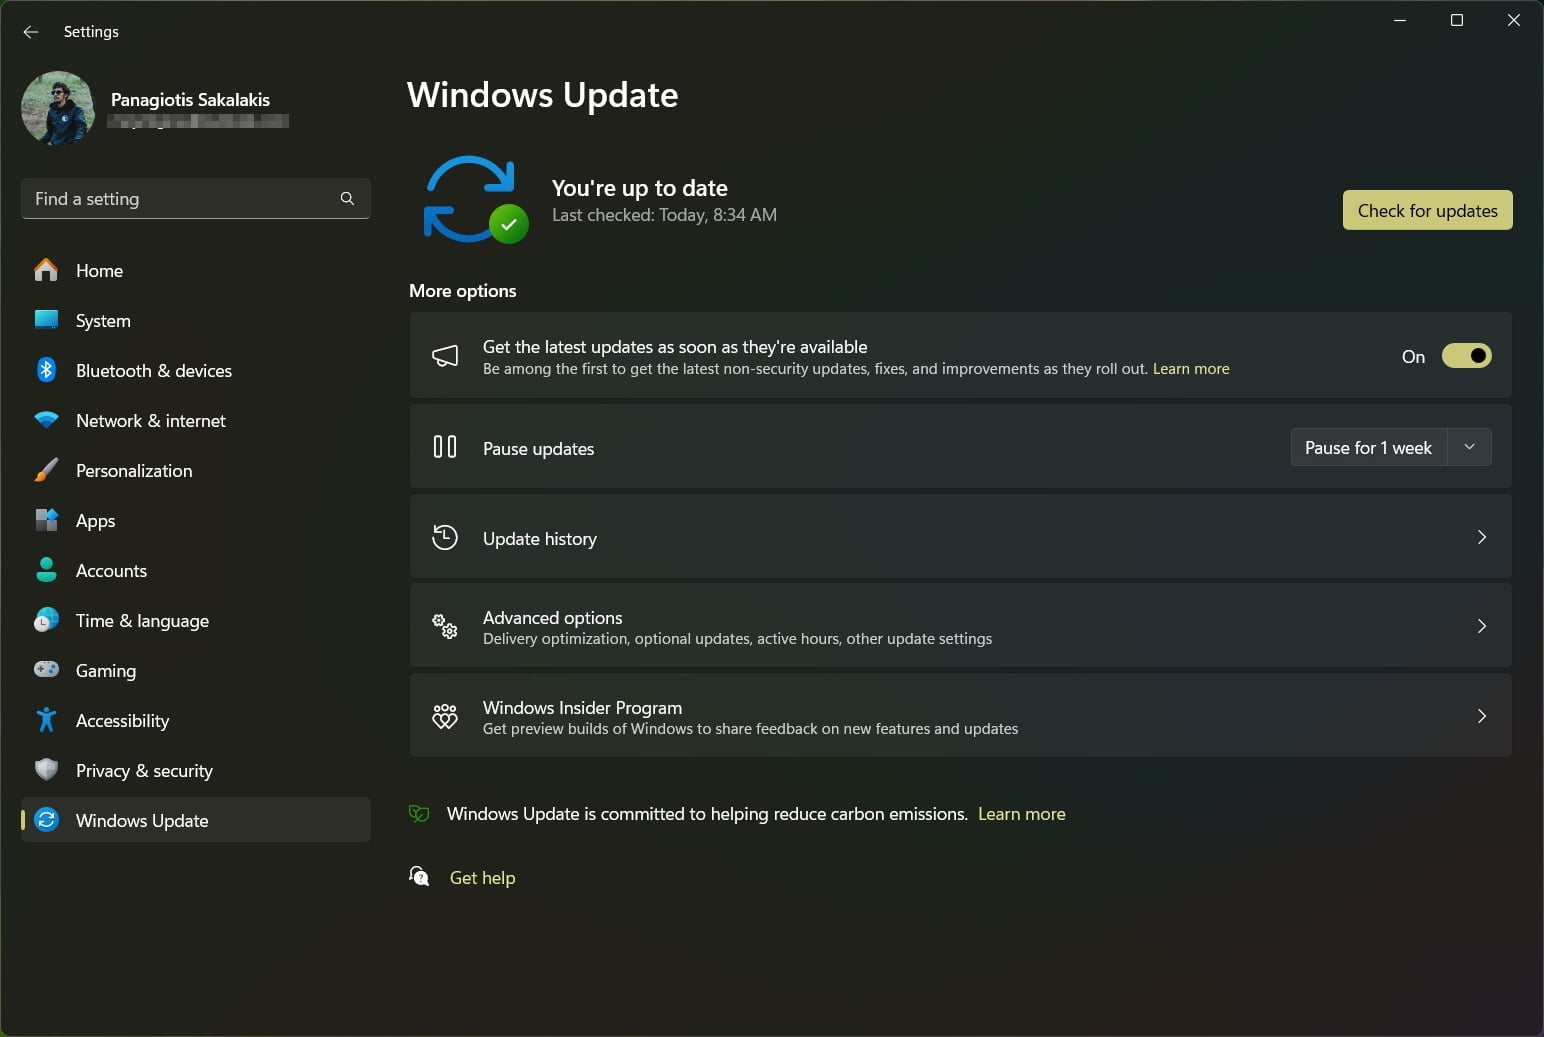
- Head over to Settings.
- Click on the Windows Update tab.
- Click on the Check for updates button.
You can also enable the “Receive updates for other Microsoft products” from the “Advanced Options“, or get the latest goodies faster than ever by enabling the “Get the latest updates as soon as they’re available“. Although that’s a great way of using everything that is being released faster, they may also introduce bugs and issues.
By restarting your PC, all temporary files are cleared and you immediately free up your memory, so make sure you do that after every new update.
2. Debloat Windows 11 by deleting unnecessary apps
By removing all the pre-installed apps and whatever you’re not using is a great way to improve the overall speed of your PC and save some disk space along the way.
Delete pre-installed apps
Finding and deleting all the installed apps is pretty straightforward in Windows 11:
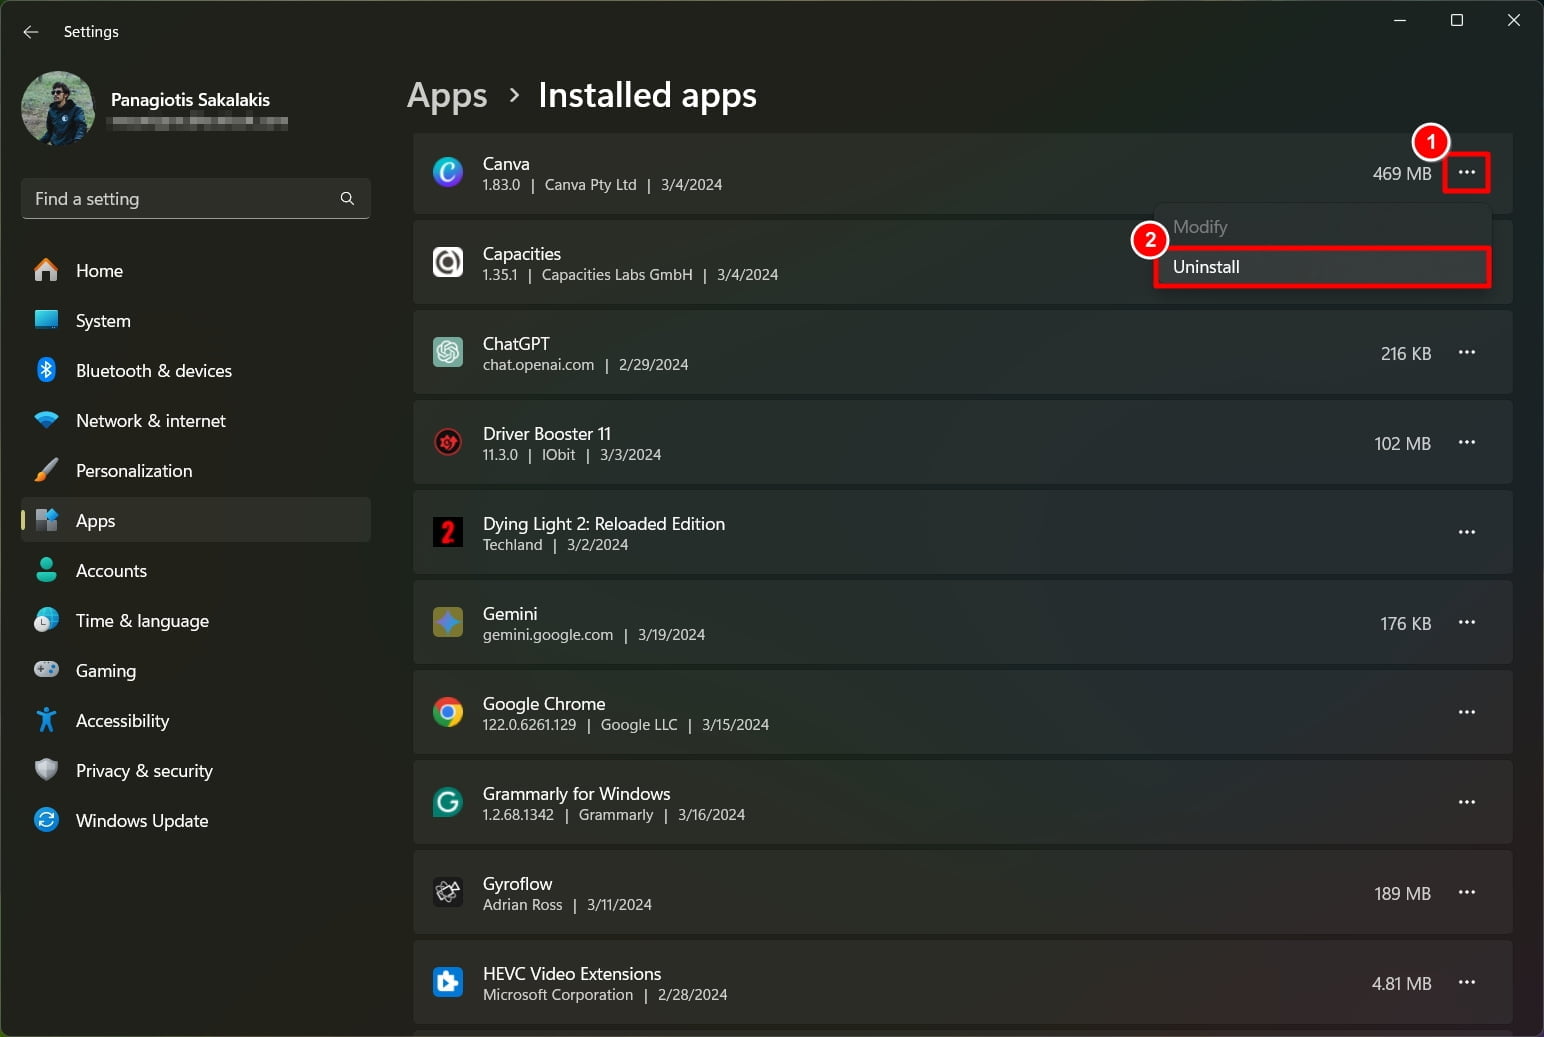
- Open Settings
- Go to Apps
- Click on “Installed Apps“.
- Click on the three dots at the right side of every app and hit “Uninstall” in every application you’re not going to be using.
Remember, you can find all those apps on the Microsoft Store, so if you need something in the near future, just head over there, search for it, and install it.
Clea up built-in software
Now that most of the pre-installed apps have been deleted and we enabled the archive apps feature, it’s time to clean up the latest built-in software that comes from Microsoft.
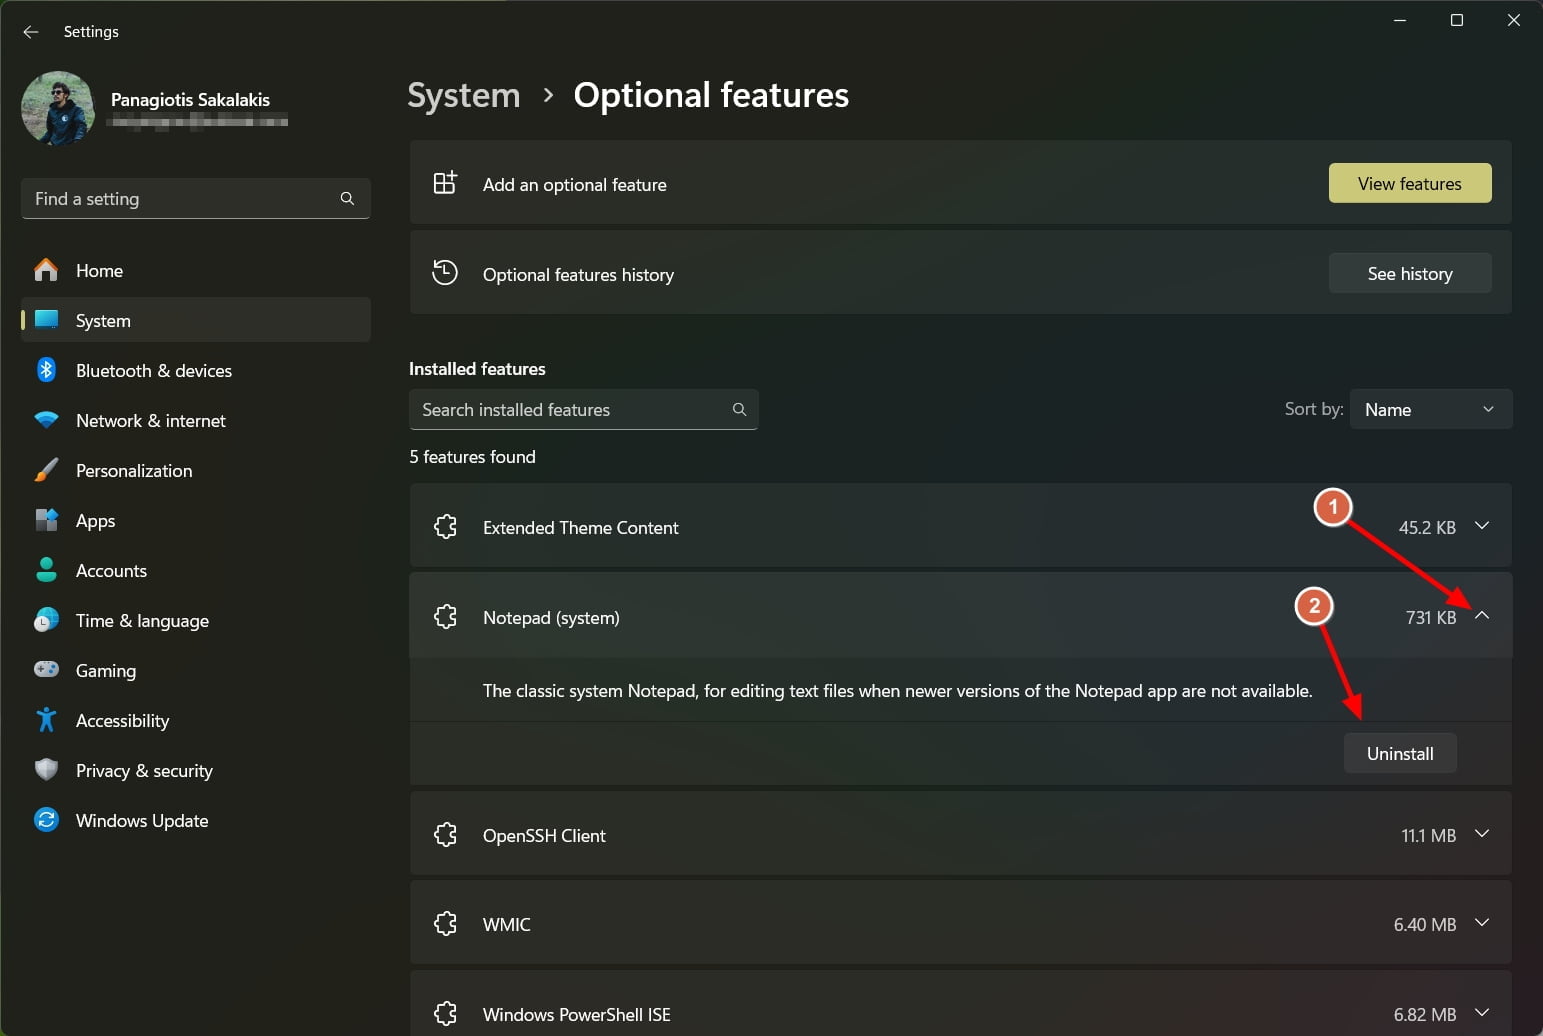
- Open Settings
- Go to the “System” tab.
- Click on the “Optional features“.
- Delete every app that is pre-installed and you’re not going to be using it.
You should now have a fresh PC with fewer apps, more available disk space, and a bit of performance increase.
3. Disable startup programs
Disabling the startup programs that automatically run when Windows 11 boots may sound like a waste of time, just because you’re going to be using most of them all the time. But should you keep those apps from running at the startup? The short answer is no, you shouldn’t let them automatically run in the background, even if that makes them open faster.
Let’s say that you have a few apps starting with Windows; You may have Skype, Spotify, Notion, and even a hundred windows in Microsoft Edge. If you’re not going to be using Skype or Spotify or any other software, it’s useless having it run in the background and consume your PC’s resources, including the CPU and RAM.
To disable startup programs in Windows 11, just follow those simple instructions:
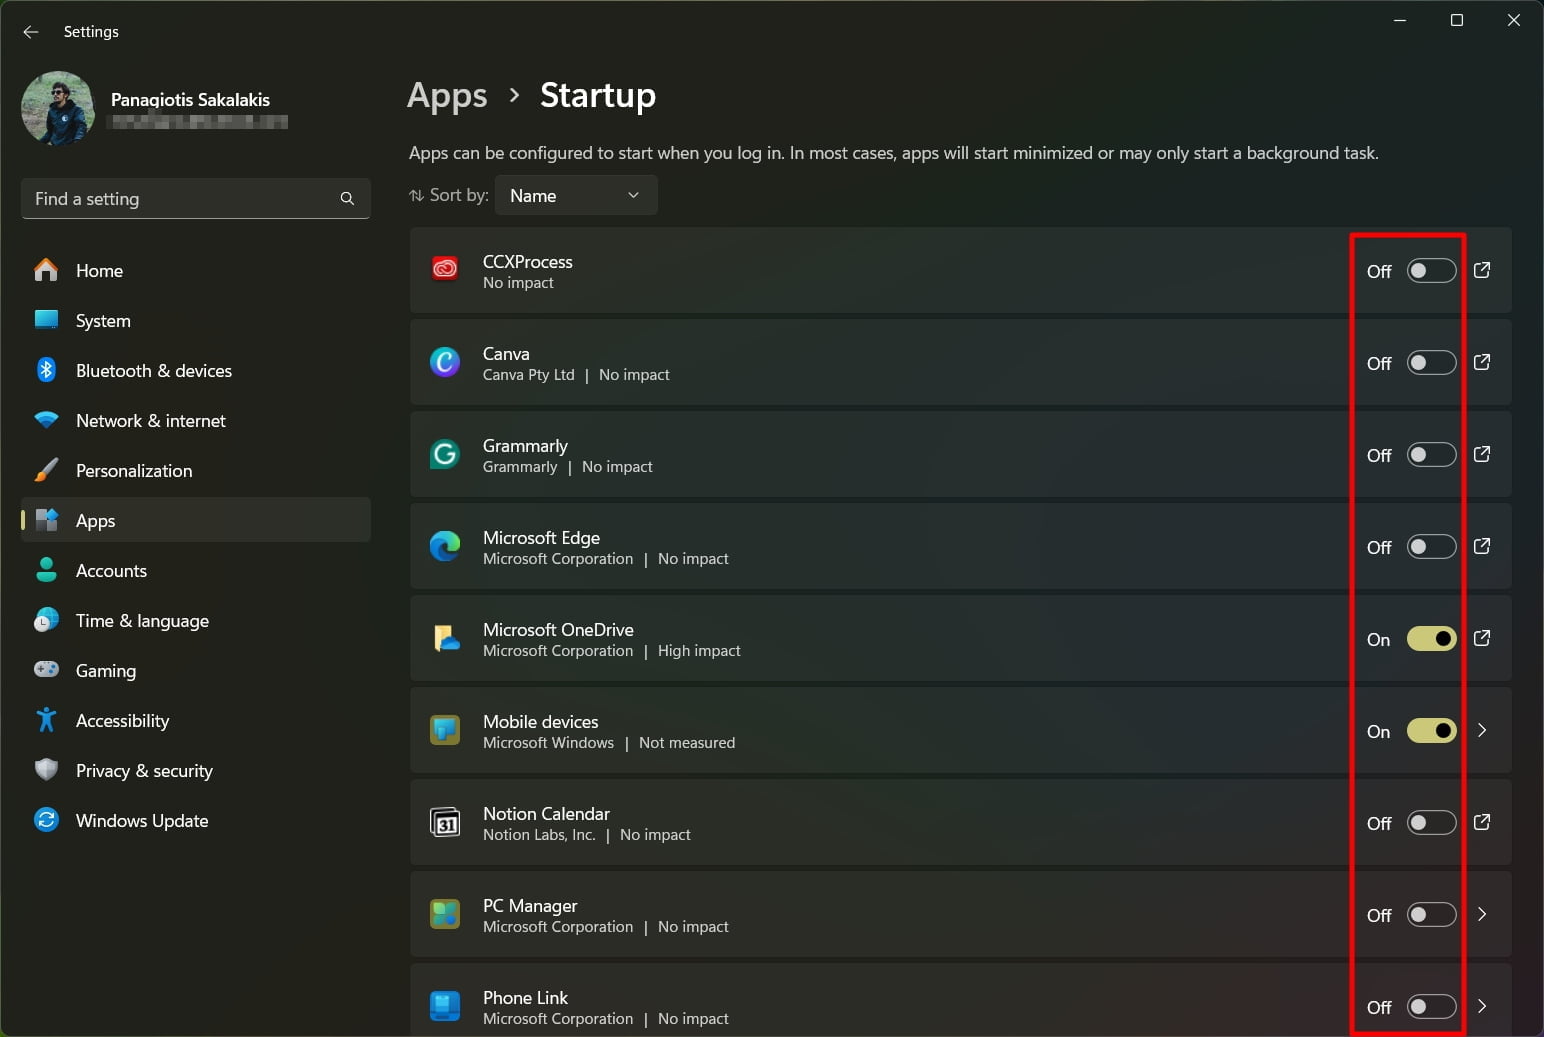
- Open Settings.
- Go to Apps.
- Click on Startup tab.
- Disable every program you don’t want to start when you log in.
That way, only the apps that you’re currently using will consume your PC’s resources, making things faster, based on the number of software you’ve had running all the time in the background. If you had more than 5-7 apps starting every time with Windows, things are going to get a whole lot faster, from booting and starting the operating system to having more available RAM and CPU for your current tasks.
4. Automatically archive your infrequently used apps
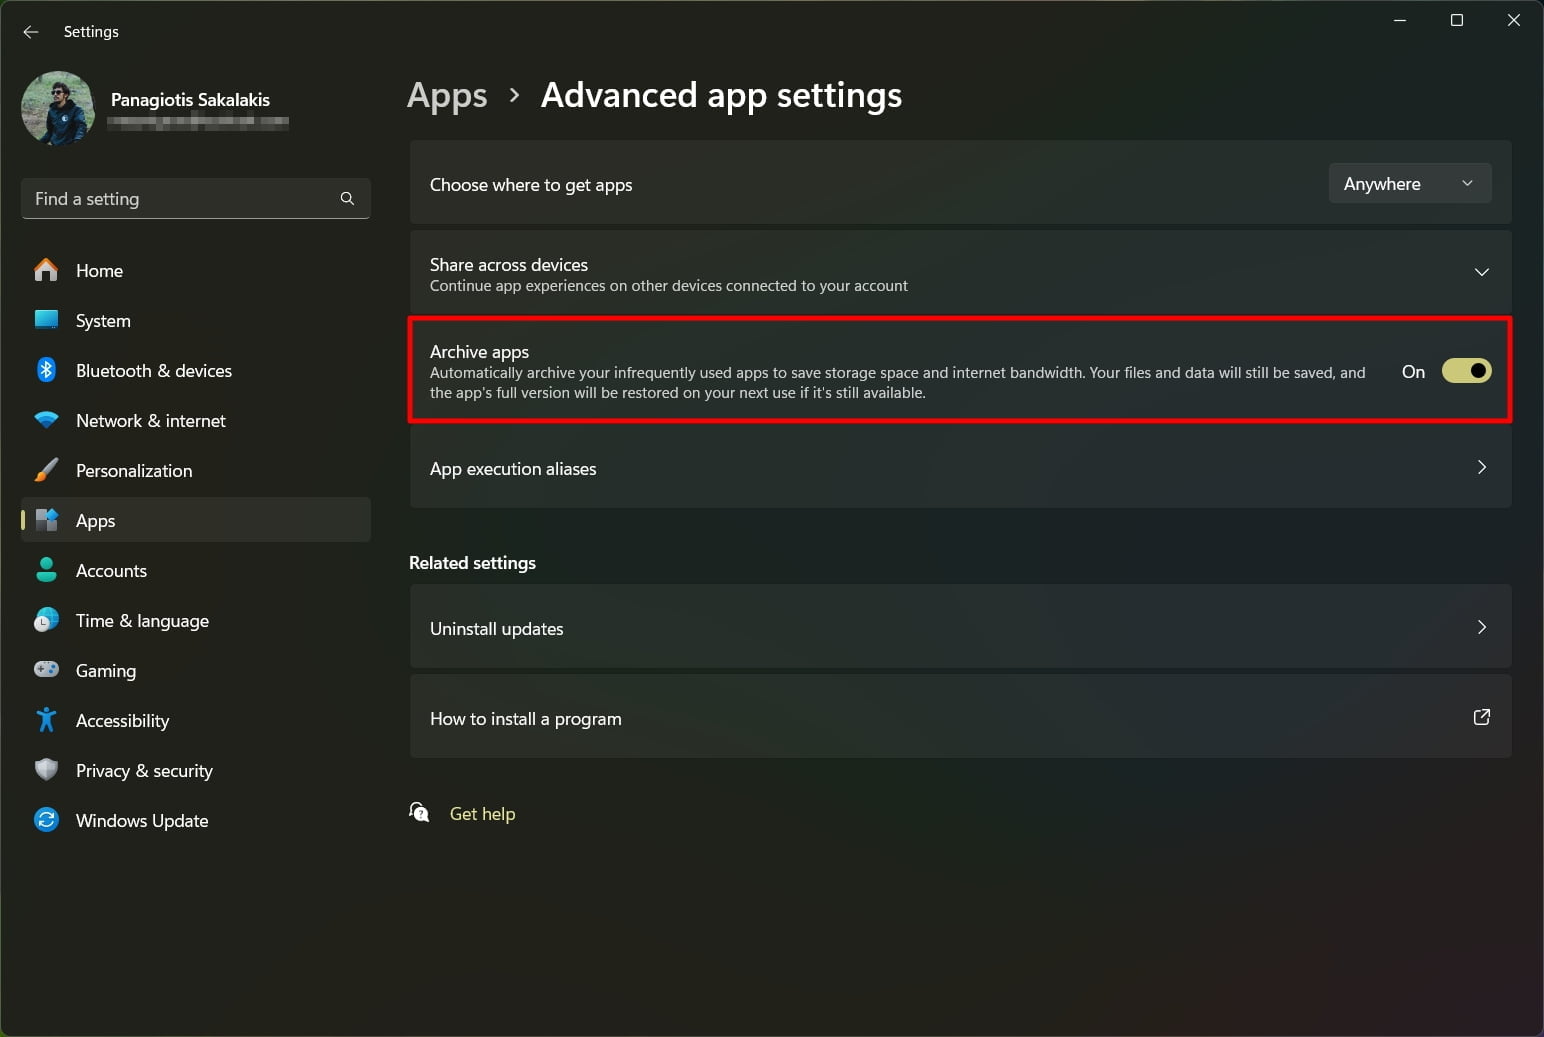
Similar to what Android is offering for putting your infrequently used apps to deep sleep, in Windows 11 users have the option to archive their less-used apps with a click of a button. Microsoft is describing this feature as a way to save storage space and internet bandwidth, and all of your saved data will remain intact when you re-enable those apps.
You can enable the “Archive Apps” feature by following these basic steps:
- Open Settings.
- Go to Apps.
- Click on Advanced app settings.
- Make sure the option “Archive apps” is enabled.
While none of your most-used apps will get archived, you can easily restore an archived app just by clicking on it and opening it.
5. Deactivate the visual effects
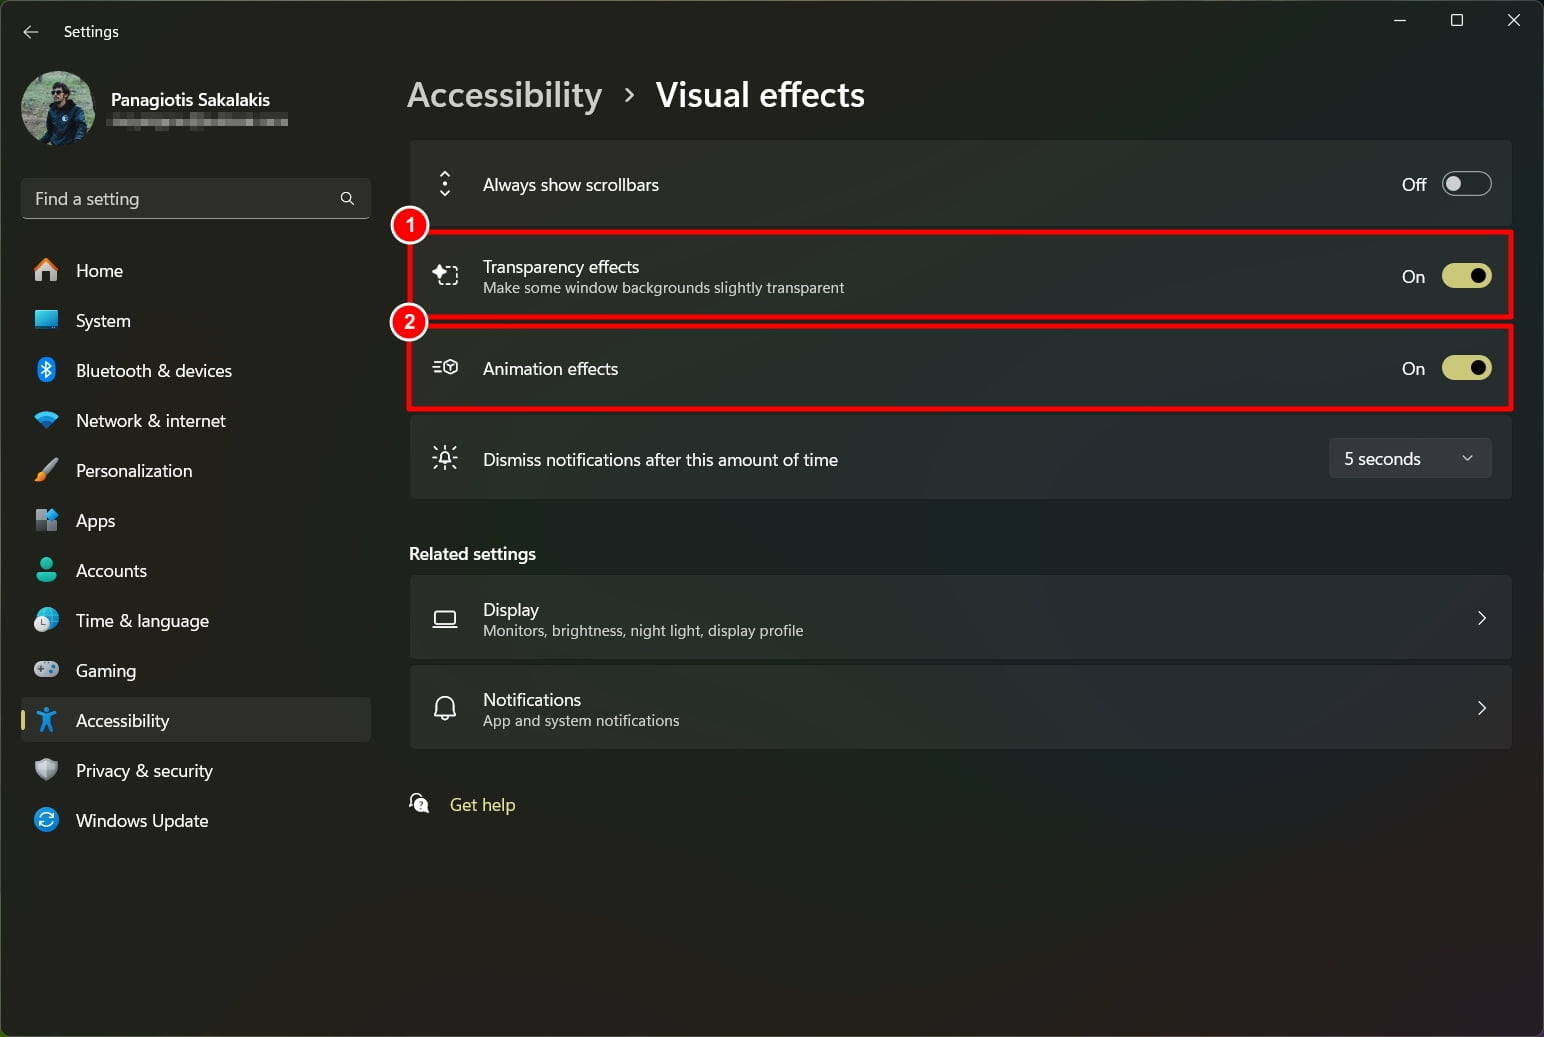
Sometimes, it’s easier to make things a bit faster just by disabling the visual effects. As probably most of you already know, visual effects, based on how they’ve been created, rely on the CPU to render the animations, graphical elements, and whatever else there is. While that may not have an impact on your RAM, saving CPU resources is important when it comes to speed.
Some visual effects might use a small amount of RAM for temporary storage during rendering, but our main focus is to unload the CPU usage as much as possible, and we can do that with a few clicks from the Windows 11 settings page:
- Open Settings.
- Click on the “Accessibility” tab.
- Disable the “Transparency Effects” and “Animation Effects“.
- Go back to Settings and click on “System“.
- Scroll down and click on the “About” section.
- Now click on “Advanced system settings“.
- A pop-up window should appear, click on the “Settings” button in the “Performance” section.
- Select “Adjust for best performance” and hit “Apply” and “OK“.
Unfortunately, you may see some effects gone missing, most noticeably when opening and closing windows and apps, but that shouldn’t be an issue if you have no problems using an operating system that has no smoothness because of its visual effects being deactivated.
6. Clean up temporary files
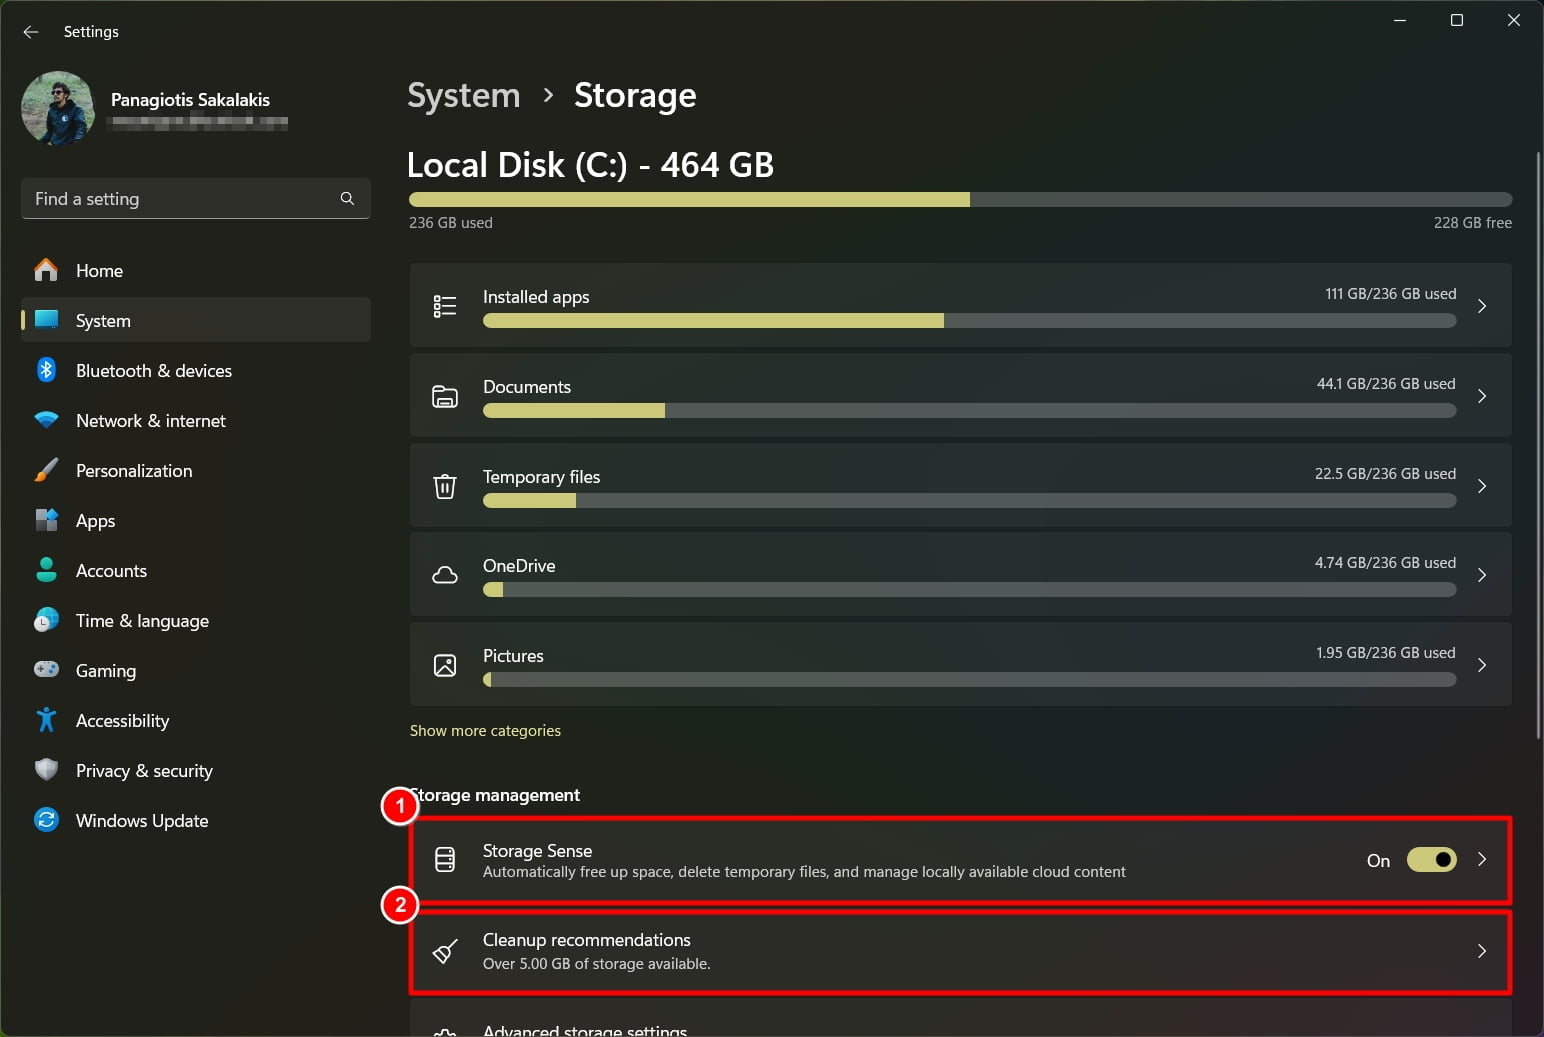
There are a few things Windows 11 is keeping saved for various reasons, including versions of older Windows versions so you can easily restore your settings, thumbnails of your pictures, videos, and documents, delivery optimization files, temporary internet files, and so much more.
If you get into a problem, or your PC suddenly has performance drops, some of those files may be causing the issues. To clean them up for good, and keep Windows 11 automatically keep cleaning them once per week or month, follow these steps:
- Open Settings.
- Click on the “System” tab.
- Click on the “Storage” option.
- Click on “Temporary files“.
- Select everything that you want Windows to clean.
- Click on the “Remove files” option.
- Go back to “Storage” and this time click on “Storage Sense“.
- Enable the “Automatic User content cleanup“.
- In the “Run Storage Sense” menu of options select “Every Week” or “Every Month“, based on how often you’re using your device.
Note: Inside the “Temporary files” options there’s also the “Downloads” folder. This is your main “Downloads” folder on Windows, and if you select it, all of your downloaded files will be wiped out, so make sure there’s nothing important there, or simply deselect it.
Not only we’ve cleaned some of the most important temporary files, but we also made sure that Windows 11 will automatically clean those files every few days, keeping things smooth while saving disk space.
7. Change the Power Mode settings
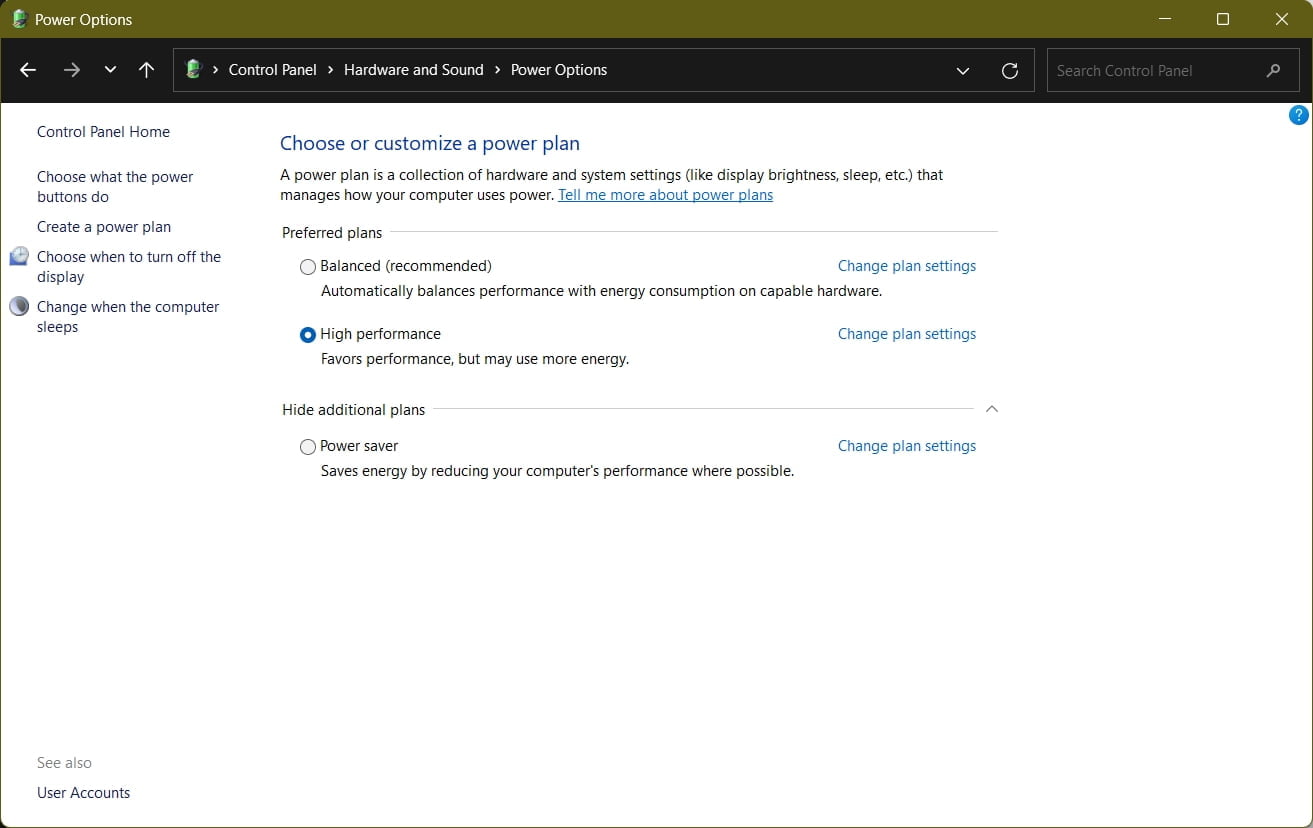
By default, for all PCs and laptops that have Windows pre-installed, their Power Mode is set to “Balanced (Recommended)“. This is a great option for most people who want to save battery life without compromising their performance too much. But users get to choose which Power Mode they want, including “Power Saver” and “High Performance“.
If you have a PC or a laptop that is just too slow, changing its power mode can make a huge difference in performance. To do that, simply follow these steps:
- Open the Start menu, type “Power Plan“, and click on the “Edit Power Plan” option.
- Click on the “Power Options“.
- Change our power mode from “Balanced (Recommended)” to “High Performance“.
- If you don’t see a “High Performance” option, just click on “Create a power plan“.
- Select the “High Performance” as your power plan.
- Add a name and click on “Next“.
- Done!
That should increase the operating system’s performance by using all the hardware resources that are available on your PC or laptop. If you’re a laptop owner, it may be useful to remember to change that option whenever you are out working and looking to increase your battery’s life.
Look at the “Power Saver” power plan, which is useful for increasing your battery’s life, but will decrease your device’s performance.
8. Reset Windows 11 from Settings
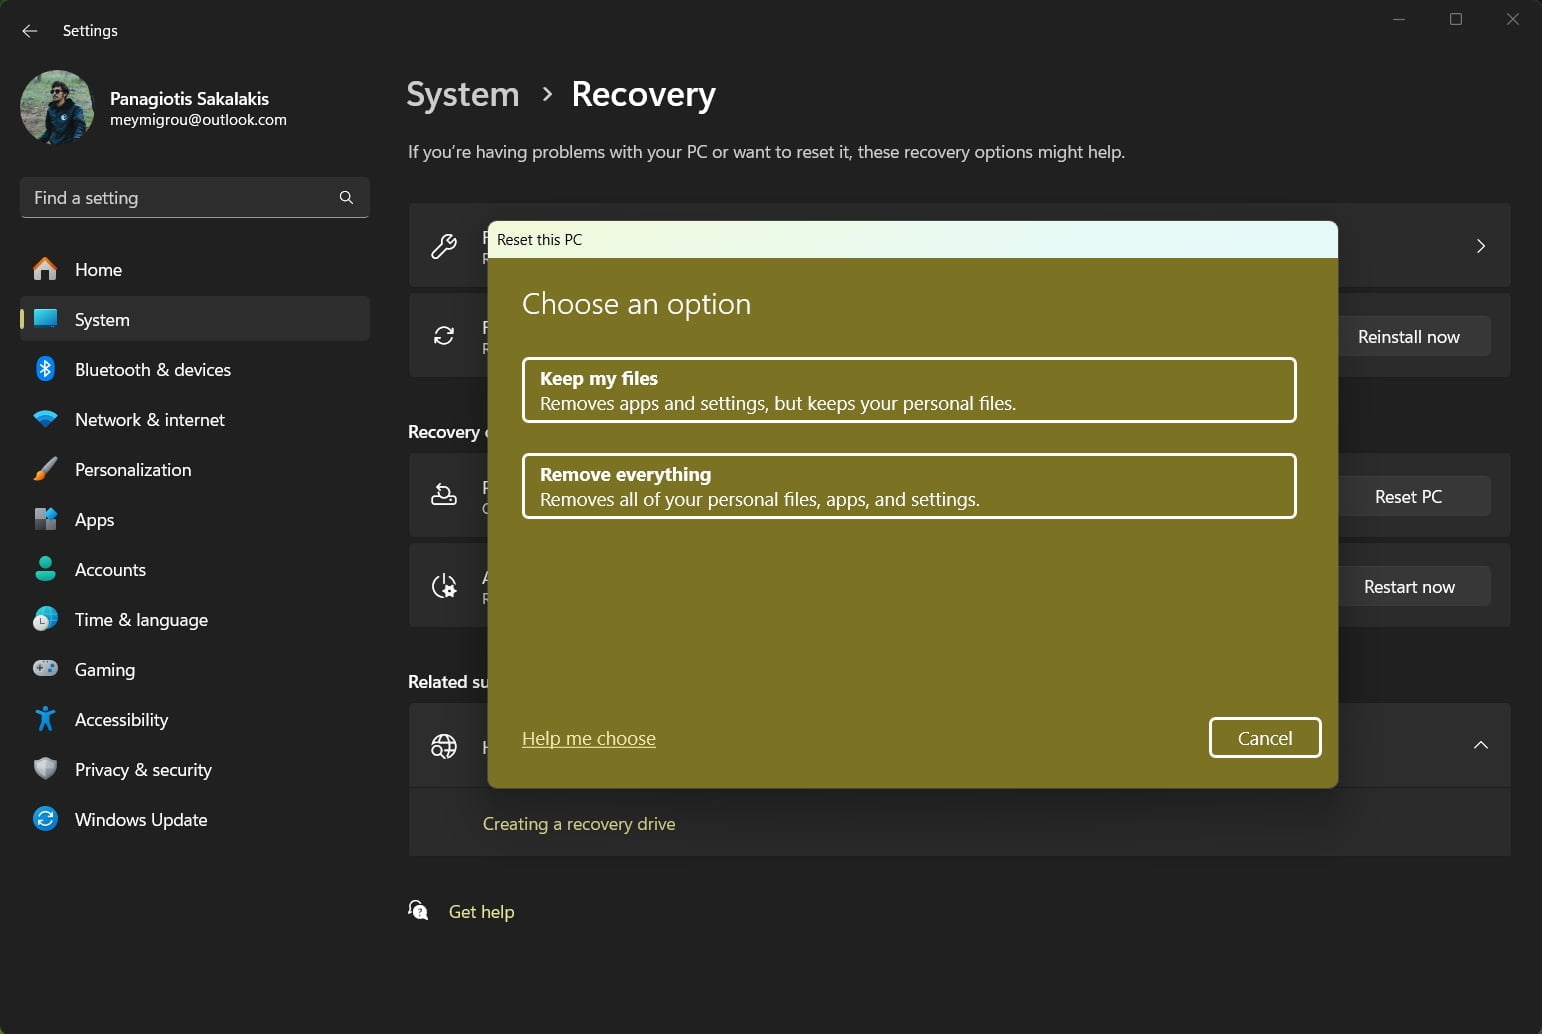
If none of the steps provided above helped increase the Windows 11 performance, what’s left from tweaking the settings page is going with a full reset. You can keep your personal files, or fully delete and reinstall everything; The second choice is always the best one. Make sure you’ve kept a full backup of all your important files, or they have already been uploaded to the cloud.
To reset Windows 11, follow these steps:
- Open Settings.
- Click on the “System” tab.
- Click on the “Recover” option.
- Click on the “Reset this PC” button.
- Choose “Keep my files” or “Remove everything” to proceed.
Your PC/laptop may restart several times until the reset has been completed, and the operating system will automatically download and install the latest version. If you think that your PC may have a virus or malware, make sure to select “Remove everything” if you really looking at cleaning everything.
9. Upgrade your RAM
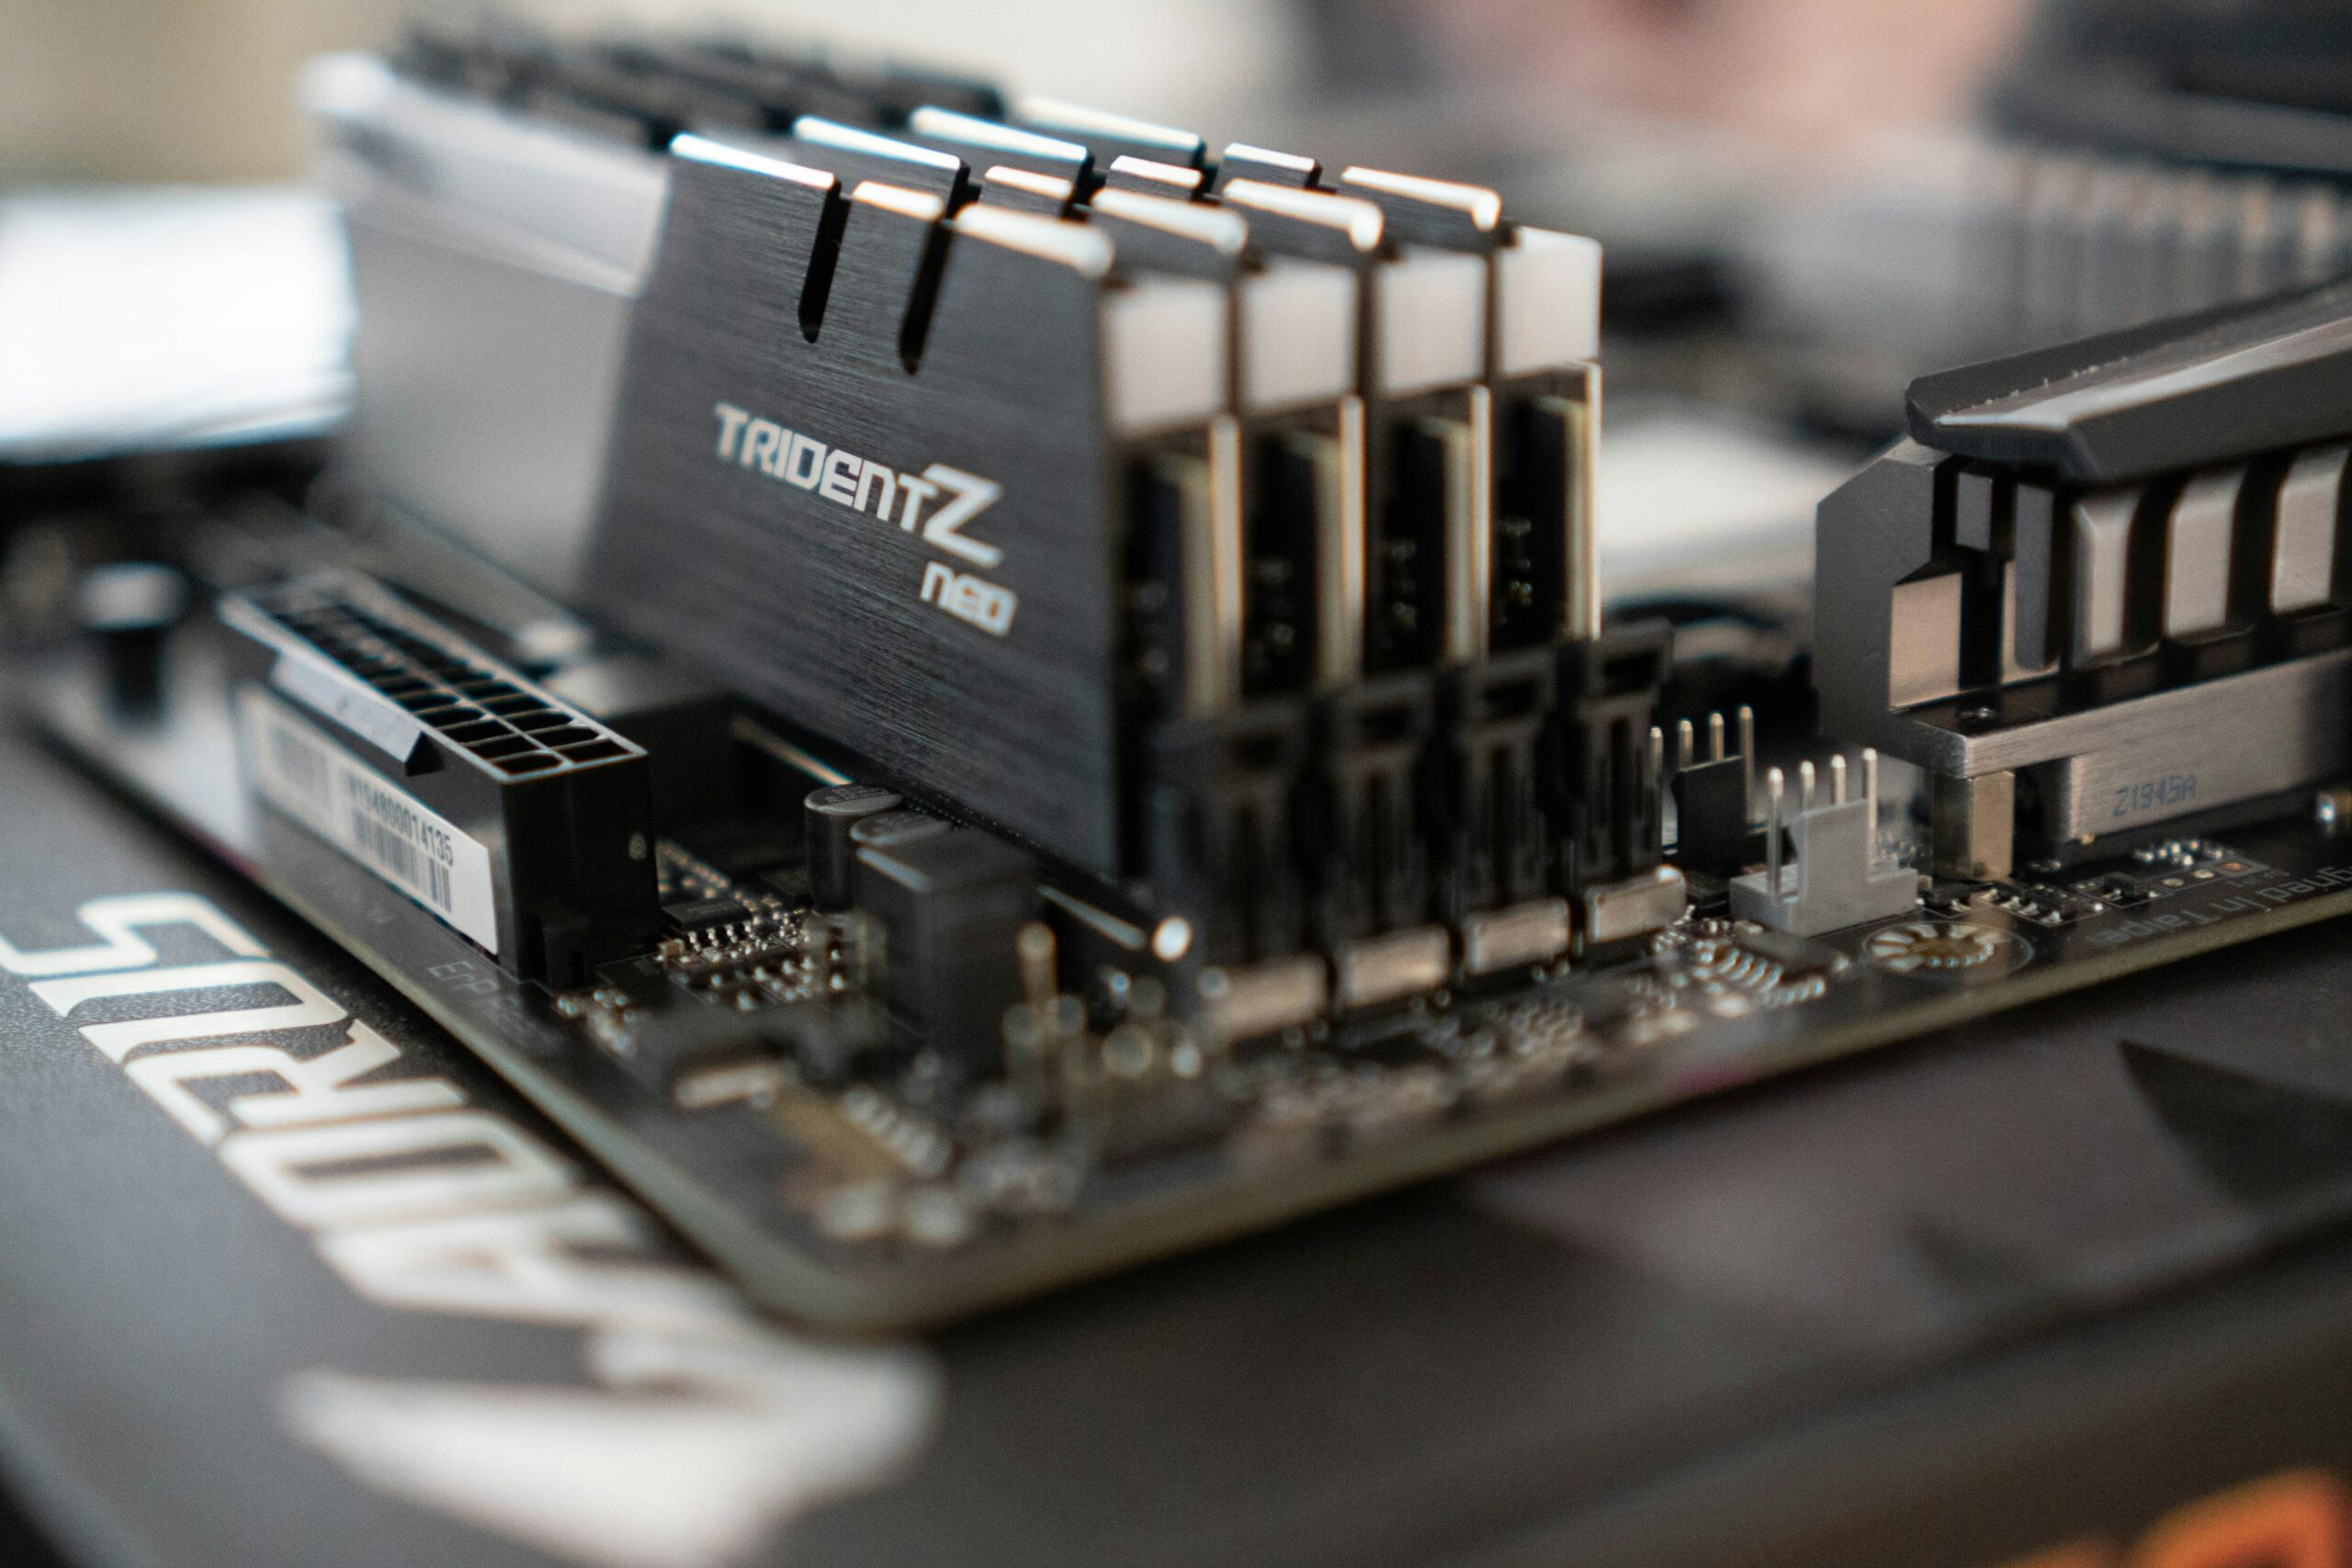
Here’s the thing; If you’re looking at smooth operations, having more RAM is always crucial. If you have a PC/laptop with only 4GB of RAM, that should be the first and biggest issue. Most PCs can handle more RAM, based on their motherboard’s specs, while laptops can also see an increase in RAM, but they’re more difficult to install.
Nowadays, having at least 8GB of RAM is important to keep everything running smoothly and faster, while with 4GB of RAM, there’s going to be a whole lot of lagging and slowness. Everything that’s above 8GB of RAM will be perfect for running most apps, services, and other more intense software, while 16GB or 32GB of RAM is the perfect way of working for every advanced user or gamer.
RAM also comes with different speeds, but that should also depend on your motherboard. If you have a new motherboard, DDR4 and DDR5 RAM modules are probably supported, and having the latest is an improvement when it comes to speed and handling multiple tasks with ease. Older models are mostly supporting DDR3 and DDR2 alike, but those shouldn’t be able to run Windows 11 anyways.
Find the best RAM for your PC or Laptop

Fast and optimized for ultimate performance!
Discover the best and fastest RAM modules for your motherboard, and make your old PC/Laptop faster and smoother than ever before.
Buy On Amazon10. Upgrade your Hard Disk with an SSD
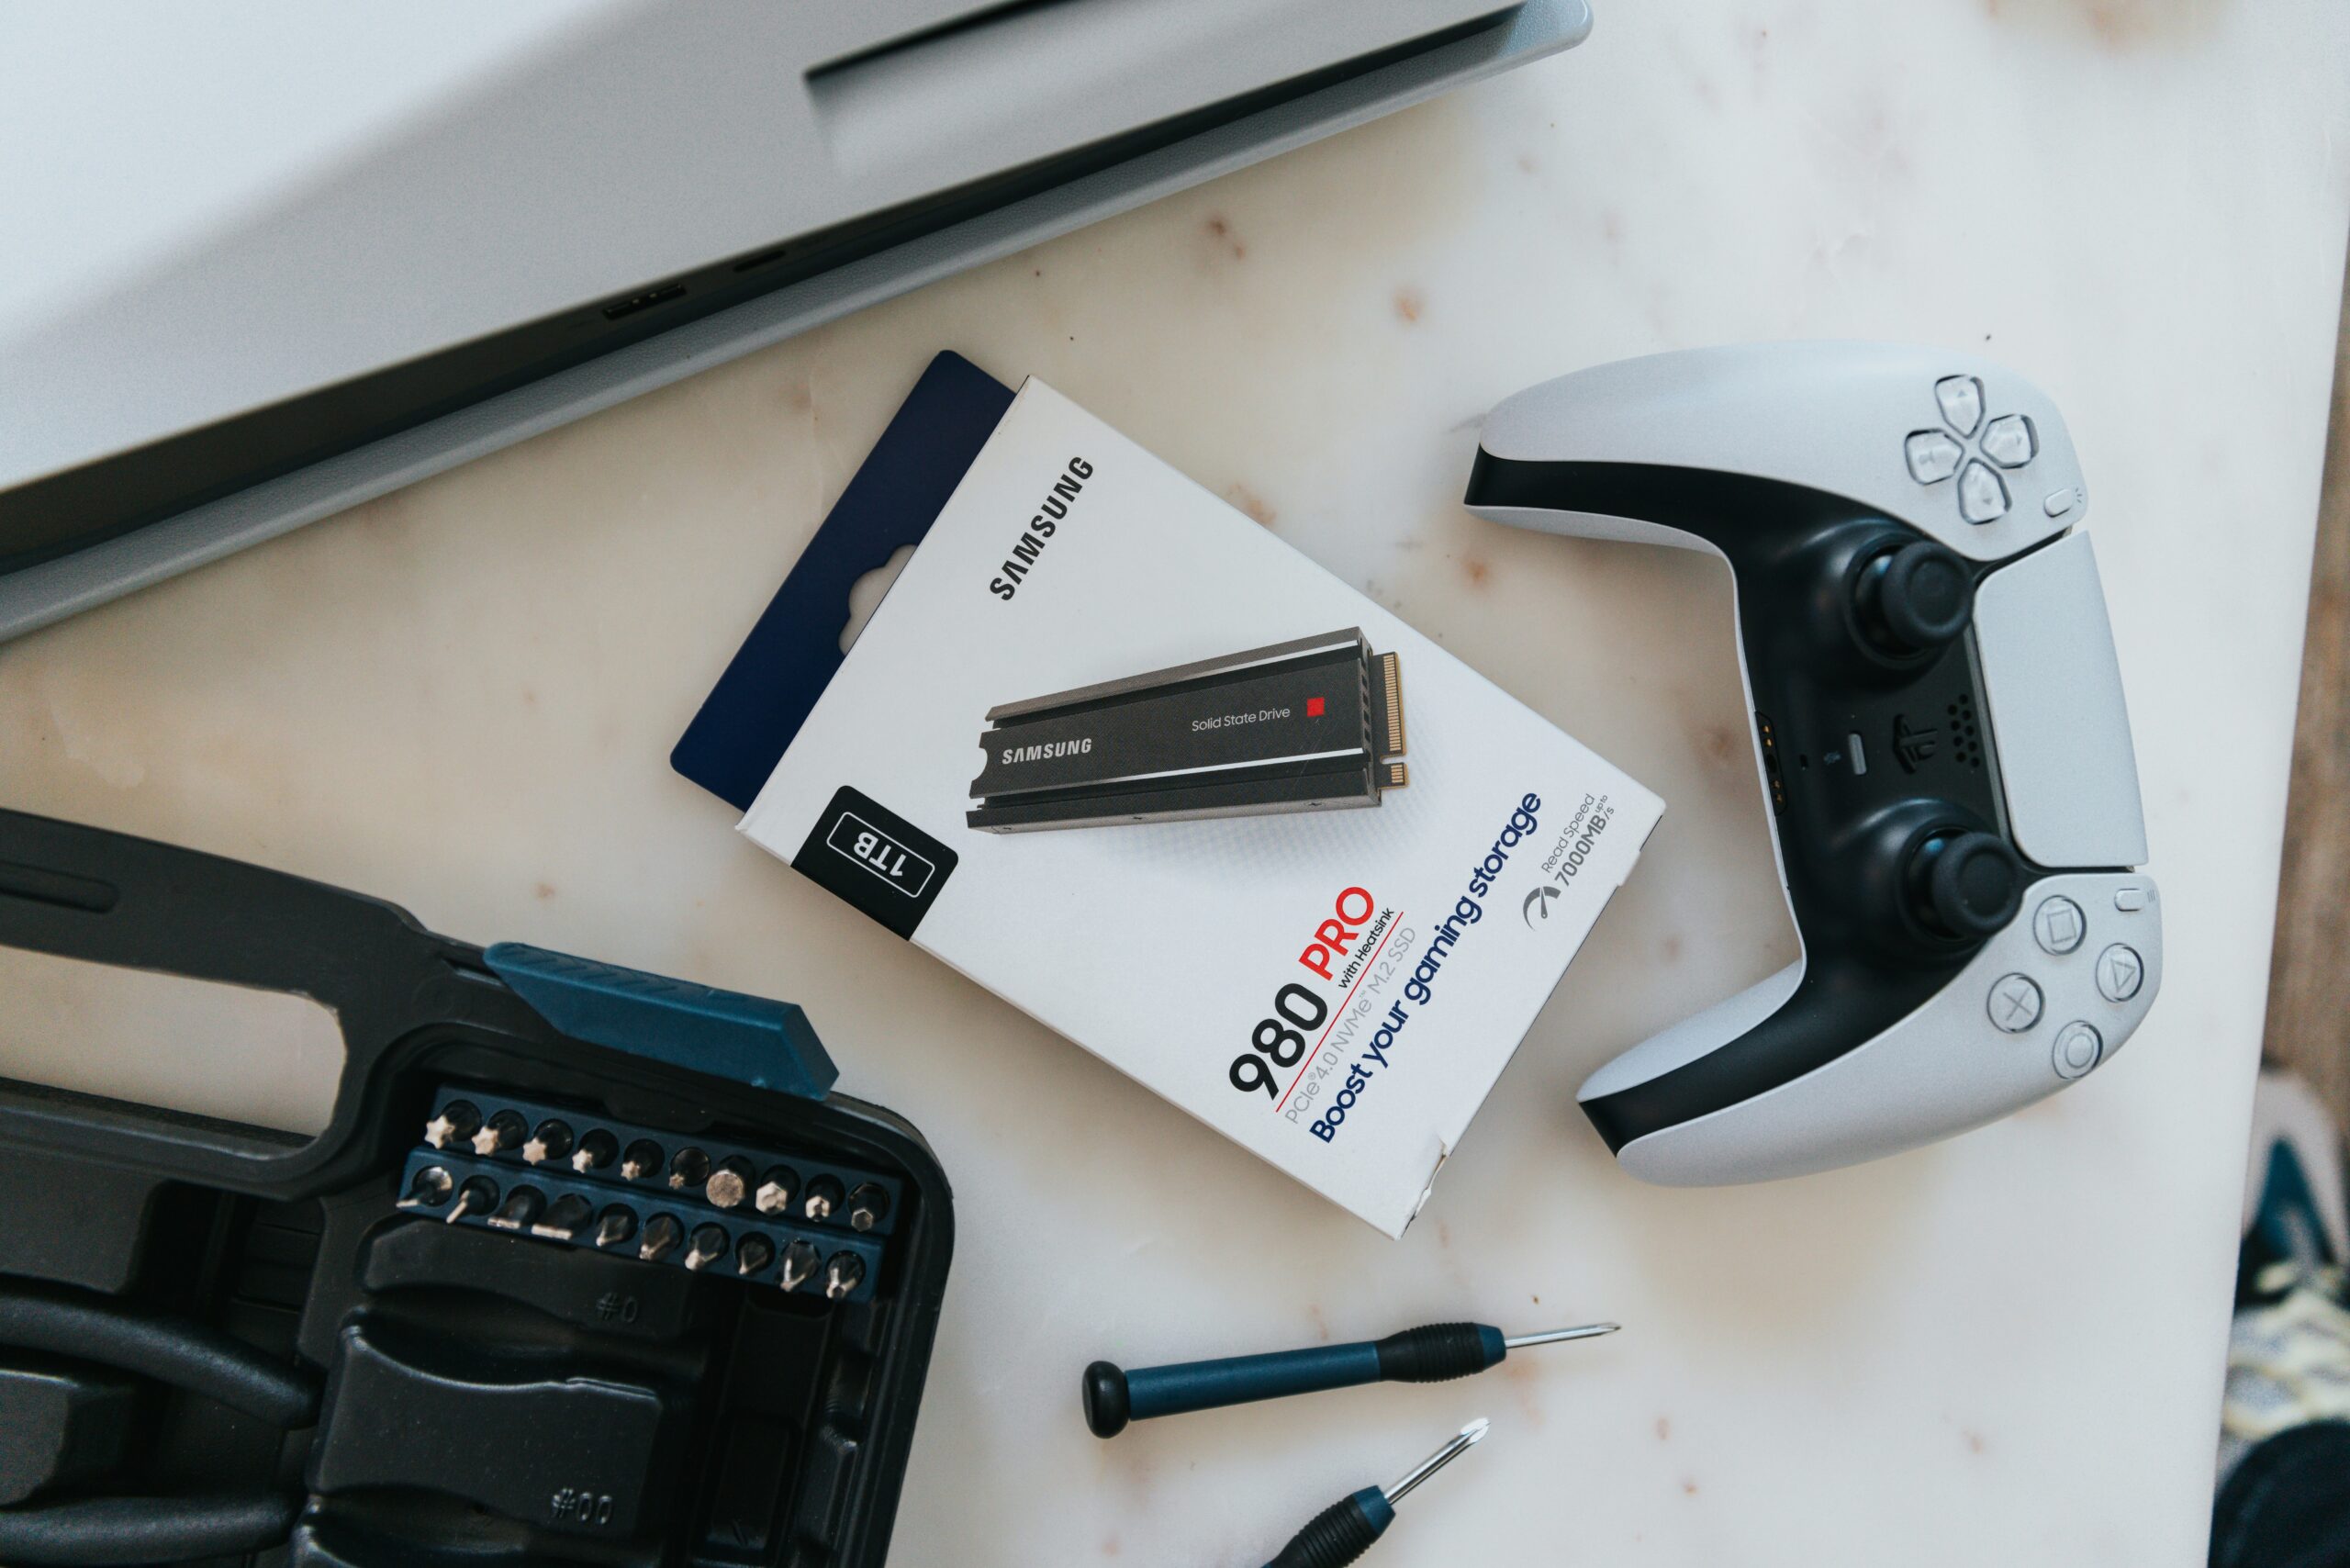
If you’re an owner of an older laptop or PC that still runs Windows on an old HDD hard disk, replacing it with a newer, modern, and faster SSD disk will instantly increase 5x to 10x the performance of your device. Any PC/laptop should support an SSD out-of-the-box, and it takes just a few minutes to install and connect it.
A typical HDD might offer read and write speeds of around 80-160 MB/s (megabytes per second). In comparison, a standard SATA SSD can deliver speeds between 200 MB/s to 550 MB/s, which is already several times faster. Newer NVMe SSDs can reach even higher speeds, exceeding 3,500 MB/s.
While the newer NVMe SSDs are the fastest of them all, they’re not supported by the oldest motherboards, a standard SATA SSD will do the trick if you’re looking at increasing your device’s whole performance with just a replacement.
Discover the best SSDs for your PC

Shure MV7
Replace your old HDD Disk with a new, modern, and faster SATA SSD or NVMe SSD for ultimate speed.
Buy On Amazon11. Roll-Back to Windows 10
Rolling back to a preview version is not always a bad idea, considering having low performance with the newer versions of Windows 11. There’s no easy way to roll back without making sure you’ve completely wiped out everything from Windows 11 before installing Windows 10, but you can do that with the manual way.
Head over to Windows 10 official page and download the latest version of Windows 10. There’s a tool Microsoft is giving you to quickly create a bootable USB, or you can use the free tool “Rufus“. You need a USB stick with at least 8GB of space to create a bootable USB and install Windows on any device.
There are many discussions over which version of Windows is faster, with a big list of performance tests showcasing Windows 10 as the faster option. Trying both operating systems is the best way to know for sure which is the best option for your device, but if you started experiencing drops in performance after upgrading to Windows 11, then rolling back to the preview version may be the ultimate choice.
If none of the tweaks have helped your device’s performance, then there are two things that come to my mind; One is that your hardware is simply not enough to run Windows 11, or even a preview version. In this case, you can try a lightweight Linux distribution, that may transform your PC or laptop into a newer, faster, and stable machine.
Second, you can send your laptop back to its manufacturer to check for any issues with the hardware, as something may be starting to die. You can also check for any heat issues that may be causing the low-performance drops by using free tools such as the Core Temp.
Is your Windows 11 still slow after following all the steps provided above? If not, which one of the tweaks mentioned above has worked the best for your device and speeded things up? I’d love to know about your experience and which changes helped the most! Don’t hesitate to share your thoughts, tips, tricks, and what helped in the comment section at the end of this post.


Disabling unnecessary startup programs and managing background apps really helped me cut down on lag after upgrading to Windows 11. Pairing those tweaks with a lightweight tool like Mem Reduct made a noticeable difference in memory usage and overall responsiveness, especially on my older laptop. It’s a simple combo that keeps things running smooth without heavy resource drain.
https://memoryreduct.com/mem-reduct-download/
Exactly what most people should do to keep their operating system clean and fast!